Quick Start Guide
1. Introduction
This Quick Start Guide explains the basics:
- how to connect and set up your target on the network
- how to install the SDK
- how to modify and build the firmware images.
The Linux Software Developer’s Kit (SDK) is an embedded hardware and software suite that enables Linux developers to create applications on Dusun’s DSGW-030 gateway.
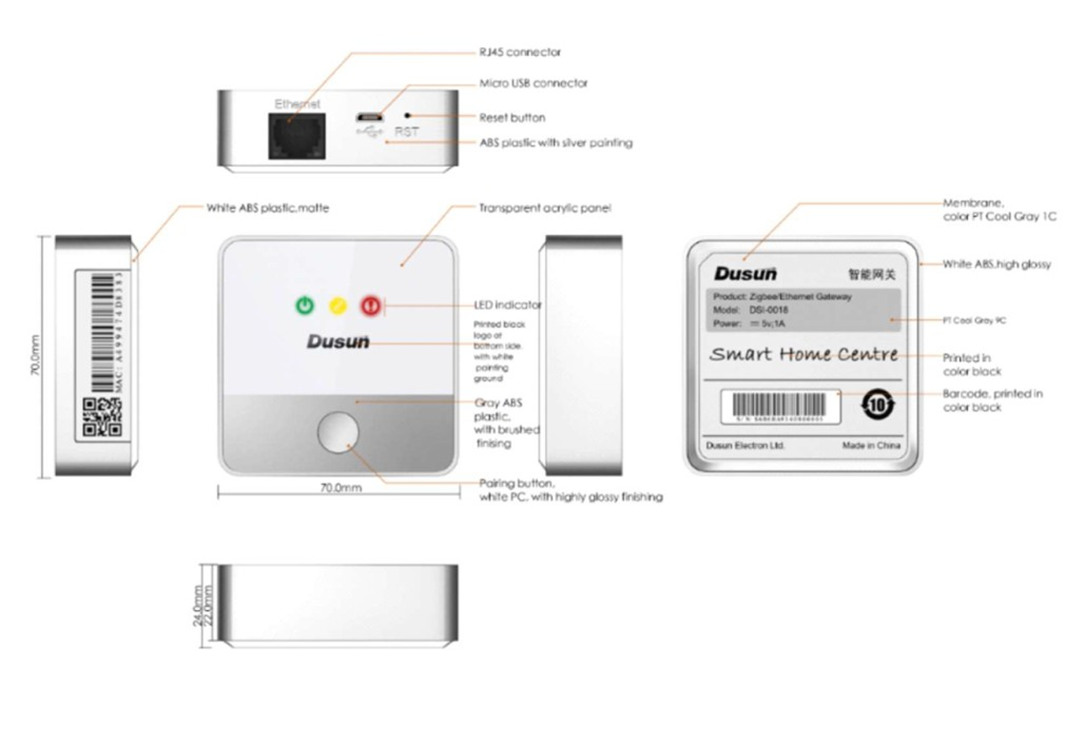
2. Gateway Information
This section describes the gateway’s basic resource infomation and interfaces.
2.1 Basic information
Processor: MTK7688 (MIPS24KEc(580MHZ))
Supply: DC-5V/2A
RAM: DDR2 128MB/64MB
NOR Flash: 16MB/32MB
Ethernet: LAN/WAN RJ45/10M/100M
Bluetooth: ERF32BG21 (optional)
Zigbee: EFR32MG1B232
Zwave: ZG130S (optional)
2.2 Interface
3. Debug Setup
This section describes how to connect the gateway into your host computer and network to debug for development.
3.1 Power
Make sure that the power adapter is 5V/2A.
Select the appropriate power plug adaptor for your geographical location. Insert it into the slot on the Universal Power Supply; then plug the power supply into an outlet.
Connect the output plug of the power supply to the gateway
3.2 Wire Connect
Connect gateway to a router for login

3.3 Debug Uart Connect
- Before you set up your development test bed, please connect the PCB serial port to your develop PC via USB-to-serial bridge.
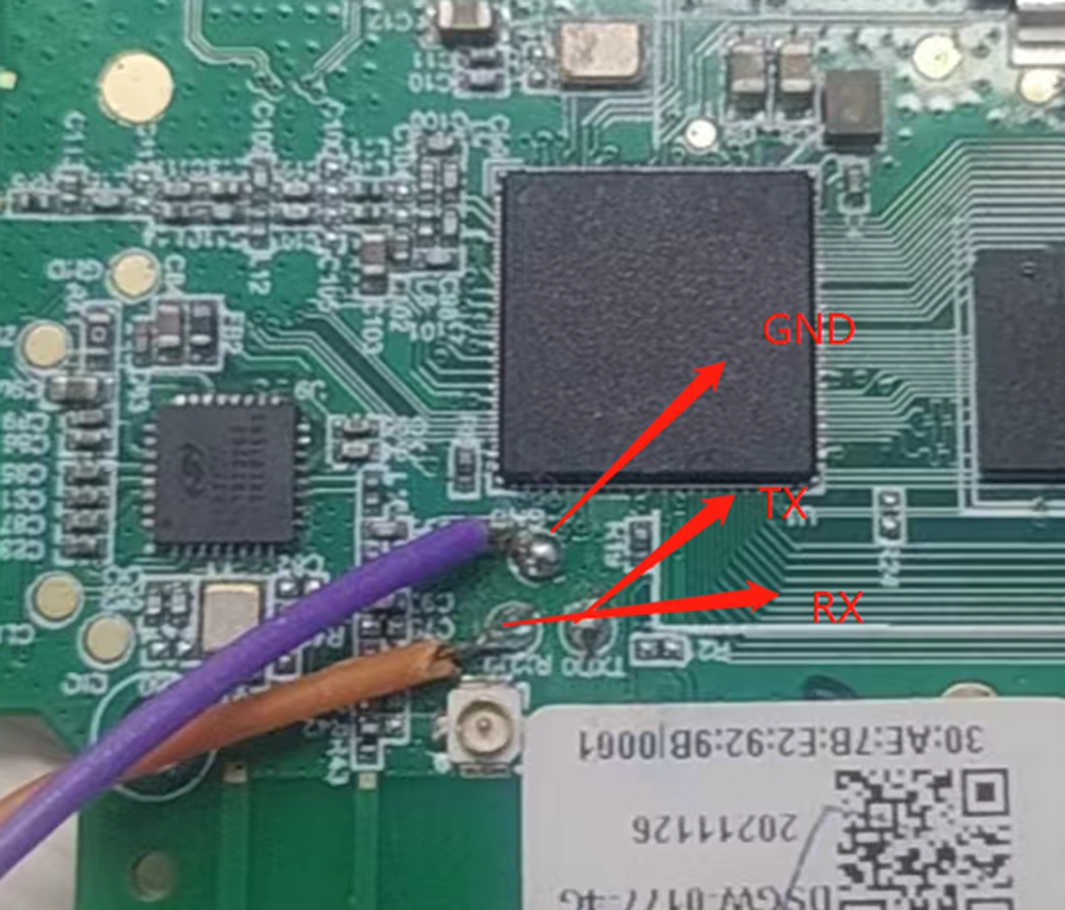
PCB serial port on Gateway

USB-to-serial bridge. Serial port setting:
- Baud rate: 57600
- Bits: 8
- Stop Bits: 1
- Hardware flow control: None
4. SDK Download And Compile
This section describes how to download the sdk and compile it.
4.1 SDK Envirment Prepare
Compilation environment: CentOS Linux 7 (Core) Openwrt’s compilation tool is automatically generated by SDK built,
- Install prerequisite:
sudo yum install git
sudo yum install unzip
sudo yum install bzip2
sudo yum install wget
sudo yum install patch
sudo yum install gcc
sudo yum install gcc-c++
sudo yum install ncurses-devel
sudo yum install perl-Thread-Queue
4.2 SDK Download
Get the source code from Dusun FTP server uncompress it under your work directory. For example:
mkdir -p ~/workdir/op030
tar zxvf DSGW-030_sdk_AV4.8.314.4296608.tar.gz -C /workdir/op030
cd ~/workdir/op030
4.3 SDK Compile
cd ~/workdir/op030
./build.sh
4.4 SDK Output
openwrt-ramips-mt76x8-DSI0177-squashfs-sysupgrade.bin is the system upgrade bin.
[au@git openwrt]$ ls ./bin/targets/ramips/mt76x8/ -alh
total 11M
drwxr-xr-x 3 au au 226 Oct 16 2021 .
drwxr-xr-x 5 au au  48 Sep 30 2021 ..
-rw-r--r-- 1 au au 122 Mar 28 11:22 config.buildinfo
-rw-r--r-- 1 au au 263 Mar 28 11:22 feeds.buildinfo
-rw-r--r-- 1 au au 4.7K Mar 28 11:24 openwrt-ramips-mt76x8-device-dsi0134.manifest
-rw-r--r-- 1 au au 11M Mar 28 11:24 openwrt-ramips-mt76x8-DSI0177-squashfs-sysupgrade.bin
drwxr-xr-x 2 au au 8.0K Mar 23 16:29 packages
-rw-r--r-- 1 au au 481 Mar 28 11:24 sha256sums
-rw-r--r-- 1 au au  18 Mar 28 11:22 version.buildinfo
5. Firmware Program And Program
5.1 Firmware Program
5.1.1 SPI Programer
To Firmware The Program, you must use the spi flash programer to program the spi nor flash. But Wo don't suggest you do this by your self
- Remove spi flash on the board.
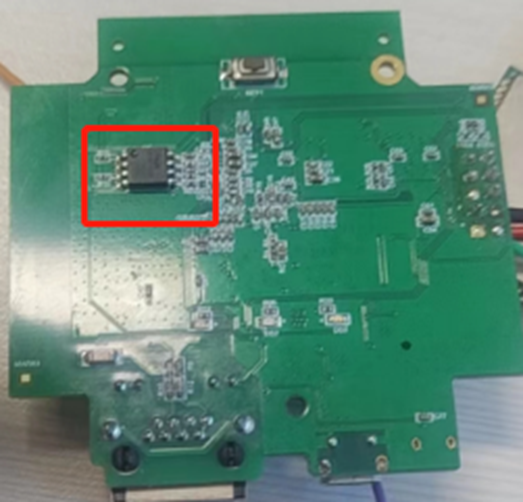
put it the to the spi flash programer(you may select correct spi flash type).
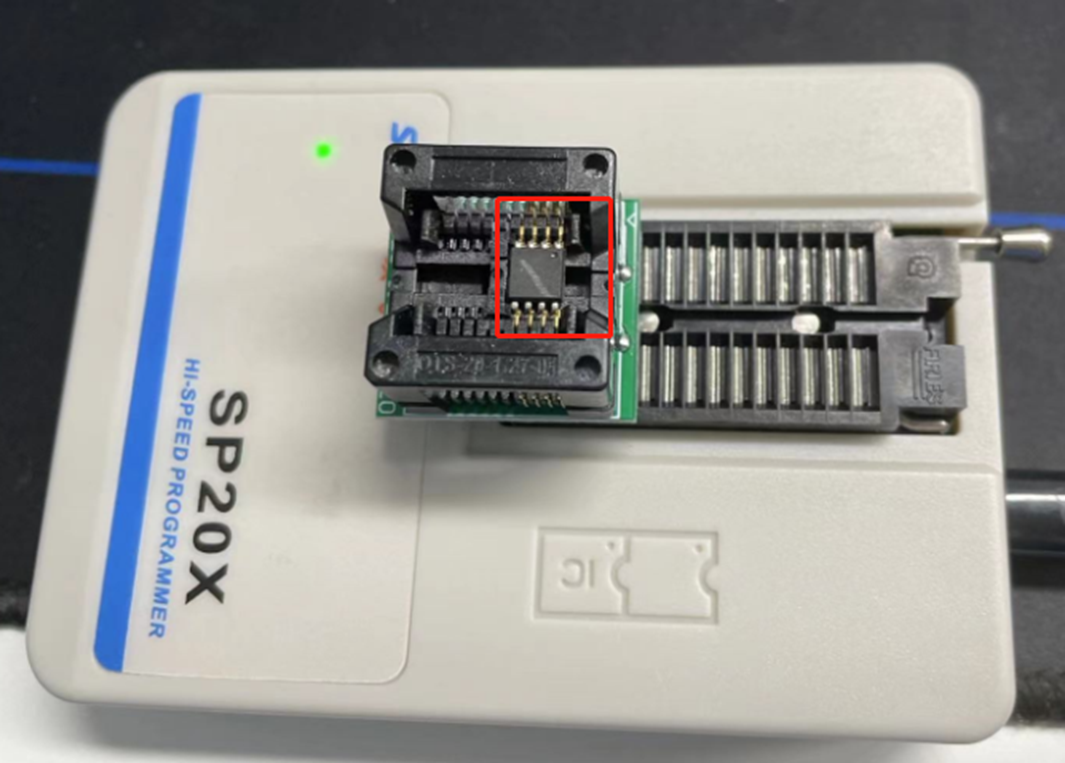
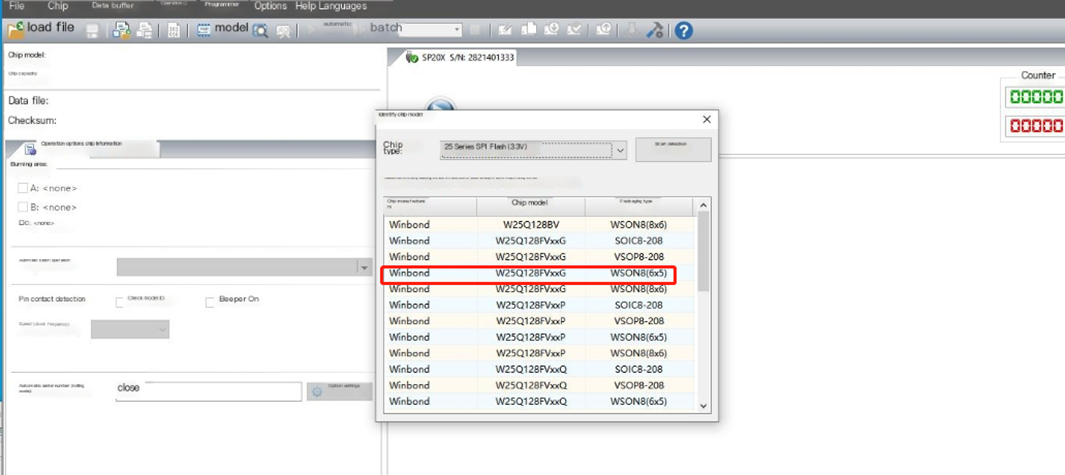
- select the corrent flash.bin and import it. please contact our sell to get the flash.bin
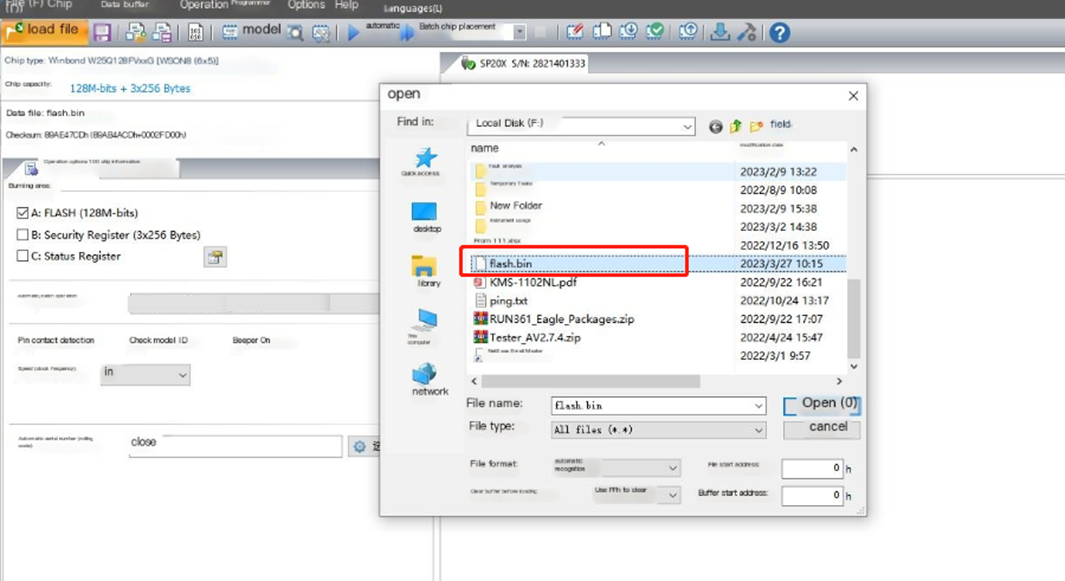
press the auto program to program the flash.

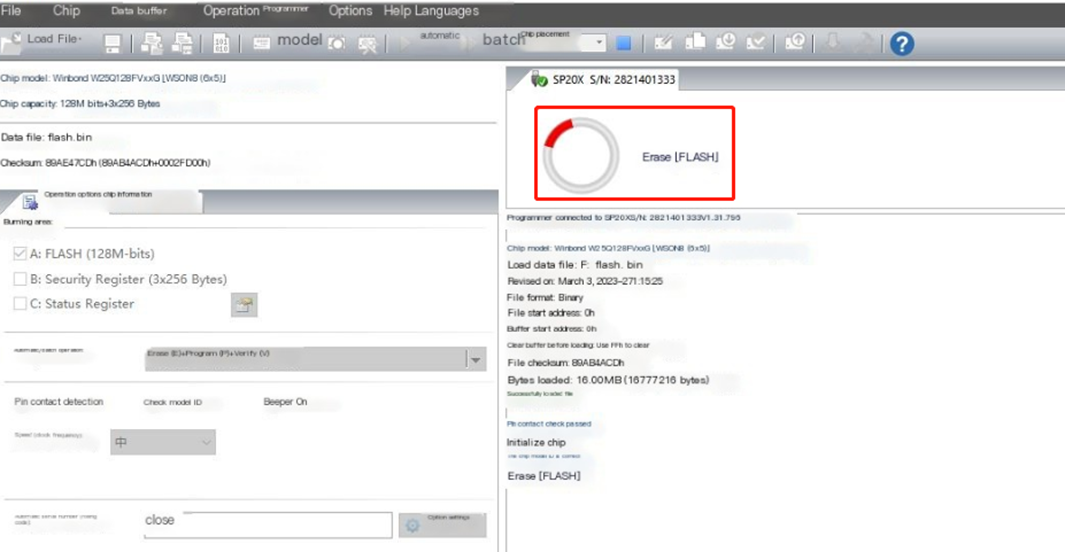
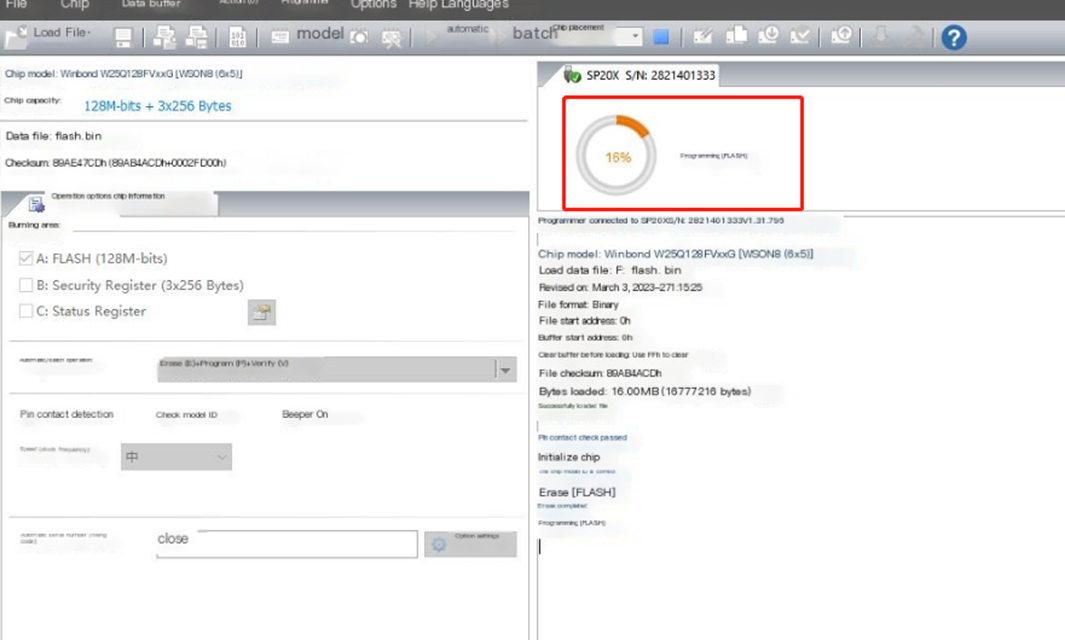
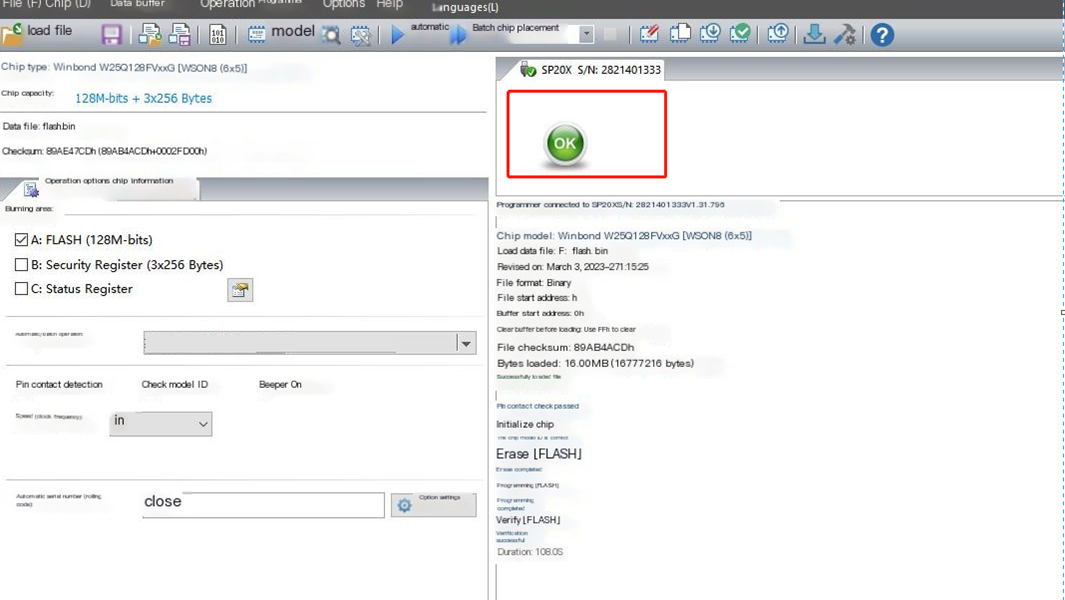
- Re weld the spi flash to the board.
5.2 Firmware Upgrade
5.2.2 Uboot Web Upgrade
- Press and hold the small hole button on the gateway to power on.
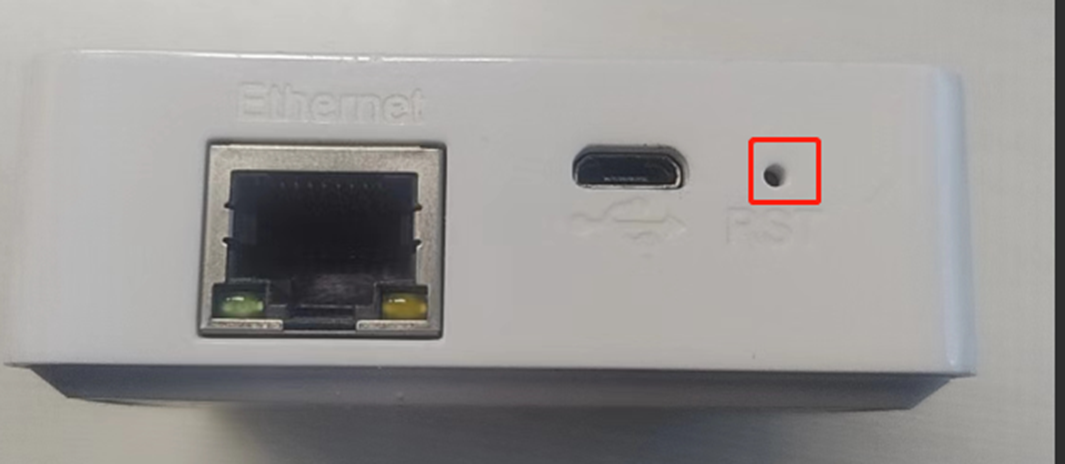
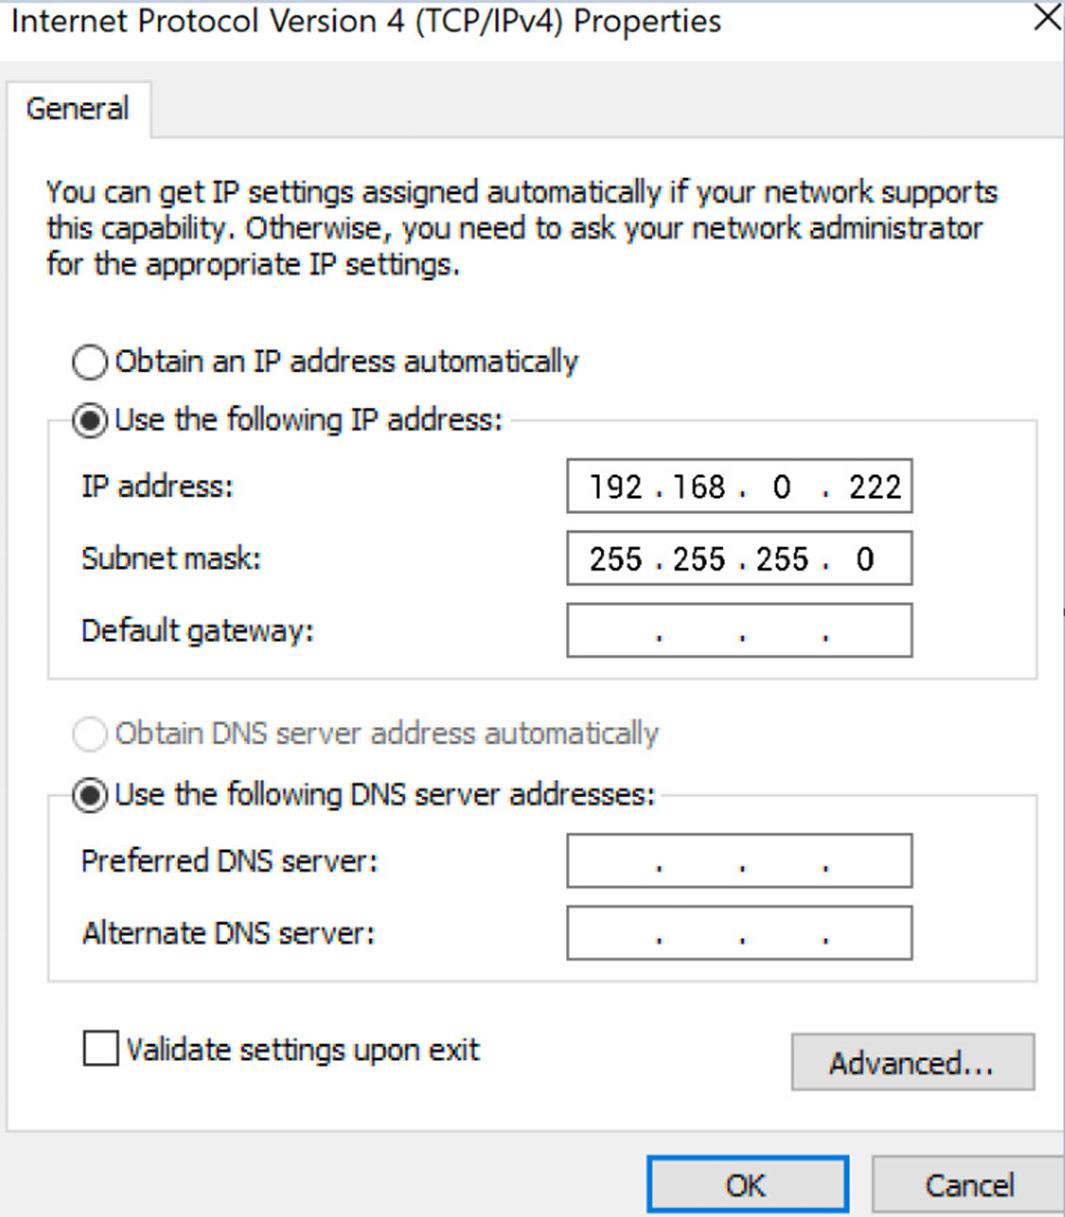
- Connect the gateway and computer directly with a network cable, and set the IP address of the computer to 192.168.0.222.
- Enter 192.168.0.250 in the browser to open the uboot upgrade page
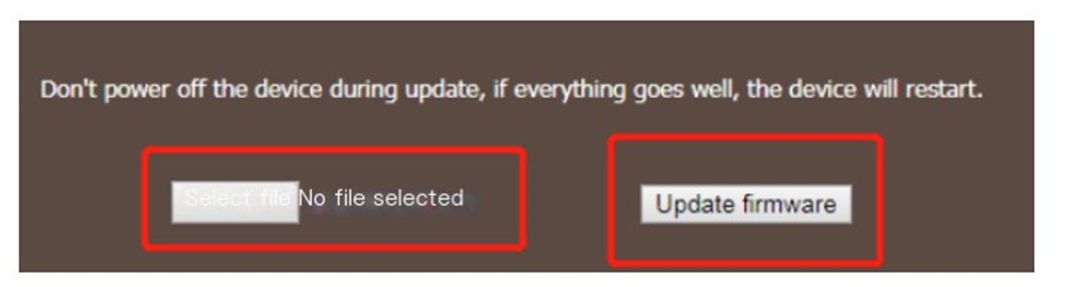
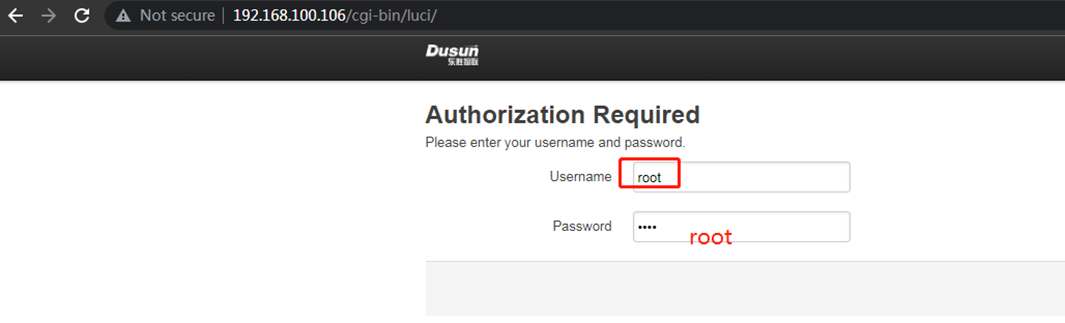
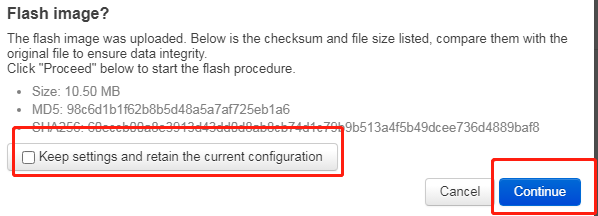
5.2.3 System Web Upgrade
- Browser input gateway IP address, account root, password root
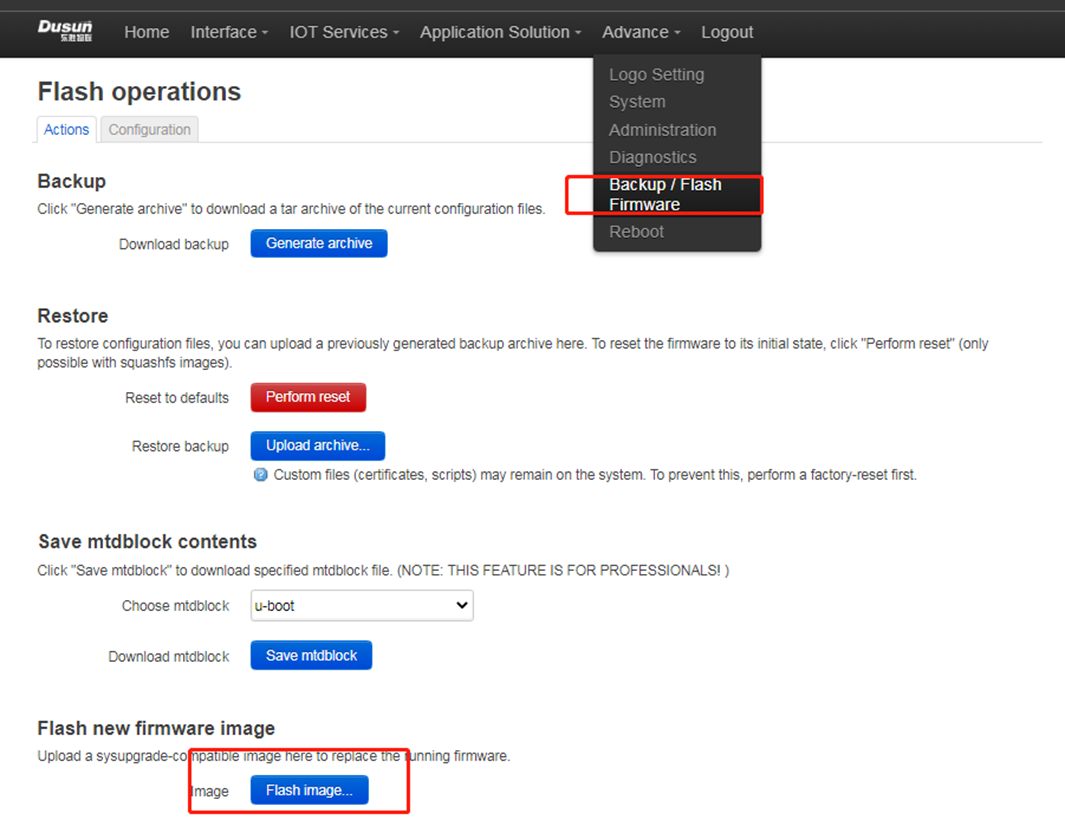
- Enter Advance->Backup And Flash Firmware
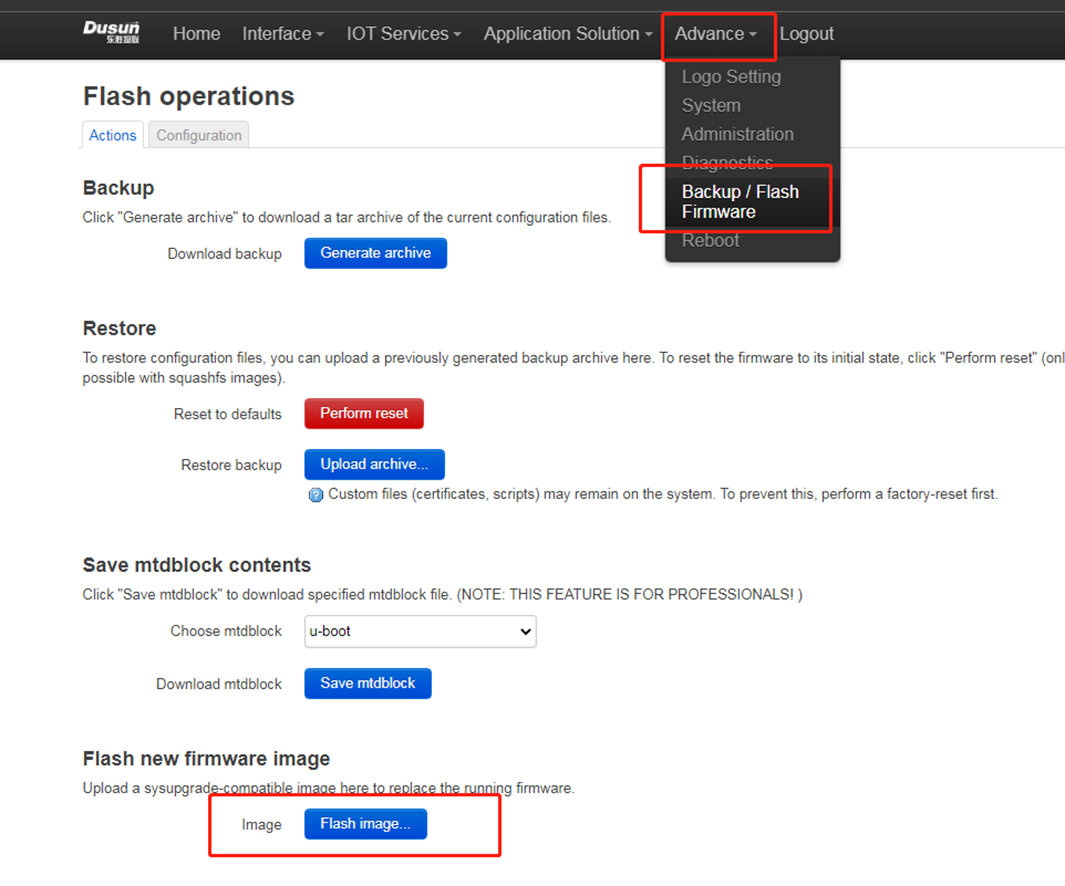
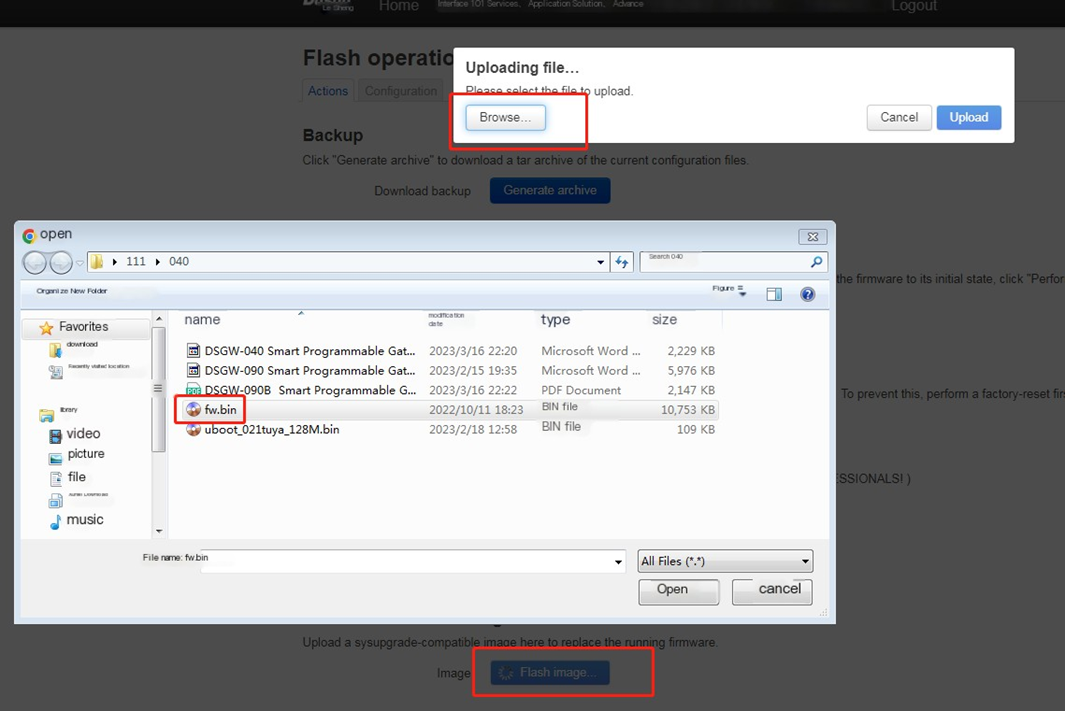
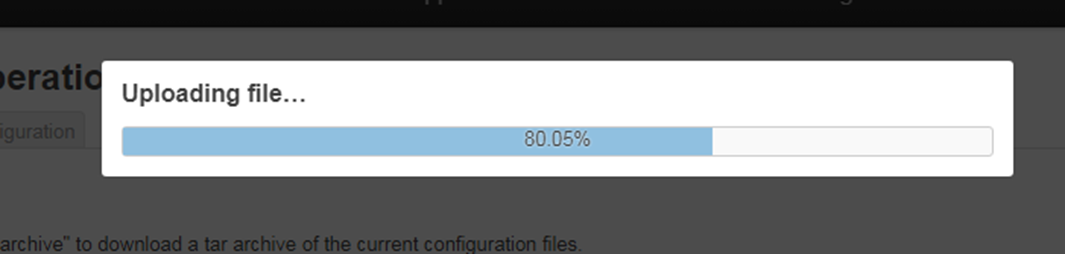
- Select fw.bin Upgrade the firmware for upgrading (fw.bin here is the upgraded firmware compiled earlier)
5.2.4 System Command Upgrade
- use scp or winscp tool to put the fw.bin to the board’s tmp
scp openwrt-ramips-mt76x8-DSI0177-squashfs-sysupgrade.bin root@192.168.xxx.xxx:/tmp/
- run sysupgrade command to upgrade the firmware
sysupgrade -n -F /tmp/openwrt-ramips-mt76x8-DSI0177-squashfs-sysupgrade.bin
6. Gateway Login
6.1 Login Through Debug Uart
- connect uart serial tool to the board’s debug uart port
- config the serial tools’s uart config
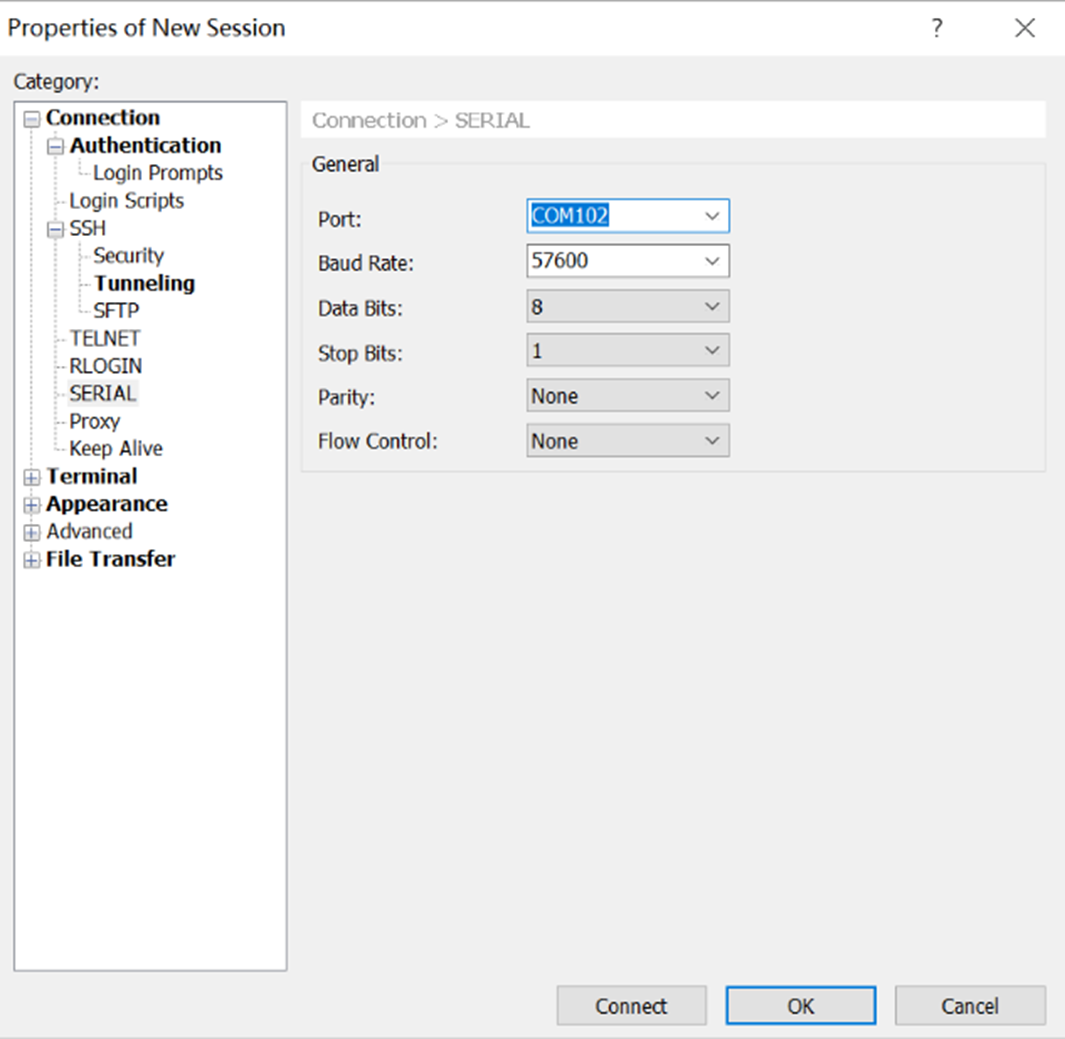
- power on the gateway
CFG_LOAD_ADDR=0x80100000, WIFI_EEPROM_OFFSET=0x40000, WIFI_EEPROM_LEN=0x200MAC address is: 30:AE:7B:E4:2B:70
wps val:8
wps val:8
Please choose the operation:
4: Entr boot command line interface.
5: Modify MAC address.
n: Load Boot Loader code then write to Flash via TFTP.
3: System Boot system code via Flash.
\## Booting image at bc050000 ...
Image Name:  Dusun v1.0.0.5
Image Type:  MIPS Linux Kernel Image (lzma compressed)
Data Size:  1261072 Bytes = 1.2 MB
Load Address: 80000000
Entry Point: 80000000
Verifying Checksum ... OK
Uncompressing Kernel Image ...
128 MB
...
Please press Enter to activate this console.
DSI0177 login: root
Password:
login[3871]: root login on 'ttyS0'
BusyBox v1.30.1 () built-in shell (ash)
_______           ________    __
|    |.-----.-----.-----.| | | |.----.| |_
|  -  || _ | -__|   || | | ||  _||  _|
|_______||  __|_____|__|__||________||__| |____|
  |__| W I R E L E S S  F R E E D O M
\-----------------------------------------------------
Roombanker Gateway V4.8.314.4296608_z4G_b7130bf@2023
\-----------------------------------------------------
root@DSI0177:~#
6.2 Login Through Network(SSH)
- config the ssh connection parameters
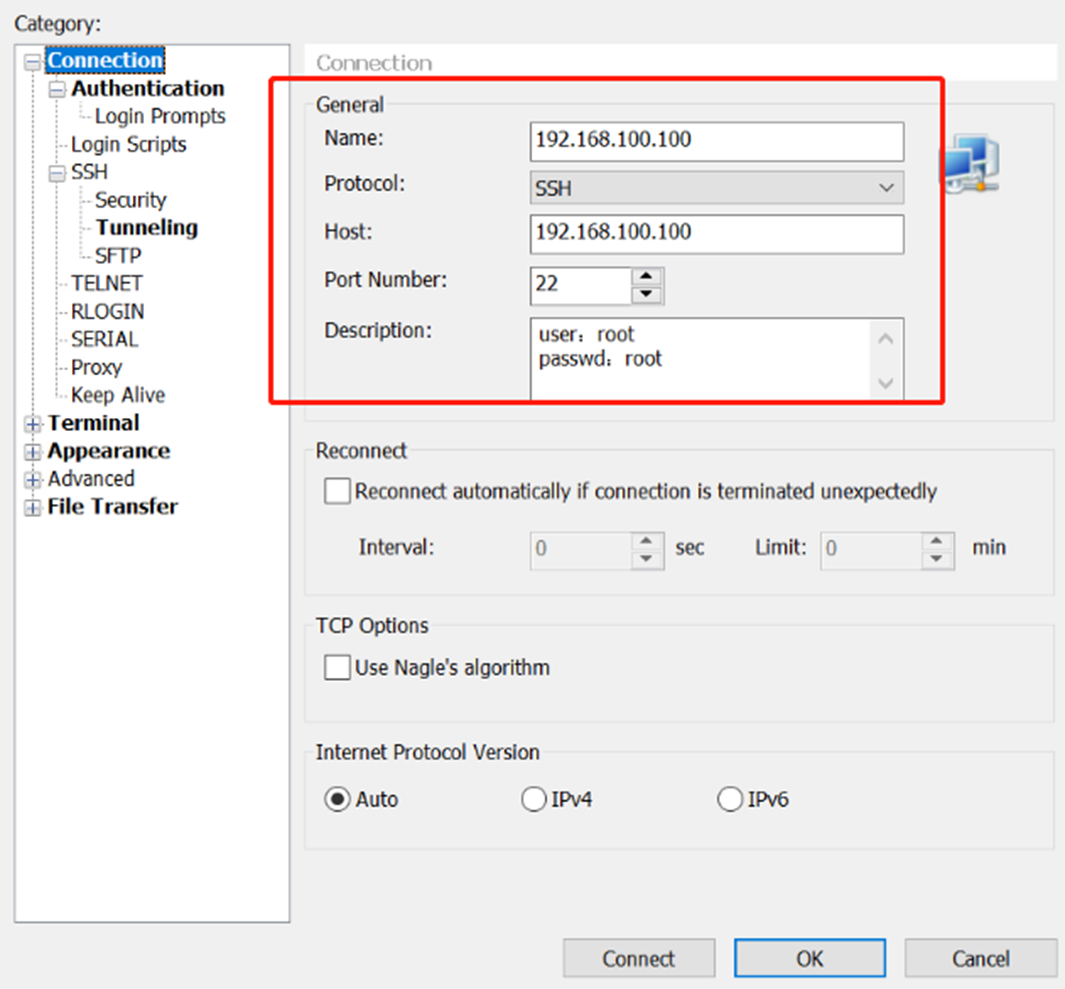
- connect success
 BusyBox v1.30.1 () built-in shell (ash)

  _______           ________    __
 |    |.-----.-----.-----.| | | |.----.| |_
 |  -  || _ | -__|   || | | ||  _||  _|
 |_______||  __|_____|__|__||________||__| |____|
      |__| W I R E L E S S  F R E E D O M
 \-----------------------------------------------------
 Roombanker Gateway V4.8.314.4296608_z4G_b7130bf@2023
 \-----------------------------------------------------
 root@DSI0177:~#
7. Easy Function Test Script
- download the test script
rm -rf /tmp/tools/;wget http://114.215.195.44:8080/au/gwtest/DSGW-030.tar.gz -O /tmp/x; tar xvf /tmp/x -C /;
- run the test script
root@DSI0177:~# /tmp/tools/test.sh
 ====================================================
 Testing [  version]..., please wait...
 BUILD_VERSION=V4.8.314.4296608_zBE128_b7130bf
 BUILD_TIME=Thu Apr 6 17:23:07 CST 2023
 BUILD_USER=au
 BUILD_HOST=git.roombanker.cn
 VOIMI_VERSION=4.0.0.29
     Test Result : OK
 ====================================================
 Testing [    wan]..., please wait...
     Test Result : OK
 ====================================================
 Testing [    led]..., please wait...
     Test Result : OK
 ====================================================
 Testing [    btn]..., please wait...
     Please Press the Hole button ...
     Test Result : OK
 ====================================================
 Testing [  zigbee]..., please wait...
 power on zigbee..
 /dev/ttyS2
 ezsp ver 0x06 stack type 0x02
     Test Result : OK
 ====================================================
 Testing [    ble]..., please wait...
 power on ble..
 /dev/ttyS1


     Test Result : OK
 ====================================================
 Testing [   zwave]..., please wait...
 power on zwave..
 /dev/ttyS1


     Test Result : OK
 ====================================================
 Testing [  wifi24]..., please wait...
     Test Result : OK
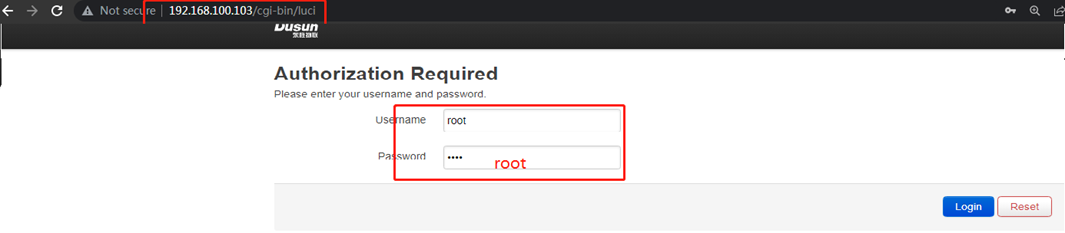
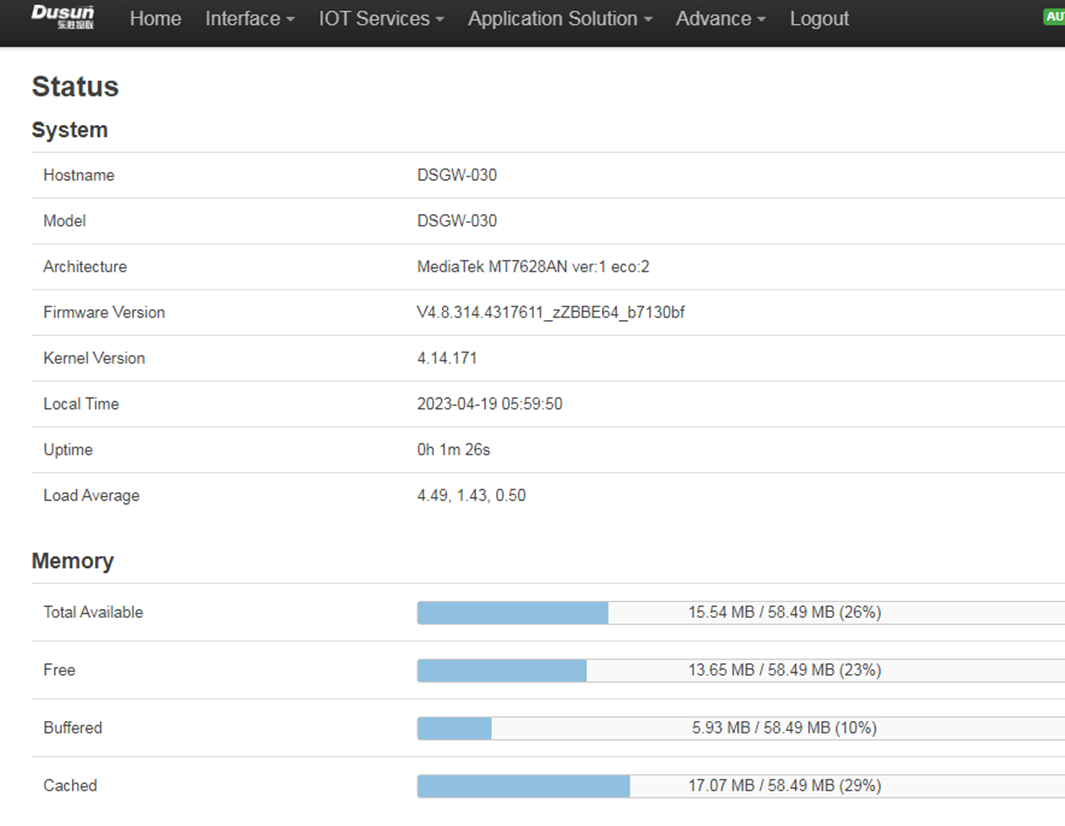
8. Luci Web Function Simple Description
For a detailed description see DSGW-Luci-Web Description
login in use user(root) and password(root)
- Home Page
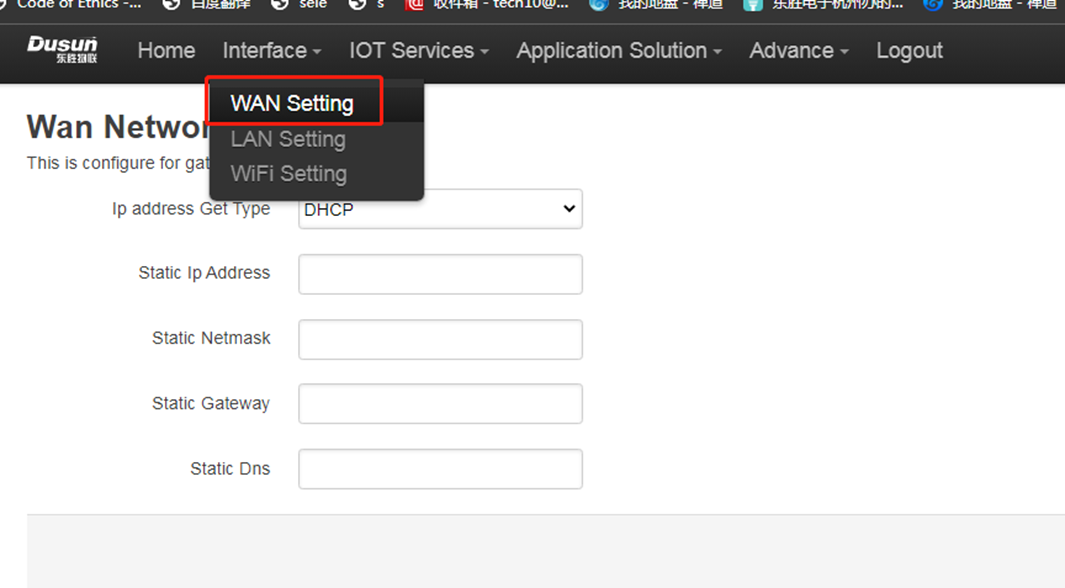
- Wan Setting Page
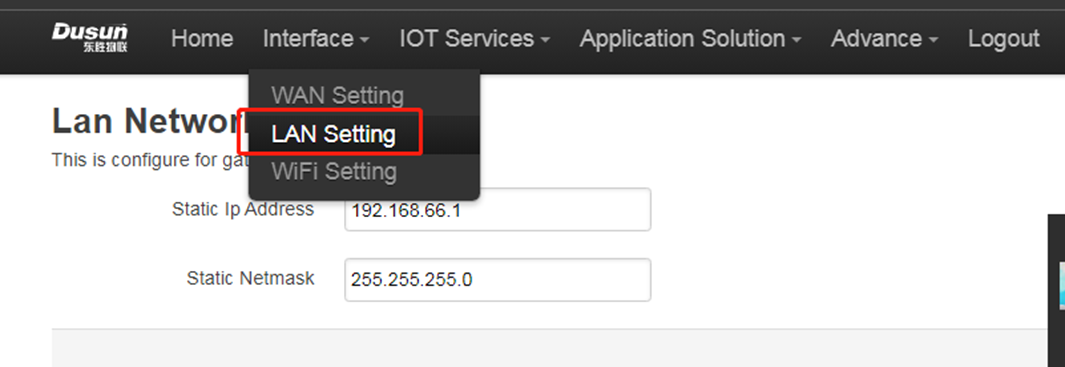
- Lan Setting Page
- Wifi Setting Page

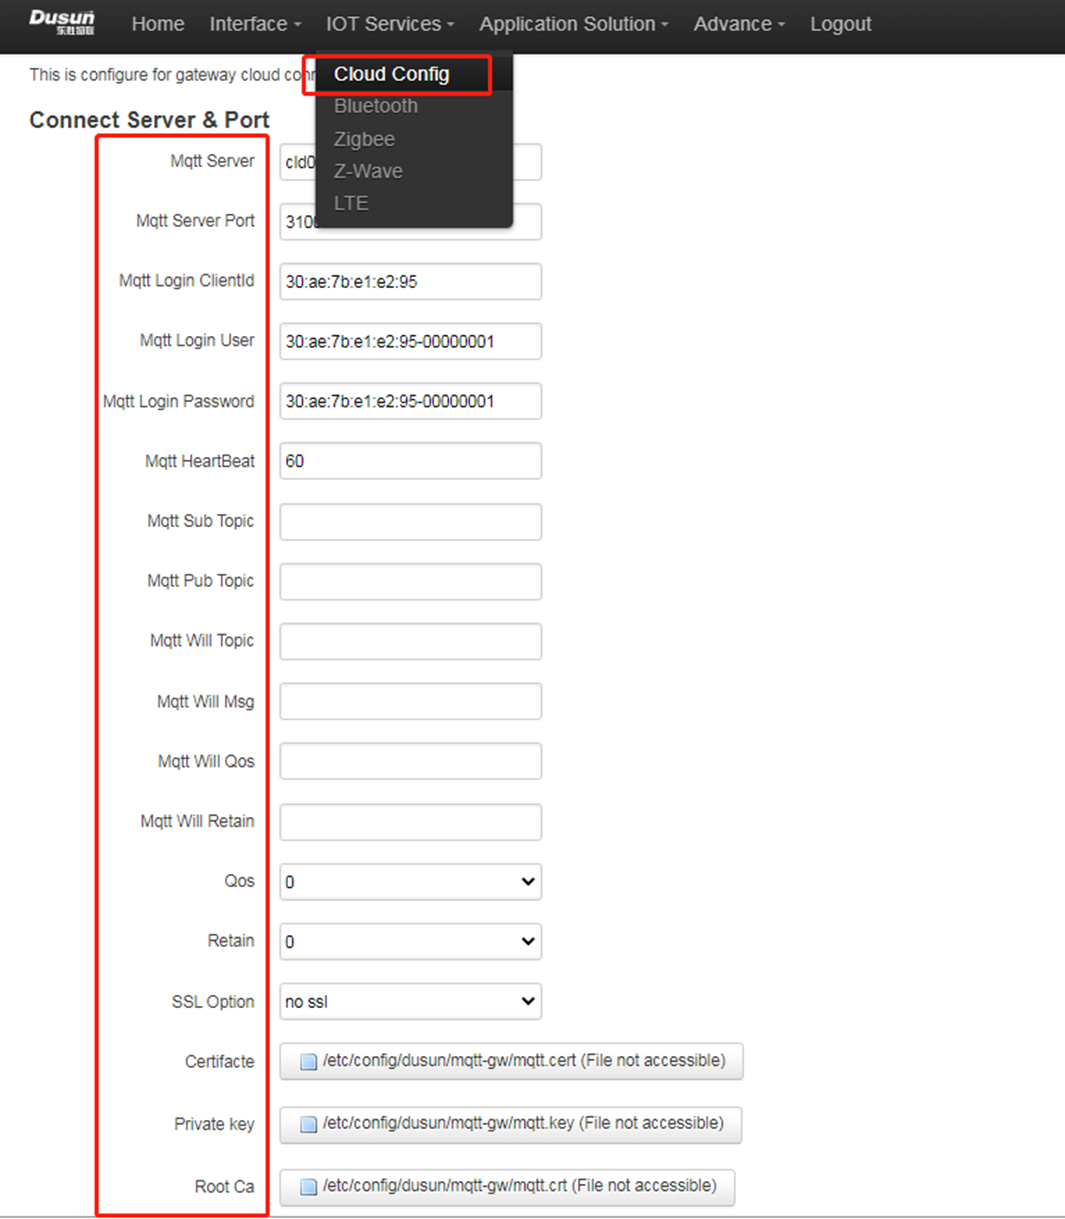
- Cloud Mqtt Config Page
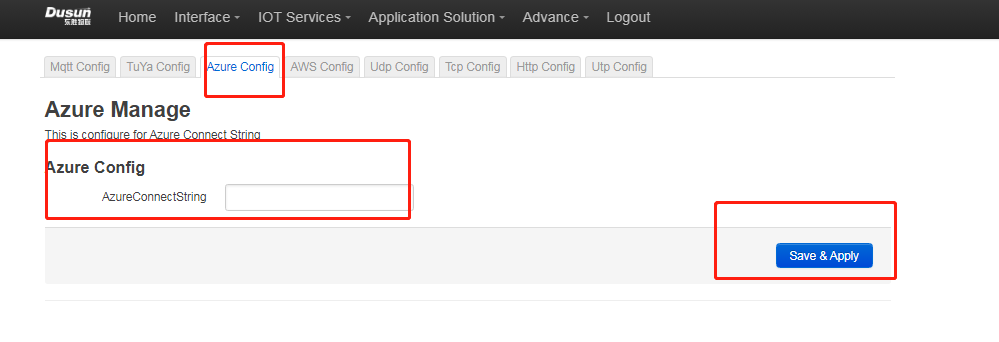
- Cloud Azure Config Page
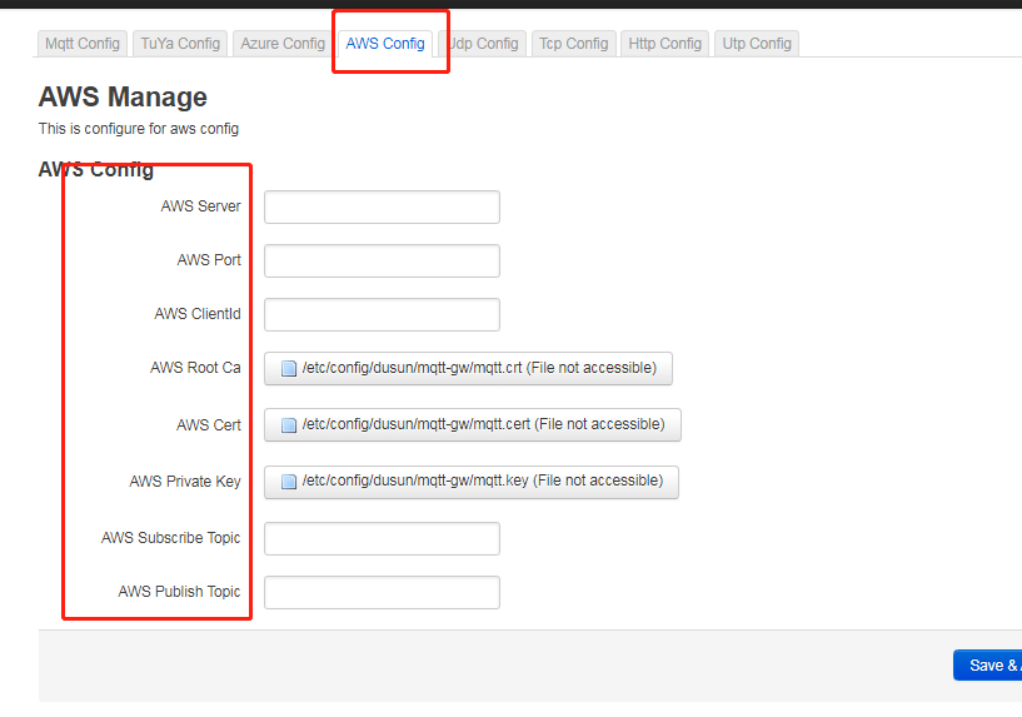
- Cloud Aws Mqtt Config Page
- Bluetooth

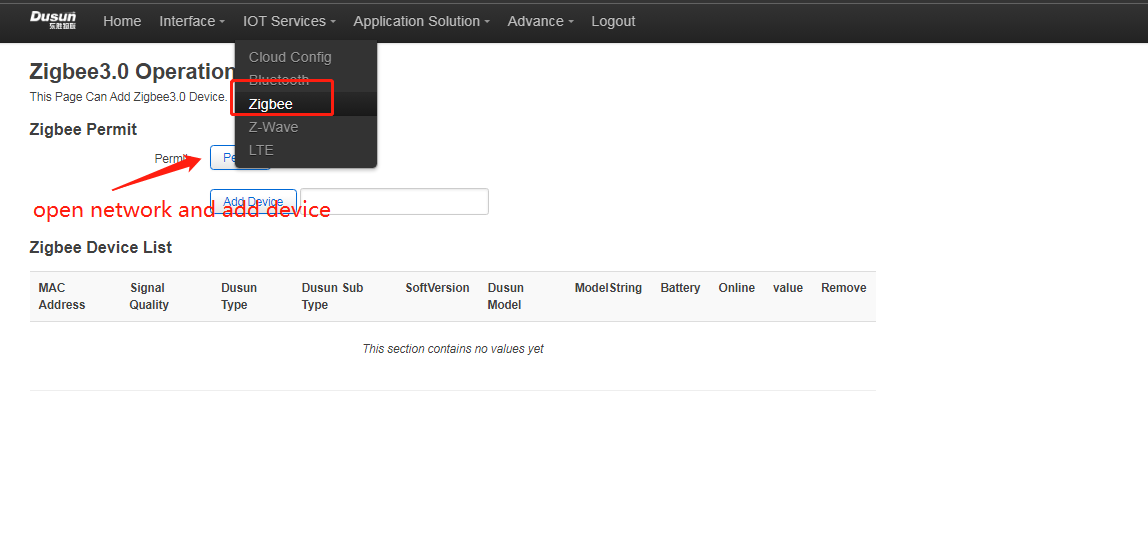
- Zigbee
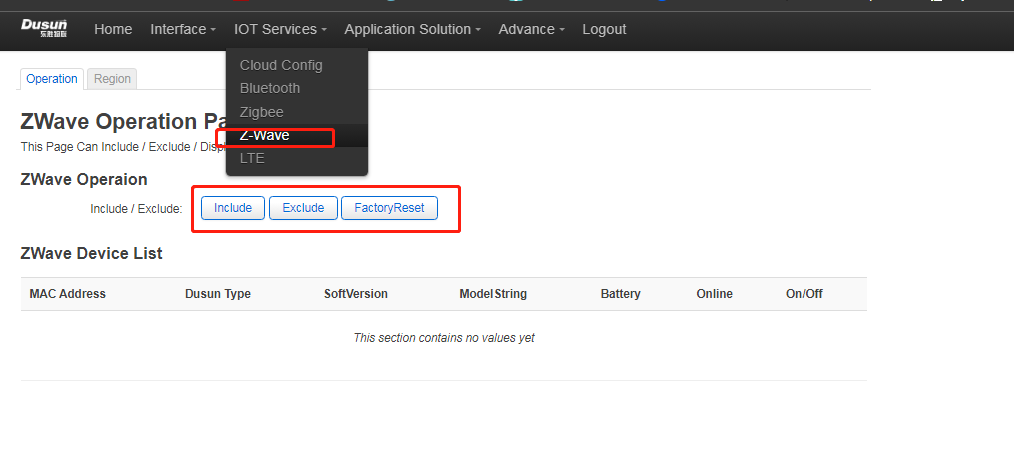
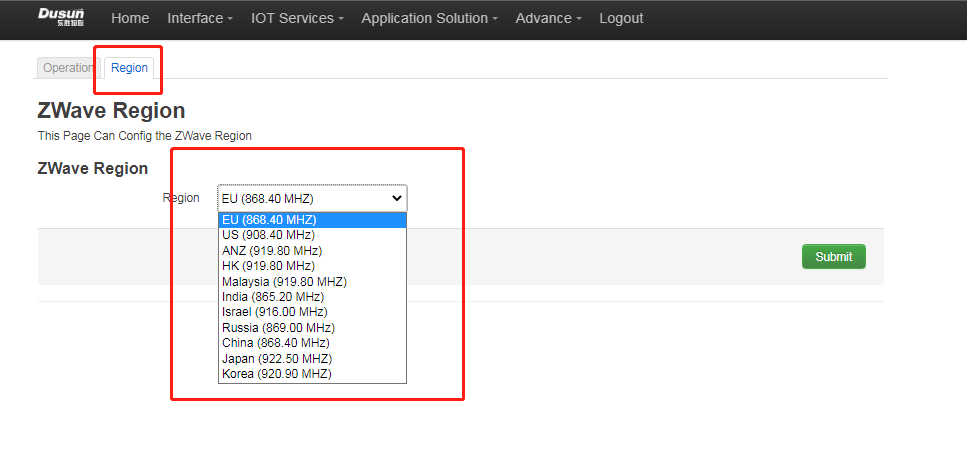
Zwave
Region Setting
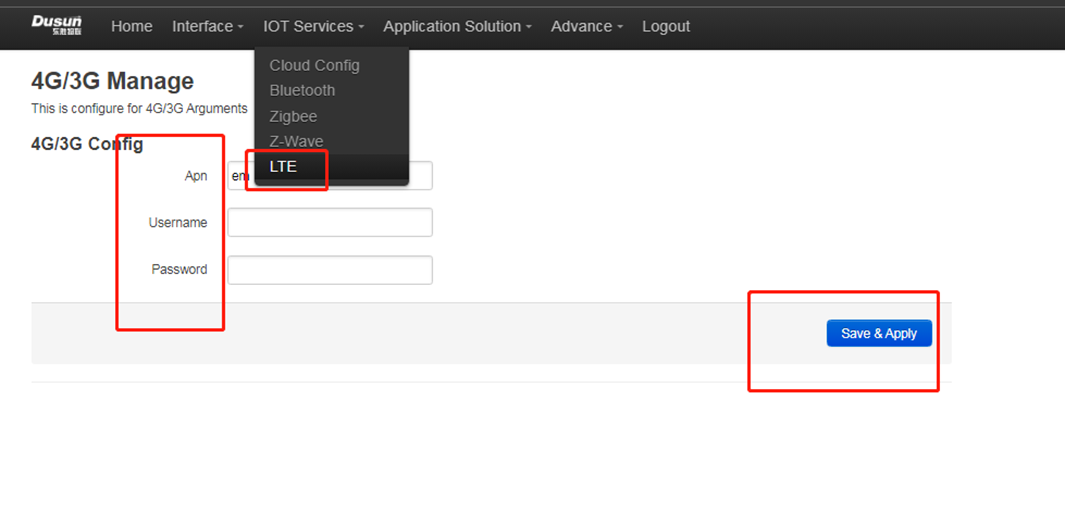
LTE
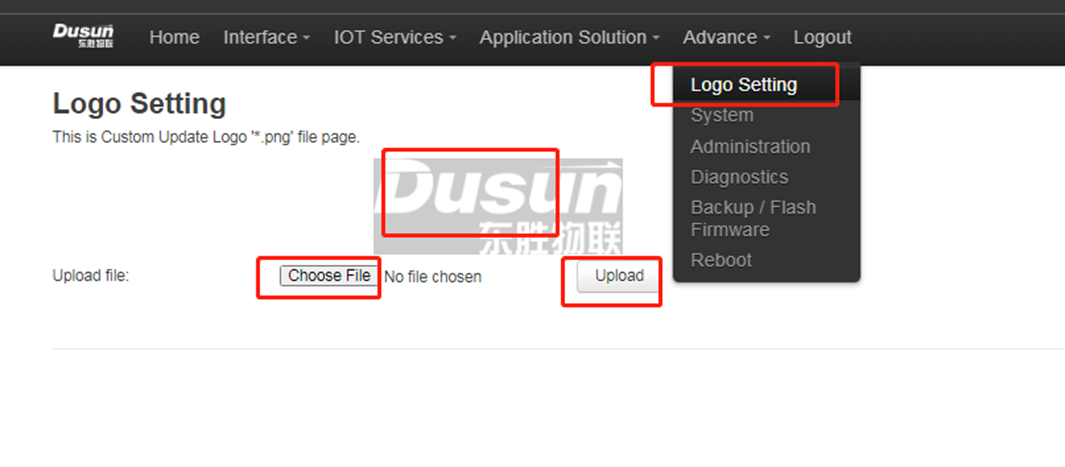
Logo Setting Page
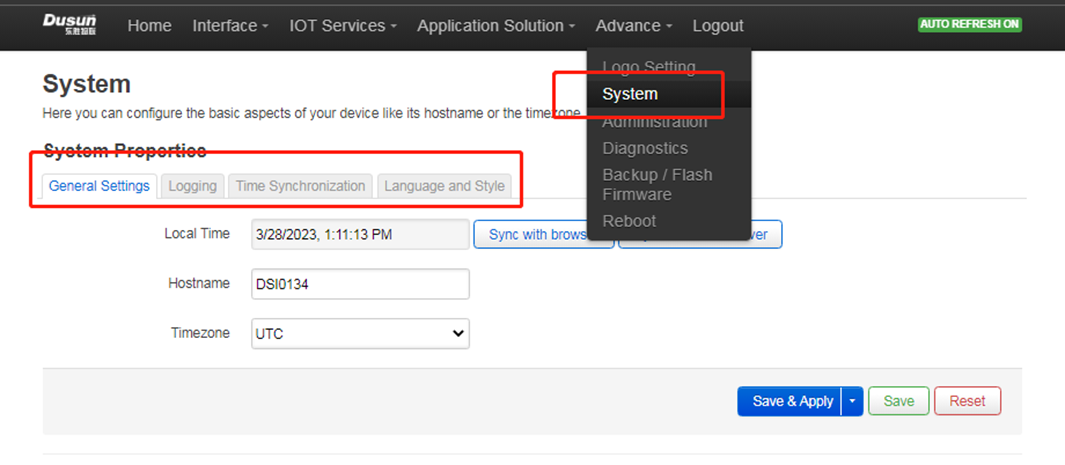
- System Setting Page
- System Administrator Setting page

- System Network Diagnostics Page
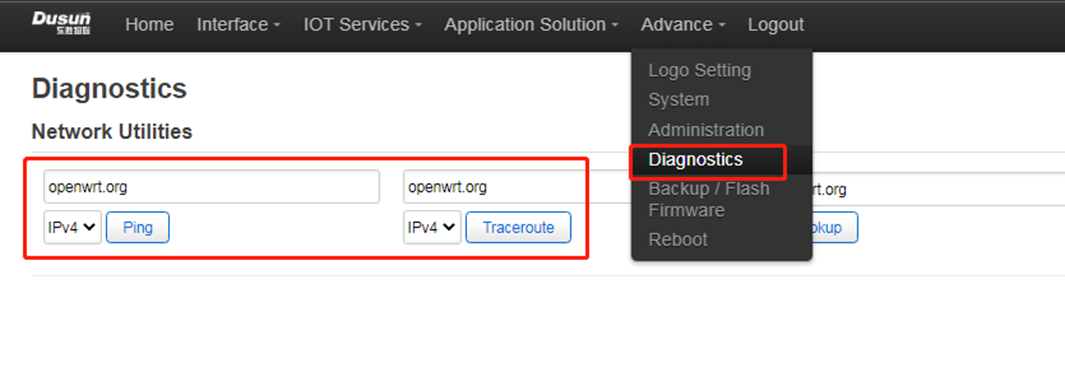
- System Upgrade Page
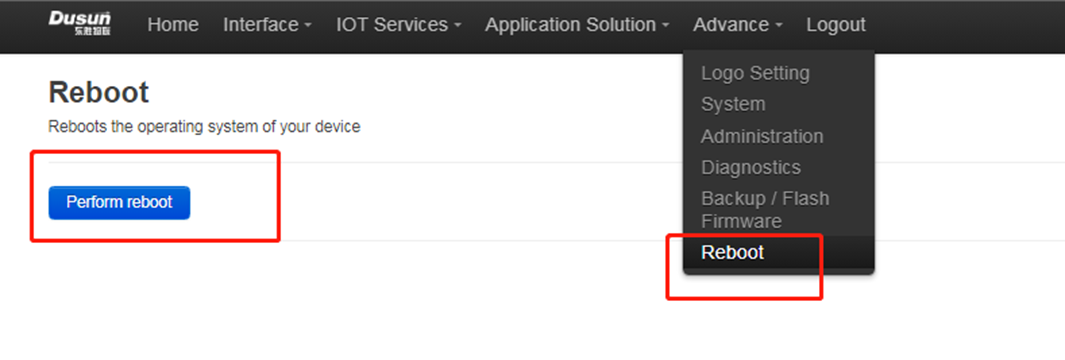
- Reboot Page
- Logout Page

9. Application Layer Development
9.1 Led
This board has three leds can be controlled by software, they are pwrled, zigbee, errled
9.1.1 on led
echo none > /sys/class/leds/pwrled/trigger
echo 1 > /sys/class/leds/pwrled/brightness
9.1.2 off led
echo none > /sys/class/leds/pwrled/trigger
echo 0 > /sys/class/leds/pwrled/brightness
9.1.3 blink led
echo timer > /sys/class/leds/pwrled/trigger
echo 500 > /sys/class/leds/pwrled/delay_on
echo 500 > /sys/class/leds/pwrled/delay_off
9.2 Button
This board has two buttons can used by software, when pressed, the system will auto call the button script in the /etc/rc.button/BTN_1 and /etc/rc.button/BTN_0
here are two incomming parameters
SEEN: this is the time, unit seconds
ACTION: this is the action, it will we pressed or release
see the example has one function in the button script - firts is the long pressed 15 seconds to factory reset
root@DSI0177:~# cat /etc/rc.button/BTN_1
 \#!/bin/sh

 . /lib/functions.sh
 . /lib/functions/leds.sh

 if [ "${ACTION}" == "pressed" ] ;
 then
     touch /tmp/BTN_1_pressed
     touch /tmp/btn1
 else
     rm -f /tmp/BTN_1_pressed
 fi

 if [ -f /tmp/dusun_upgrade ] ; then
     exit 0
 fi

 if [ -f /tmp/BTN_0_pressed -a -f /tmp/BTN_1_pressed ]; then
     exit 0
 fi

 [ ! "${ACTION}" == "released" ] && {
     exit 0
 }

 [ "${SEEN}" -ge 15 ] && {
         led_off zwled
         led_off pwrled
         led_off errled
         led_timer zwled 200 200
         led_timer pwrled 200 200
         led_timer errled 200 200
         logger "FACTORY RESET"
         \#jffs2reset -y && reboot &
         firstboot -y && reboot &
 }
9.3 Ethernet
this gateway has one ehternet port - wan port eth0
see the config
root@DSI0177:~# cat /etc/config/network

 config interface 'loopback'
     option ifname 'lo'
     option proto 'static'
     option ipaddr '127.0.0.1'
     option netmask '255.0.0.0'

 config globals 'globals'
     option ula_prefix 'fda3:1395:e773::/48'

 config interface 'lan'
     option type 'bridge'
     option ifname 'wlan0-1'
     option proto 'static'
     option ipaddr '192.168.66.1'
     option netmask '255.255.255.0'
     option ip6assign '60'

 config interface 'wan'
     option ifname 'eth0'
     option proto 'dhcp'
     option mtu '1492'

 config device 'wan_eth0_dev'
     option name 'eth0'
     option macaddr 'ff:ff:ff:ff:00:00'

 config interface 'wan6'
     option ifname 'eth0'
     option proto 'dhcpv6'

 config interface 'pwan'
     option ifname 'ppp0'
     option proto 'none'
     option metric '3'
     option mtu '1492'
     option mac '30:AE:7B:E2:92:9B'

 config interface 'wwan0'
     option proto 'dhcp'
     option metric '1'
     option ifname 'wlan0'
     option mtu '1492'
9.4 wifi
This gateway only have one 2.4 radio(mt7603), when startup, it worked at ap mode. The Default AP’s SSID is Dusun-XXXXXX where XXXXXX is the mac’s last three bytes. And the AP’s Password is XXXXXXXX, the mac’s last four bytes.
see the default config:
root@DSI0177:~# cat /etc/config/wireless

 config wifi-device 'radio0'
     option type 'mac80211'
     option channel '11'
     option hwmode '11g'
     option path 'platform/10180000.wmac'
     option htmode 'HT20'

 config wifi-iface 'ap0'
     option device 'radio0'
     option network 'lan'
     option mode 'ap'
     option ssid 'Dusun-E1E295'
     option encryption 'psk2'
     option key '7BE1E295'
9.5 Zigbee
This Gateway Has a Zigbee Module EFR32MG1B232
Host Development Demo Example
NCP Development
- User can obtained the zigbee module¡¯s NCP program in simplicity studio, the module number is EFR32MG1B232F256G
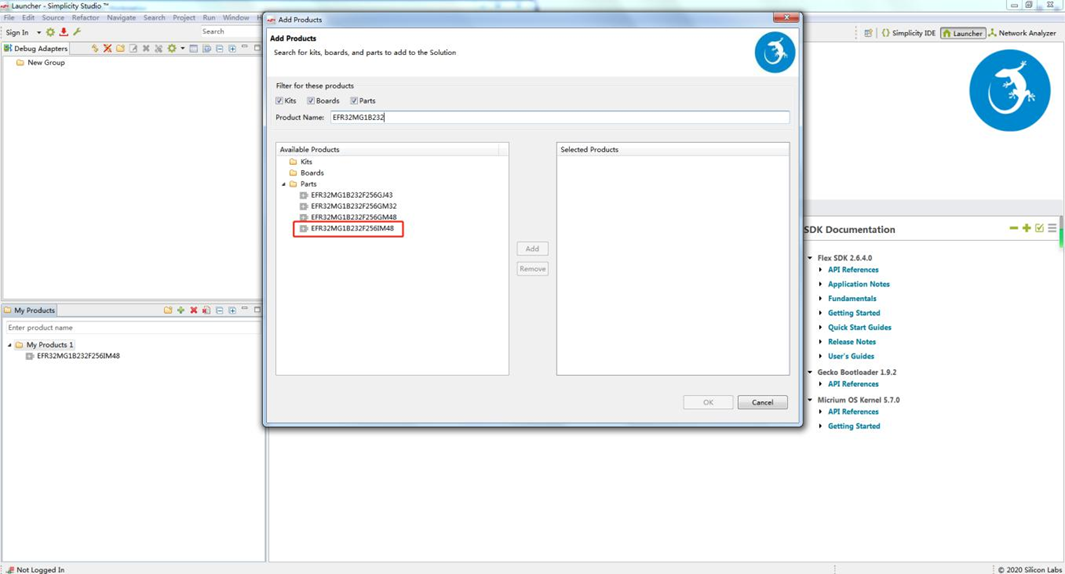
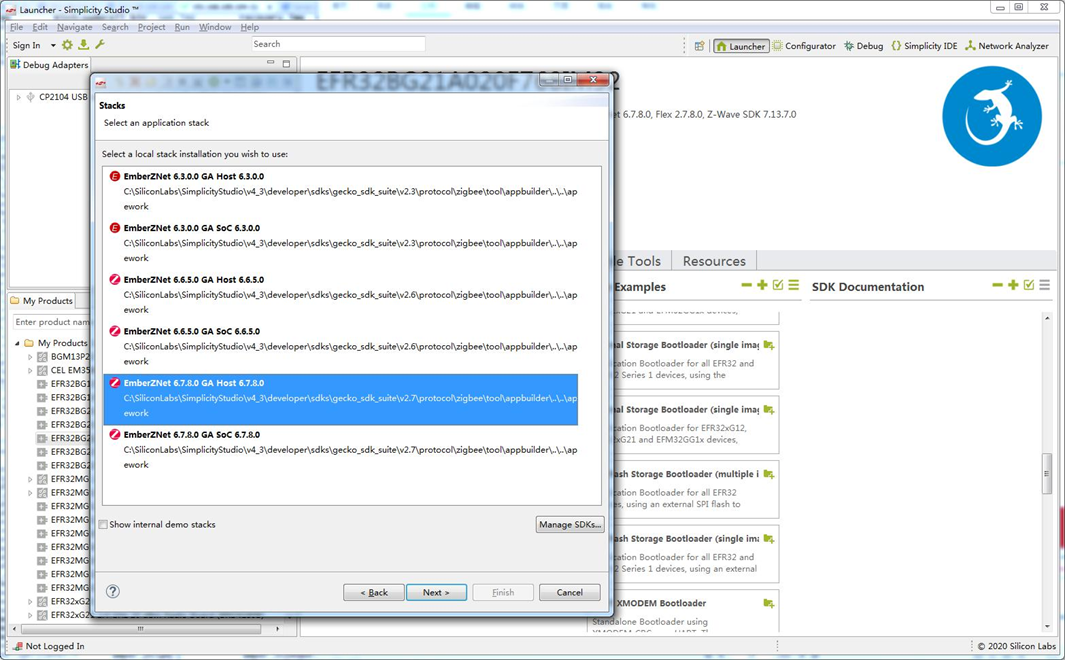
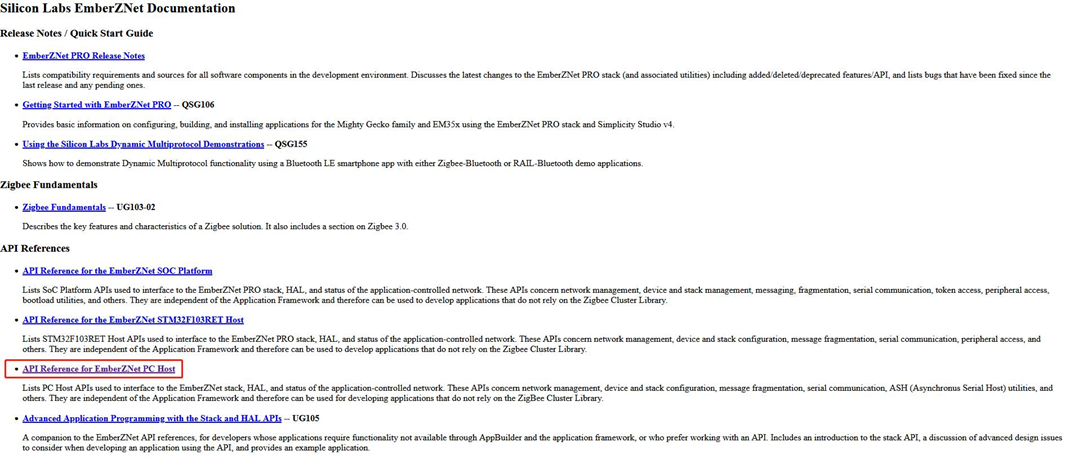
For detailed information to flash image to the zigbee module, please refer to document ZIGBEE MODULE FLASH FIRMWAREv1.0 For SDK to develop program in gateway, please refer to document API Reference for EmberZNet PC Host. It can be found in the ss5¡¯s directory of C:\SiliconLabs\SimplicityStudio\v4_3\developer\sdks\gecko_sdk_suite\v2.7\protocol\zigbee\documentation
9.6 Bluetooth
This Gateway Has a Bluetooth Module EFR32BG21
Host Development Demo Example
NcP Development
User can obtained the ble module¡¯s NCP program in simplicity studio, the module number is ERF32BG21
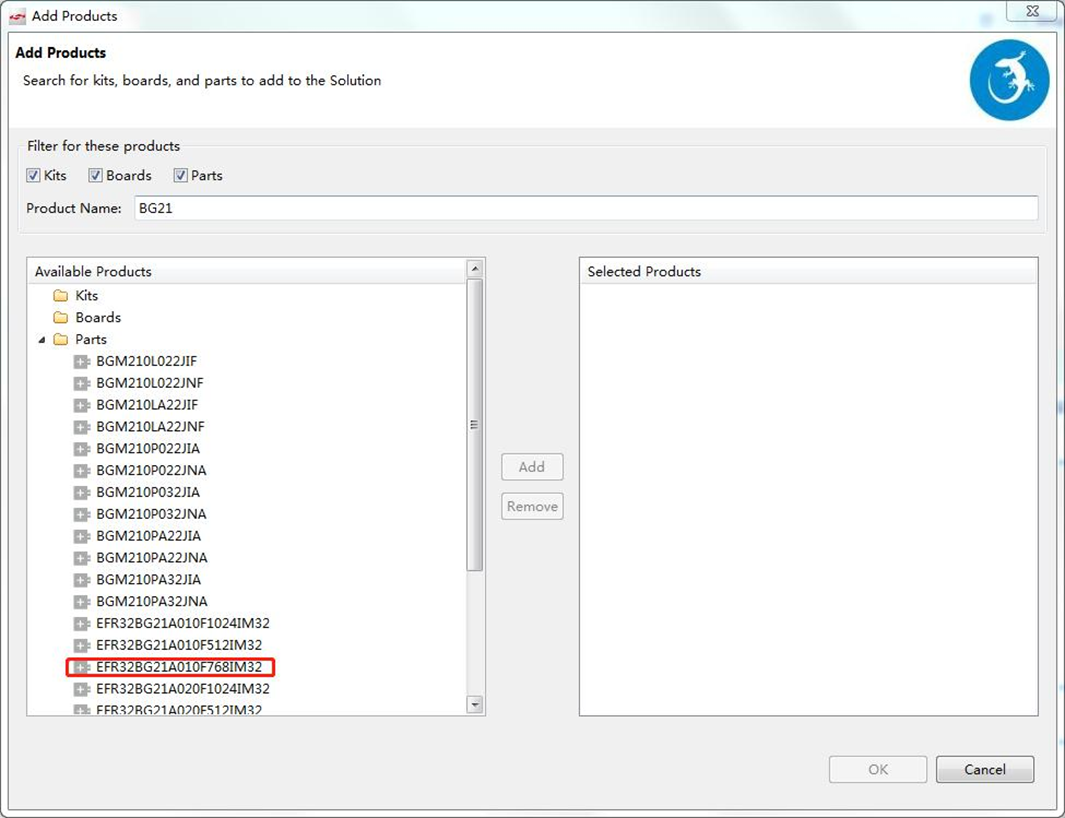
Find the correct BLE module in simplicity studio, then follow the same guide in section 10
9.7 Zwave
This Gateway Has a Zwave Module ZG130S
Host Development Demo Example
NCP Development
User can obtained the Z-Wave module¡¯s NCP program in simplicity studio, and acquire the Z-Wave sdk in siliconlabs for further development .
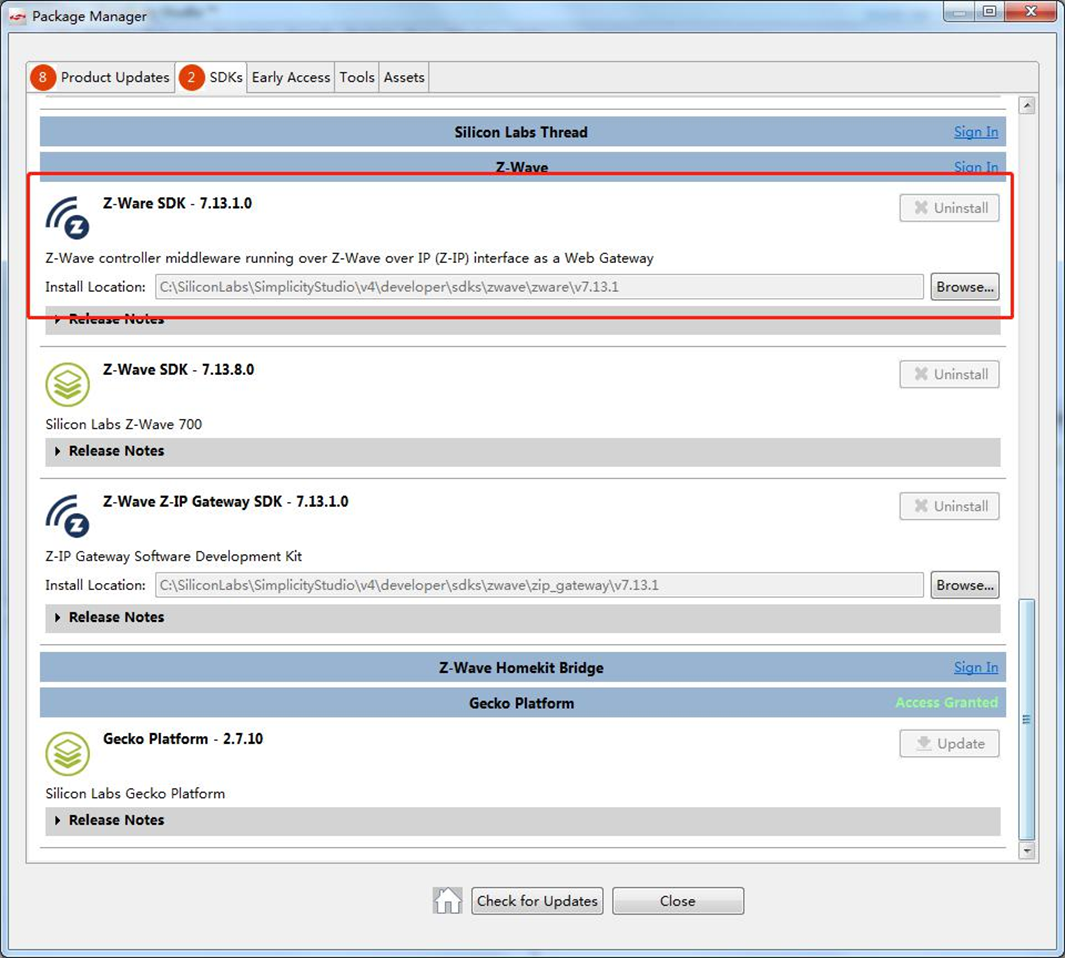
Find the correct Z-Wave module in simplicity studio, then follow the same guide in section 10
10. Kernel Development DTS Description
This Gateway’s dts file is the ./target/linux/ramips/dts/DSI0177.dts
10.1 Led
gpio-leds {
   compatible = "gpio-leds";

   led_power: power {
    label = "pwrled";
    gpios = <&gpio0 4 1>;
   };

   led_error: error {
    label = "errled";
    gpios = <&gpio0 5 1>;
   };

   led_zigbee: zigbee {
    label = "zigbee";
    gpios = <&gpio0 19 1>;
   };

   led_wanlink: wanlink {
    label = "wanlink";
    gpios = <&gpio0 14 1>;
   };

   led_wandata: wandata {
    label = "wandata";
    gpios = <&gpio0 15 1>;
   };
  };
10.2 Button
gpio-keys-polled {
     compatible = "gpio-keys-polled";
     \#address-cells = <1>;
     \#size-cells = <0>;
     poll-interval = <20>;

     pair {
       label = "BTN_0";
       gpios = <&gpio0 3 1>;
       linux,code = <0x100>;
     };
     wps {
       label = "BTN_1";
       gpios = <&gpio0 2 1>;
       linux,code = <0x101>;
     };
   };
10.3 Ethernet
eernet {
  mtd-mac-address = <&factory 0x28>;
 };
10.4 wifi
&wmac {
  status = "okay";
  ralink,mtd-eeprom = <&factory 0x0>;
 };
  pcie: pcie@10140000 {
   compatible = "mediatek,mt7620-pci";
   reg = <0x10140000 0x100
    0x10142000 0x100>;

   \#address-cells = <3>;
   \#size-cells = <2>;

   interrupt-parent = <&cpuintc>;
   interrupts = <4>;

   resets = <&rstctrl 26 &rstctrl 27>;
   reset-names = "pcie0", "pcie1";
   clocks = <&clkctrl 26 &clkctrl 27>;
   clock-names = "pcie0", "pcie1";

   status = "disabled";

   device_type = "pci";

   bus-range = <0 255>;
   ranges = <
    0x02000000 0 0x00000000 0x20000000 0 0x10000000 /* pci memory */
    0x01000000 0 0x00000000 0x10160000 0 0x00010000 /* io space */
   \>;

   pcie0: pcie@0,0 {
    reg = <0x0000 0 0 0 0>;

    \#address-cells = <3>;
    \#size-cells = <2>;

    device_type = "pci";

    ranges;
   };
  };
10.5 Zigbee
&uart2 {
  status = "okay";
 };
10.6 Bluetooth
&uart1 {
  status = "okay";
 };
10.7 Zwave
&uart1 {
  status = "okay";
 };