Quick Start Guide
1 Introduction
This Quick Start Guide explains the basics: how to connect and set up your target on the network; how to install the SDK; and how to build the firmware images.The Linux Software Developer’s Kit (SDK) is an embedded hardware and software suite that enables Linux developers to create applications on Dusun’s DSGW-230-11B gateway.Base on the 4.4 Linux kernel, and leveraging existing open source software, the SDK simplifies the process of adding custom applications. Device drivers, GNU toolchain, Pre- defined configuration profiles, and sample applications are all in included.
2 Gateway Information
2.1 Basic information
SOC: RK3328
Quad-core ARM Cortex-A53 Mali-450MP2 GPU Power Supply: DC-5V
LTE module: BG96 (LET CAT-1)
Wi-Fi module: 6221A (Wi-Fi chip: RTL8821CS)
Zigbee: EFR32MG1B232F256GM32
Z-wave: ZGM130S037HGN
Bluetooth: EFR32BG21A020F768IM32
eMMC: 8GB SDRAM: 2GB
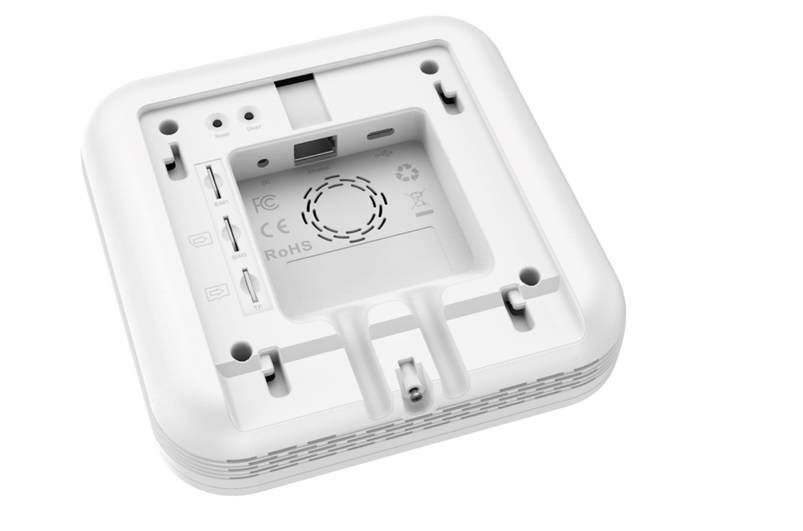
2.2 Interface
3 Target Setup
This section describes how to connect the gateway into your host computer and network.
- Connecting a gateway – Power
1)Make sure that the power adapter is 5V/3A.
2)Select the appropriate power plug adaptor for your geographical location. Insert it into the slot on the Universal Power Supply; then plug the power supply into an outlet.
3)Connect the output plug of the power supply to the gateway
- Connecting a gateway – USB port
1) Connect one end of the USB cable to the USB port on the laptop or desktop 2) Connect the other end of USB cable to the USB port on the gateway.

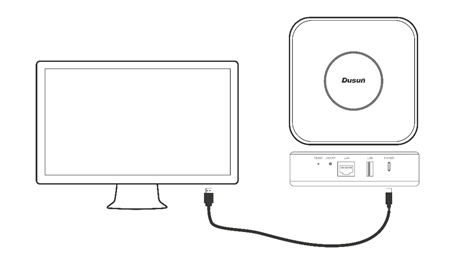
Figure3-1. Connecting a gateway via USB port
- Connecting a PCBA board – Serial Port
If you want to debug the gateway, you can open the shell, Connect the PC to the PCBA board via Serial to USB tool.
PIN in board for serial connection: TP1100: RX TP1101: TX TP1154: GND
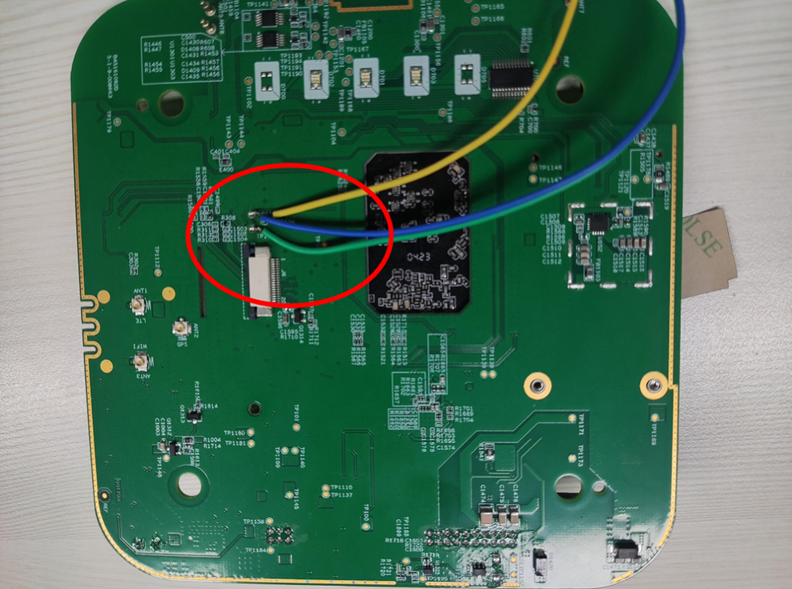
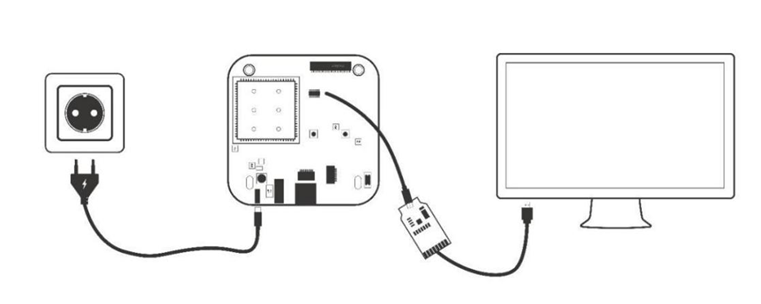
Figure3-2. Connecting a PCBA via Serial-USB tool
4 Compile the Environment to Build
Please use ubuntu 18.04 .iso image to setup your build environment. You can use a virtual machine or a physical PC to install ubuntu 18.04.
4.1 Virtual Machine
It is recommended that novice users use virtual machines, install ubuntu 18.04 to thevirtual machine, and leave enough disk space (at least 100G) for the virtual machine.
4.2 Ubuntu PC Compile the Environment to Build
The use of physical machine compilation users can use a ubuntu PC.
5 SDK Acquisition and Preparation
5.1 Download the source code from the Dusun FTP
The source package name will be 3328-linux-*.tar.gz, get it from Dusun FTP.
5.2 Code Compression Package Check
The next step can be taken only after generating the MD5 value of the source compression package and comparing the MD5 value of the MD5 .txt text to confirm that the MD5 value is the same, and if the MD5 value is not the same, the energy code pack is damaged, please download it again.
$ md5sum rk3328-linux-*.tar.gz
5.3 The Source Compression Package is Unzipped
Copy the source code to the corresponding directory and unzip the source code compression package.
$ sudo    -i
$ mkdir workdir
$ cd workdir
$ tar -zxvf  /*path*/*to*/rk3328-linux-*.tar.gz
$ cd rk3328-linux
6 Code Compilation
6.1 Getting started, global Compilation
6.1.1 Initialize Compilation Environment Variables (select file system)
You can build buildroot, ubuntu or debian rootfs image. Select it in "./build.sh init".
 ```
 $ ./build.sh init processing option: init
 ============You're building on Linux=========== Please choose BoardConfig
 1. BoardConfig_rp3328_buildroot
 2. BoardConfig_rp3328_ubuntu
 3. BoardConfig_rp3328_debian
 Please input num:
 ```
We strongly recommend you to build and run the system with buildroot rootfs to get familiar with the hardware and build environment, when you get started.
After you tried buildroot system, you can try ubuntu and debian system.
6.1.2 Prepare the Root File System base
This section is for building ubuntu or debian file system. If you want to build the
buildroot file system, skip this section.
- Compile Ubuntu
Download the root file system compression package ubuntu.tar.gz The Root file system compresses the package directory:
Unzip the compression package
$unzip ubuntu-rootfs.zip // you get xxx-rootfs.img
Copy the root file system to the specified path
$ cd workdir/rk3328-linux
$ mkdir ubuntu
$ cp /*path*/*to*/xxx-rootfs.img ./ubuntu/ubuntu.img
- Compile Debian
Download the root file system compression package debian.tar.gz Unzip the compression package
$ unzip debian-rootfs.zip // you get xxxx-rootfs.img
Copy the root file system to the specified path
$ cd workdir/rk3328-linux
$ mkdir debian
$ cp ./xxxx-rootfs.img ./debian/linaro-rootfs.img
6.1.3 Start Compiling
The software package installation commands for compiling the SDK environment are as follows:
$sudo apt-get install git ssh make gcc libssl-dev liblz4-tool expect  libc6-dev libc6-dev-i386 \
g++ patchelf chrpath gawk texinfo chrpath diffstat binfmt-support python3  python3-pip\
 python-dev  swig live-build bison flex fakeroot cmake gcc-multilib  autoconf  \
g++-multilib unzip device-tree-compiler ncurses-dev
Build a complete directory of firmware
$ ./build.sh
Build a complete directory of firmware files: rockdev/update.img and other separate images, update.img includes all firmware for full upgrade.
The build will take a long time, please wait patiently.
After update.img is built, burn it to the board according to chapter 7.
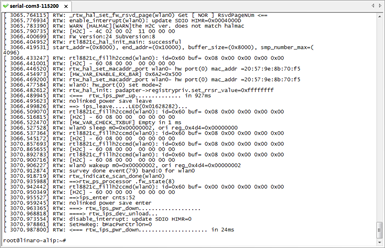
6.1.4 Run The Image on the board
Connect the RK3328 board serial port to the PC via a USB to UART Bridge. Use Putty or other Terminal software as your console tool,
SERIAL CONSOLE SETTINGS:
115200/8N1
Baud: 115200
Data Bits: 8
Parity Bit: No
Stop Bit: 1
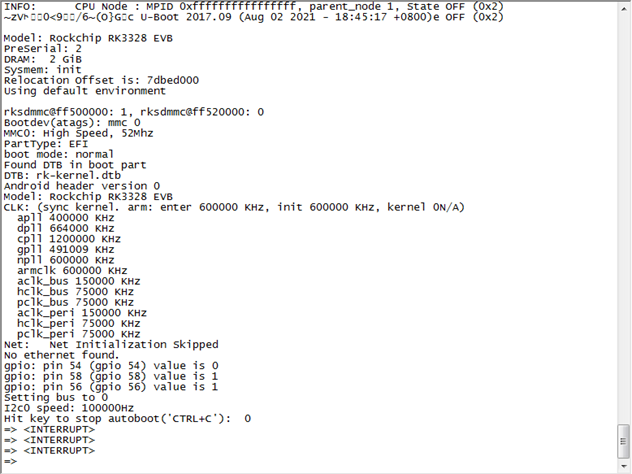
Power UP the board, you can see the boot log on console:
There is no default password for system login.
6.2 Compiled Each Image Part Separately
6.2.1 The build system and the image structure
The update.img is composed of several parts. Main parts are uboot.img, boot.img, recovery.img, rootfs.img.
uboot.img contains bootloader uboot
boot.img contains the device tree .dtb image, Linux kernel image recovery.img: The system can boot up to recovery mode, recovery.img is the rootfs used in recovery mode. rootfs.img: The normal rootfs image. In normal mode, system boot and mount this rootfs image.
You may need to build the images separately, especially when you focus on single module (e.g. uboot or kernel driver) development. Then you can build only that part of image and update that partition in flash.
6.2.2 Build Uboot only
$ ./build.sh uboot
6.2.3 Build Linux Kernel Only
$ ./build.sh kernel
6.2.4 Build Recovery File System Only
$ ./build.sh recovery
6.2.5 Build File System Only
$ ./build.sh rootfs
6.2.6 Final Image Packaging
$ ./build.sh updateimg
This command making rockdev/*.img scatter firmware packaging builds in the directory update.img
7 More about buildroot system
If you use buildroot rootfs, some Dusun test scripts/tools are already installed in the final buildroot rootfs. You can refer to buildroot/dusun_rootfs/add_ds_rootfs.sh
7.1 Test hardware components
The following testing are done under the buildroot system.
7.1.1 Test Wi-Fi as AP
The "ds_conf_ap.sh" script is for setting up Wi-Fi AP, SSID is "dsap", password is "12345678".
# ds_conf_ap.sh
192.168.10.1
start hostapd
Configuration file: /etc/hostapd.conf
wlan0: interface state UNINITIALIZED->COUNTRY_UPDATE start dnsmasq
Stopping dnsmasq: OK Starting dnsmasq: OK Done!!!!!!
#
#
# iwconfig
lo  no wireless extensions.

wlan0     IEEE 802.11an  ESSID:"dsap"  Nickname:"<WIFI@REALTEK>" Mode:Master  Frequency:5.745 GHz  Access Point: 20:57:9E:8B:70:F5 Bit Rate:72.2 Mb/s   Sensitivity:0/0
Retry:off   RTS thr:off   Fragment thr:off Encryption key:off
Power Management:off
Link Quality=1/100  Signal level=1/100  Noise level=0/100 Rx invalid nwid:0  Rx invalid crypt:0  Rx invalid frag:0
Tx excessive retries:0  Invalid misc:0   Missed beacon:0

eth0    no wireless extensions.

#
# ifconfig
eth0    Link encap:Ethernet  HWaddr 0A:11:D3:88:1E:B5
inet addr:192.168.1.4  Bcast:192.168.1.255  Mask:255.255.255.0
inet6 addr: fe80::811:d3ff:fe88:1eb5/64 Scope:Link
UP BROADCAST RUNNING MULTICAST  MTU:1500  Metric:1
RX packets:73386 errors:0 dropped:0 overruns:0 frame:0 TX packets:52722 errors:0 dropped:0 overruns:0 carrier:0 collisions:0 txqueuelen:1000
RX bytes:64535523 (61.5 MiB)  TX bytes:4975499 (4.7 MiB)
Interrupt:40

lo  Link encap:Local Loopback
inet addr:127.0.0.1  Mask:255.0.0.0 inet6 addr: ::1/128 Scope:Host
UP LOOPBACK RUNNING  MTU:65536  Metric:1
7.1.2 Test Wi-Fi as STA
Config /etc/wpa_supplicant.conf
#cat /etc/wpa_supplicant.conf
ctrl_interface=/var/run/wpa_supplicant ctrl_interface_group=0 update_config=1

network={
ssid=" shu fang @```  " psk="dl123456" disabled=1
}

network={
ssid="AAAAAA" scan_ssid=1 psk="12345678"
key_mgmt=WPA-PSK priority=2
}
#
#
# iwconfig wlan1
wlan1   unassociated  Nickname:"<WIFI@REALTEK>"
Mode:Managed  Frequency=2.412 GHz  Access Point: Not-Associated Sensitivity:0/0
Retry:off   RTS thr:off   Fragment thr:off Encryption key:off
Power Management:off
Link Quality:0  Signal level:0  Noise level:0
Rx invalid nwid:0  Rx invalid crypt:0  Rx invalid frag:0 Tx excessive retries:0  Invalid misc:0   Missed beacon:0
#
#wpa_supplicant   -B -d -i wlan1 -c /etc/wpa_supplicant.conf
#
#
#udhcpc -i wlan1
#
7.1.3 Test LTE
bg96_dial.sh is used for LTE dial.
# ifconfig eth0 down
#


AT+CPIN?
+CPIN: READY

OK AT+ CSQ
+CSQ: 31,99

OK
...
sent [IPCP ConfAck id=0x1]
rcvd [IPCP ConfNak id=0x3 <addr 172.28.36.150> <ms-dns1 221.131.143.69> <ms-dns2 112.4.0.55>] sent [IPCP ConfReq id=0x4 <addr 172.28.36.150> <ms-dns1 221.131.143.69> <ms- dns2 112.4.0.55>] rcvd [IPCP ConfAck id=0x4 <addr 172.28.36.150> <ms-dns1 221.131.143.69>
<ms-dns2 112.4.0.55>]
Could not determine remote IP address: defaulting to 10.64.64.64 local IP address 172.28.36.150

^Z[1]+            bg96_dial.sh
Stopped
#

lo      Link encap:Local Loopback inet addr:127.0.0.1
Mask:255.0.0.0 inet6 addr:
::1/128 Scope:Host
UP LOOPBACK RUNNING MTU:65536 Metric:1
RX packets:131 errors:0 dropped:0 overruns:0 frame:0 TX packets:131 errors:0 dropped:0 overruns:0 carrier:0 collisions:0 txqueuelen:1
RX bytes:12350 (12.0 KiB) TX bytes:12350 (12.0 KiB)

ppp0    Link encap:Point-to-Point Protocol
inet addr:172.28.36.150  P-t-P:10.64.64.64  Mask:255.255.255.255
UP POINTOPOINT RUNNING NOARP MULTICAST  MTU:1500
Metric:1
RX packets:6 errors:0 dropped:0 overruns:0 frame:0 TX packets:6 errors:0 dropped:0 overruns:0 carrier:0 collisions:0 txqueuelen:3
RX bytes:96 (96.0 B) TX bytes:114 (114.0 B)

wlan0  Link encap:Ethernet HWaddr 20:57:9E:8B:70:F5
inet addr:192.168.10.1 Bcast:0.0.0.0 Mask:255.255.255.0
inet6 addr: fe80::2257:9eff:fe8b:70f5/64 Scope:Link
UP BROADCAST RUNNING MULTICAST MTU:1500 Metric:1
RX packets:33387 errors:0 dropped:0 overruns:0 frame:0 TX packets:56331 errors:0 dropped:636 overruns:0 carrier:0 collisions:0 txqueuelen:1000
RX bytes:5077398 (4.8 MiB) TX bytes:78164665 (74.5 MiB)
#
You need to configure APN, username/password for BG96, in quectel-chat-connect and quectel-ppp file. Before you run the test.
# cat /etc/ppp/peers/quectel-chat-connect
ABORT "BUSY"
ABORT "NO CARRIER" ABORT "NO DIALTONE" ABORT "ERROR"
ABORT "NO ANSWER" TIMEOUT 5
"" AT OK ATE0
OK AT+CPIN? READY AT
OK AT+CSQ
OK AT+QCFG="nwscanmode" OK AT+QCFG="nwscanseq" OK AT+QCFG="iotopmode" OK AT+QCFG="band"
OK AT+CREG?
OK ATI;+CSUB;+CSQ;+CPIN?;+COPS?;+CGREG?;&D2
# Insert the APN provided by your network operator, default apn is 3gnet    <================ OK AT+CGDCONT=1,"IP","3gnet",,0,0
OK ATD*99# CONNECT
#
#
# cat /etc/ppp/peers/quectel-ppp
# /etc/ppp/peers/quectel-pppd
# Usage:root>pppd call quectel-pppd
#Modem path, like /dev/ttyUSB3,/dev/ttyACM0, depend on your module, default path is /dev/ttyUSB3
/dev/ttyUSB5 115200
#Insert the Username and Password for authentication, default User and Password are test user "test" password "test"    <==========================
# The chat script, customize your APN in this file
connect 'chat -s -v -f /etc/ppp/peers/quectel-chat-connect'
# The close script
disconnect 'chat -s -v -f /etc/ppp/peers/quectel-chat-disconnect'
# Hide password in debug messages hide-password
# The phone is not required to authenticate noauth
# Debug info from pppd debug
# If you want to use the HSDPA link as your gateway defaultroute
# pppd must not propose any IP address to the peer noipdefault
# No ppp compression novj
novjccomp noccp
ipcp-accept-local ipcp-accept-remote local
# For sanity, keep a lock on the serial line lock
modem dump nodetach
# Hardware flow control nocrtscts
remotename 3gppp ipparam 3gppp
ipcp-max-failure 30
# Ask the peer for up to 2 DNS server addresses usepeerdns
#
#
#Open GPS CMD:
pppcmd /dev/ttyUSBx "AT+QGPS=1"
#Read GPS data:
cat /dev/ttyUSBy(try: y=x-2 or y=x-1)
7.1.4 Test LED
# dsled
Usage: dsled [r|g|b] [on/off]
dsled [r|g|b] [blink_slow|blink_fast] dsled [r|g|b] breathe

#
# dsled r on
# dsled b blink_fast
For detailed I2C command, please refer to link-dsled.zip
7.1.5 Test I2C
# i2cdetect -y 0
0  1  2  3  4  5  6  7  8  9  a  b  c  d  e  f
00: -- -- -- -- -- -- -- -- -- -- -- -- --
10: -- -- -- -- -- -- -- -- -- -- -- -- -- -- -- --
20: -- -- -- 23 -- -- -- -- -- -- -- -- -- -- -- --
30: -- -- -- -- -- -- -- -- -- -- -- -- -- -- -- --
40: -- -- -- -- -- -- -- -- -- -- -- -- -- -- -- --
50: -- -- -- -- -- 55 -- -- -- -- -- -- -- -- -- --
60: -- -- -- -- -- -- -- -- -- -- 6a -- -- -- -- --
70: -- -- -- -- -- -- -- --
#
Actually LED controlled is I2C interface.
7.1.6 Test key
#include <unistd.h>
#include <stdio.h>
#include <linux/input.h>
#include <stdlib.h>
#include <sys/types.h>
#include <sys/stat.h>
#include <fcntl.h>
#include <pthread.h>
#define DEV_PATH "/dev/input/event1" //difference is possible
void * thread_func(void *arg) {
    long now = time(NULL);
    while (1) {
        if (time(NULL) - now > 8) {
            exit(-2);
        }
    }
}
int main() {
    int sys_reset_gpio_pin; char buf[2];
    int val;
    int ret;
    int pressed = 0; int release = 0; int counter = 0;

    sys_reset_gpio_pin = open("/sys/class/gpio/gpio55/value", O_RDONLY); if (sys_reset_gpio_pin < 0) {
        printf("can't open system reset pin GPIO file\n");
    }

    printf("wait for pressed ... \n");
    while(1){
        lseek(sys_reset_gpio_pin, 0, SEEK_SET);
        ret = read(sys_reset_gpio_pin, buf, 2);

        buf[1] = '\0';
        if (ret == 2) {
            val = buf[0]-'0';
            //TRACE(("Read system reset pin ret = %d, value = %x\n", ret, val));
            if (val == 0) {
                if(release == 1){
                    release = 0;
                    printf("pressed\n");
                }
                pressed = 1;
             } else if (val == 1) {
                release = 1;
                if(1 == pressed){
                    printf("release\n"); break;
                }
            }
        }
        usleep(100000); counter += 1;
        if(counter > 50)
        {
            return -1;
        }
    }
    close(sys_reset_gpio_pin); return 0;
}
7.2 How to make menuconfig in buildroot
Normal mode buildroot rootfs config file:
buildroot/configs/rockchip_rk3328_defconfig
Recovery mode buildroot rootfs config file:
buildroot/configs/rockchip_rk3328_recovery_defconfig
#cd buildroot
#make rockchip_rk3328_defconfig
#make menuconfig
#mv .config ./configs/rockchip_rk3328_defconfig <==== after config change, overwrite the old one
If you want to change buildroot configure, here are the steps:
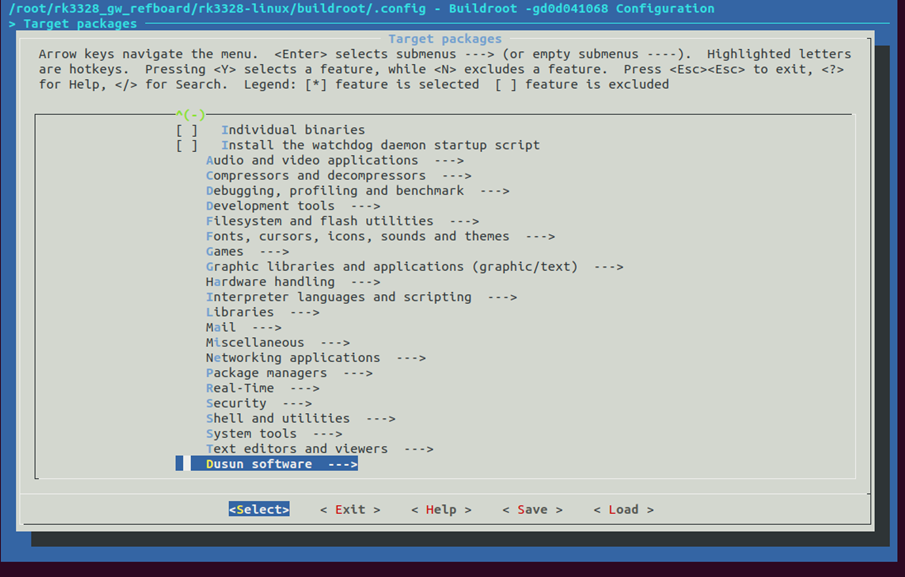
Figure3-1.buildroot make menuconfig
7.3 How to add an application in buildroot source tree
Make directory buildroot/dusun_package/<your_app>
Put APP source code files and Makefile to buildroot/dusun_package/< your_app >your_app.h your_app.c Makefile
Make directory buildroot/package/< your_app > Config.in your_app.mk
Add Config.in sourcing in buildroot/package/Config.in
menu "Dusun software"
source "package/dsled/Config.in"
+source "package/<your_app>/Config.in"
endmenu
Make menuconfig to select your APP, and save the configure file as 5.2. "./build.sh rootfs" to rebuild rootfs.
Please refer to buildroot/dusun_package/dsled/, it's a useful example.
7.4 Switch to ubuntu or debian system
If you have built a buildroot system image, and want to switch to ubuntu or debian image. You don't need to clean the make and do a clean rebuild. Just do the following steps:
- "./build.sh init" to select ubuntu or debian
- "./build.sh rootfs" to rebuild ubuntu or debian rootfs
- "./build.sh" to build a the final update.img
Be careful, the dusun tools and scripts are default copied to buildroot rootfs, not to ubuntu or debian rootfs.
If you want to copy them to ubuntu or debian rootfs, you can modify the
buildroot/dusun_rootfs/add_ds_rootfs.sh. For the APPs, you can copy the code to the board and build it on the target board ubuntu or debian system, since it has gcc and other toolchains.
7.5 Battery
- You can check the battery status of gateway in directory
ls /sys/class/power_supply/bq27546-0/

- Set to the startup program upon startup(5000mah)
echo "i2cset -f  -y 0 0x55 0x26 0x16a8 w" >> /etc/init.d/rcS
echo "i2cset -f  -y 0 0x55 0x00 0x0041 w" >> /etc/init.d/rcS
- Set to the startup program upon startup(6000mah)
echo "i2cset -f  -y 0 0x55 0x26 0x19a0 w" >> /etc/init.d/rcS
echo "i2cset -f  -y 0 0x55 0x00 0x0041 w" >> /etc/init.d/rcS
8 Wireless development (Zigbee, Z-Wave, BLE, LoRaWAN)
Please build a debian system to do the following steps. The code will be compiled on the board, not on host.
root@linaro-alip:~# apt-get update
root@linaro-alip:~# apt-get install libncurses5-dev root@linaro-alip:~# apt-get install libreadline-dev
root@linaro-alip:~# apt-get install libssl-dev root@linaro-alip:~# apt-get install libjson-c-dev
Prepare some library on the board
scp SDK "buildroot/dusun_rootfs/target_scripts/export_zigbee_zwave_ble_gpio.sh" from host to board, under /root
root@linaro-alip:~# ./export_zigbee_zwave_ble_gpio.sh
root@linaro-alip:~#
Power on wireless modules on board.
8.1 Zigbee
Zigbee interface is /dev/ttyUSB0.
Download "Z3GatewayHost_EFR32MG12P433F1024GM48.tar.gz" from Dusun FTP,
root@linaro-alip:~# tar xvzf Z3GatewayHost_EFR32MG12P433F1024GM48.tar.gz
root@linaro-alip:~# cd Z3GatewayHost_EFR32MG12P433F1024GM48
root@linaro-alip:~/Z3GatewayHost_EFR32MG12P433F1024GM48# make
<=============== wait for app build OK
root@linaro-alip:~/Z3GatewayHost_EFR32MG12P433F1024GM48# cd build/exe/ root@linaro-alip:~/Z3GatewayHost_EFR32MG12P433F1024GM48/build/exe# root@linaro-alip:~/Z3GatewayHost_EFR32MG12P433F1024GM48/build/exe# ls Z3GatewayHost_EFR32MG12P433F1024GM48  ota-files
root@linaro-alip:~/Z3GatewayHost_EFR32MG12P433F1024GM48/build/exe#./ Z3GatewayHost_EFR32MG12P433F1024GM48 -n1 -p
/dev/ttyUSB0 -b115200 Reset info: 11 (SOFTWARE)
ezsp ver 0x07 stack type 0x02 stack ver. [6.6.5 GA build 204]  Ezsp Config: set source route table size to 0x0064:Error: set: 0x35 Ezsp Config: set security level to 0x0005:Success: set
Ezsp Config: set address table size to 0x0002:Success: set
Ezsp Config: set TC addr cache to 0x0002:Success: set Ezsp Config: set stack profile to 0x0002:Success: set
Ezsp Config: set MAC indirect TX timeout to 0x1E00:Success: set Ezsp Config: set max hops to 0x001E:Success: set
...
Z3GatewayHost_EFR3
Then build Z3Gateway and run.
For more information about Z3Gateway, please visit https://docs.silabs.com/ for more information.
8.2 Z-Wave
Z-Wave interface is /dev/ttyS1.
Download " rk3328_zwave_test.tar.gz " from Dusun FTP, and copy it to board, under /root
root@linaro-alip:~# tar xvzf rk3328_zwave_test.tar.gz
root@linaro-alip:~# ls
Z3GatewayHost_EFR32MG12P433F1024GM48    export_zigbee_zwave_ble_gpio.sh Z3GatewayHost_EFR32MG12P433F1024GM48.tar.gz  rk3328_zwave_test.tar.gz zipgateway
root@linaro-alip:~#
Unzip it and you can get ./zipgateway
root@linaro-alip:~# cd zipgateway/zipgateway-7.13.01-Source/usr/local/src/serialapi
root@linaro-alip:~/zipgateway/zipgateway-7.13.01-Source/usr/local/src/serialapi# make clean
root@linaro-alip:~/zipgateway/zipgateway-7.13.01-Source/usr/local/src/serialapi# make
<============= wait for build OK, you get "my_serialapi_test" in ./serialapi

root@linaro-alip:~/# ./my_serialapi_test /dev/ttyS1 0   // set region: 0 is EU, 1 is US root@linaro-alip:~/# ./my_serialapi_test /dev/ttyS1
...
dump: <===
pwj: 10 01 15 5a 2d 57 61 76 65 20 37 2e 31 31 00 07
Vesion: Z-Wave 7.11 dump: ===>
pwj: 01 03 00 08 f4


dump: <== i
Get init data

dump: ===>
pwj: 01 03 00 02 fe


dump: <===
pwj: 25 01 02 08 08 1d 01 00 00 00 00 00 00 00 00 00
pwj: 00 00 00 00 00 00 00 00 00 00 00 00 00 00 00 00
pwj: 00 00 00 07 00


dump: nlist
pwj: 01 00 00 00 00 00 00 00 00 00 00 00 00 00 00 00
pwj: 00 00 00 00 00 00 00 00 00 00 00 00 00

Node [1] GW
Now build a zwave simple test tool and run:
In "my_serialapi_test", press 'a' to include zwave device, 'r' to exclude device, 'd' to reset to default, 'i' to get devices list and 'q' to quit.
The Zipgateway is siliabs software, "my_serialapi_test" is just a very simple tool. For more
information about Zipgateway, please visit https://docs.silabs.com/ for more information.
- Z-Wave region
If for default Dusun built, Z-Wave frequency can be configured in /etc/config/dusun/zwave/region Default is 0x00: EU
| 0x01 – US | 0x02 – ANZ | 0x03 – HK | 0x04 – Malaysia |
|---|---|---|---|
| 0x05 – India | 0x06 – Israel | 0x07 – Russia | 0x08 – China |
| 0x20 – Japan | 0x21 - Korea |
8.3 BLE
BLE interface is /dev/ttyUSB1.
Download "rk3328_ble_test.tar.gz" from Dusun FTP, and copy it to board, under /root
root@linaro-alip:~# tar xvzf rk3328_ble_test.tar.gz
root@linaro-alip:~# cd bletest/test/
root@linaro-alip:~/bletest/test#
Unzip it and you can get ./bletest build ble test tool and run:
More information about the BLE test tool, please visit https://docs.silabs.com/ for more information.
root@linaro-alip:~/bletest/test# make
<==========  wait for build OK, and you get ./build/test
root@linaro-alip:~/bletest/test# ./build/test /dev/ttyUSB1 115200 -C
8.4 LoRaWAN
Choose the correct interface for LoRaWAN, for example /dev/spidev32766.0.
The configuration file for it is in ./sx1302_hal/packet_forwarder/global_conf.json.
Download "sx1302_hal_0210.tar.gz" from Dusun FTP, and copy it to board, under /root.
root@linaro-alip:~# tar xvzf sx1302_hal_0210.tar.gz
root@linaro-alip:~# cd sx1302_hal/
Untar it and you can get ./sx1302_hal
build LoRaWAN sample code sx1302_hal and run:
More information about the LoRaWAN code, please visit https://www.semtech.com/products/wireless-rf/lora-core/sx1302 for more information.
root@linaro-alip:~/sx1302_hal# make all
<==========  wait for build OK, and you get ./packet_forwarder/
root@linaro-alip:~/sx1302_hal/packet_forwarder# ./lora_pkt_fwd
9 Image Upgrade
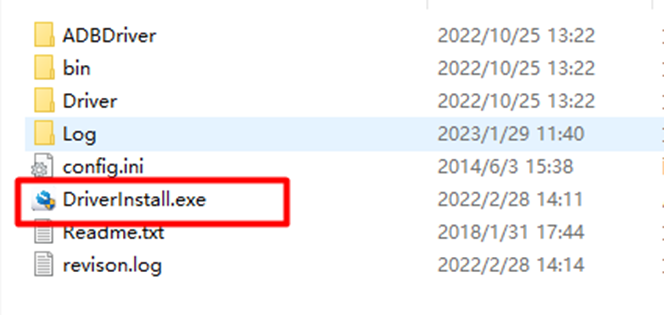
9.1 Upgrade Tool
Upgrade tool:AndroidTool_Release_v2.69
Upgrade driver:DriverAssitant_v4.91
use the upgrade tool, must first exe DriverInstall.exe in DriverAssitant_v4.91
9.2 Go into Upgrade Mode by ADB Switch
Connect the OTG port to the burning computer USB port, it's also act as POE power supply
click ADB switch in AndroidTool

9.3 Go into Upgrade Mode by Serial
Connect the OTG port to the burning computer USB port, it's also act as 5V power supply
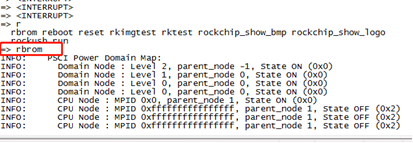
Press "Ctrl+C" when uboot is booting up, to enter uboot:
uboot "rbrom" comand to reboot the board into maskrom mode, for a complete "update.img" upgrade.
4."rockusb 0 mmc 0" command to reboot board to loader mode, for a partial firmware upgrade or a complete "update.img" upgrade.

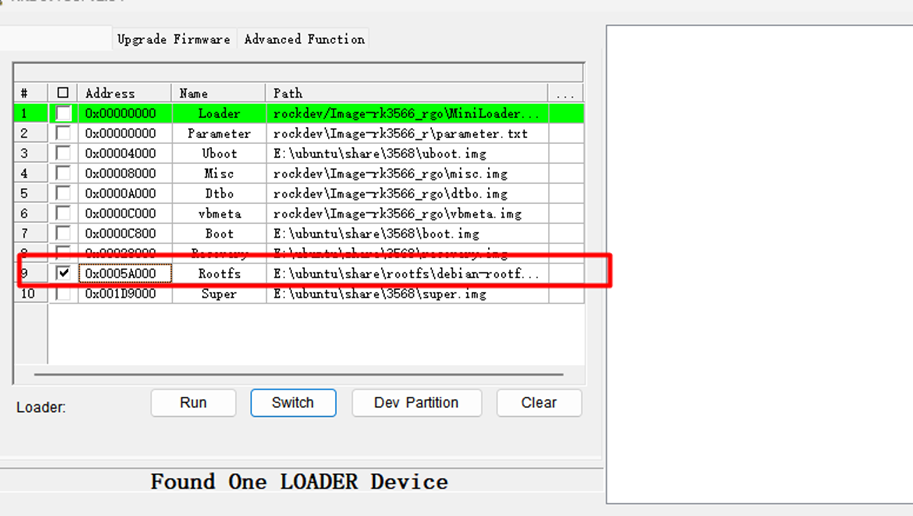
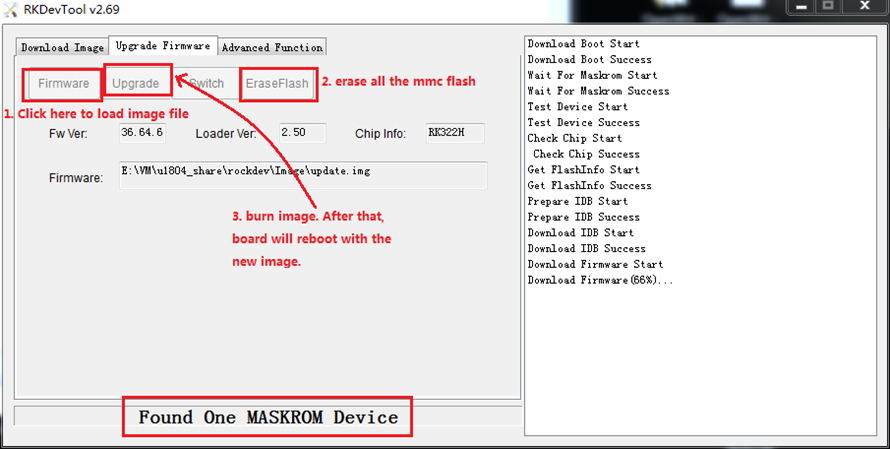
9.4 The Entire Package of Firmware "update.img" Upgrade
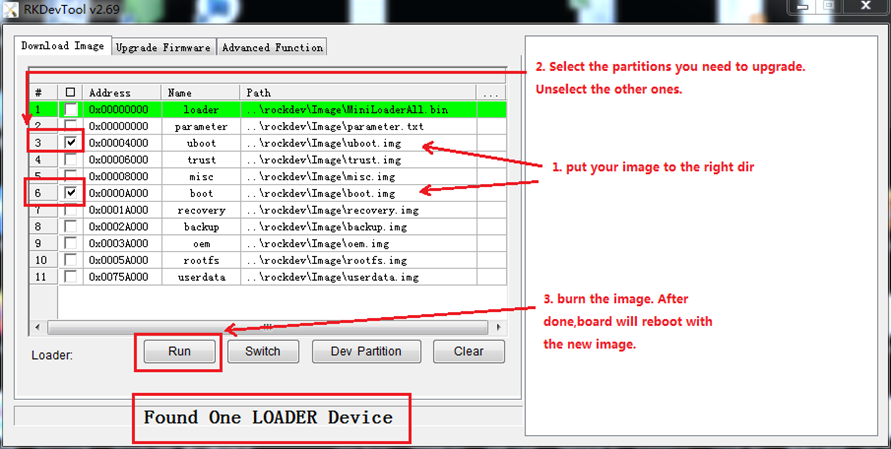
9.5 Upgrade the Firmware Separately
10 Power management configuration
The battery management chip Dusun used is BQ25895 Methods to optimize CPU power consumption is listed,
- Adjust cpufreq parameter.
/* the default frequency scaling strategy used is interactive, relative parameters are as follows: */

ls -l /sys/devices/system/cpu/cpu0/cpufreq/interactive

go_hispeed_load       /* when the loading is larger than go_hispeed_load and the frequency  is smaller than hispeed_freq,                             directly jump to hispeed_freq */

hispeed_freq           /* when jumping from low frequency to high frequency, need to jump  to hispedd_freq first */

above_hispeed_delay   /* when the frequency is larger than hispeed_freq, the time duration before each frequency increase */

min_sample_time       /* after each frequency increase, if it is to reduce the frequency next time  , the time duration before                         frequency reduce */

target_loads           /* the target loading of the frequency scaling */
timer_rate             /* the loading sampling time,unit:us */

timer_slack            /* the loading sampling time after cpu entering idle  */

boost                  /* when the frequency is smaller than hispeed_freq, keep boost to hispeed_freq */

boostpulse             /* when the frequency is smaller than hispeed_freq, boost to hispeed_freq, keep a while */

boostpulse_duration     /* time duration of boostpulse, unit:us */
io_is_busy             /* whether to compute io wait to cpu loading */

We mainly adjust three parameters: hispeed_freq,target_loads,timer_rate:
6 hispeed_freq: select an appropriate transition frequency, to make cpu stable
in the medium frequency, with the best power consumption, too large or toosmall will cause cpu jump to high frequency easily and increase the power consumption.
7 target_loads:easier to run with low frequency after this value is increased,
both the power consumption and the performance will be reduced.
8 timer_rate: easier to run with low frequency after this value is increased, both the power consumption and the performance will be reduced.
Close some cpu, limit the highest frequency of cpu
/* close cpu2,cpu3 */
echo 0 > /sys/devices/system/cpu/cpu2/online echo 0 > /sys/devices/system/cpu/cpu3/online

/* List all the available frequency */
cat /sys/devices/system/cpu/cpu0/cpufreq/scaling_available_frequencies output: 408000 600000 816000 1008000 1200000 1296000

/* set the max frequency of cpu0 to 1200MHz */
echo 1200000 > /sys/devices/system/cpu/cpu0/cpufreq/scaling_max_freq
SoC with ARM Big-Little architecture can bind the tasks with high loading to little cores through CPUSET since the energy efficiency of the little core is better.
/* create group of litte core*/
mkdir /dev/cpuset/little
/* set cpu used by group of little core */
echo 0-3 > /dev/cpuset/little/cpus
/* add pid=1111 task into the group of little core */
echo 1111 > /dev/cpuset/little/tasks
/* Android system creates several groups by default, the framework layer puts the tasks into differenct groups, you can adjust cpus of each group, analyze the power consumption */
ls /dev/cpuset
background
foreground
system-background
top-app
- Limit the cpu bandwidth of the tasks with high loading through CPUCTL (need to enable the macro CONFIG_CFS_BANDWIDTH).
/* create the group of bandwidth limitation */
mkdir /dev/cpuctl/mygroup
/* set the cycle of bandwidth limitation as 10ms */
echo 10000 > /dev/cpuctl/mygroup/cpu.cfs_quota_us
/* within each cycle, total running time of the tasks in the group cannot exceed 5ms, this value can be larger than cfs_quota_us, because it is the total running time of multiple cpus */
echo 5000 > /dev/cpuctl/mygroup/cpu.cfs_period_us
/* add relative tasks into the group */
echo 1111 > /dev/cpuctl/mygroup/tasks
echo 1112 > /dev/cpuctl/mygroup/tasks
/* cpu.shares means to limit the bandwidth of the task through weight, used for performance optimization, without affecting the power consumption */
/dev/cpuctl/mygroup/cpu.shares
11. Read firmware image from gateway
Steps for read firmware image from the gateway by Serial is shared below
1. Restart to recovery mode exec “bootm2recovery.sh” Then power reset
2. Killall dsupdateimg
3. mount /dev/mmcblk1p8 /f
4. dd if=/dev/mmcblk1p7 of=/f/rootfs.img bs=10M
5. Restart to normal Debian mode again, copy /f/rootfs.img to the server and save.
Then You have the file system you need.
When burning rootfs, specify to separately burn the previously created rootfs, so that there is no need to update the software