Quick Start Guide
1. Introduction
This Quick Start Guide explains the basics:
- how to connect and set up your target on the network;
- how to install the SDK;
- how to build the firmware images.
The Linux Software Developer’s Kit (SDK) is an embedded hardware and software suite that enables Linux developers to create applications on Dusun’s DSGW-290 gateway.
Base on the 4.19.232 Linux kernel, and leveraging existing open source software, the SDK simplifies the process of adding custom applications. Device drivers, GNU toolchain, Pre-defined configuration profiles, and sample applications are all in included.
2. Gateway Information
2.1 Basic information
SOC: RK3568
Quad-core ARM Cortex-A53
Mali-450MP2 GPU
Power Supply: DC-12V
LTE module: EG95 (LET CAT-4)
Wi-Fi module: 6221A (Wi-Fi chip: RTL8821CS)
Zigbee: EFR32MG1B232F256GM32
Z-wave: ZGM130S037HGN
Bluetooth: EFR32BG21A020F768IM32
Lora:SX1302
SUB-G:EFR32FG23A020F256IM32-C
eMMC: 64GB
SDRAM: 8GB
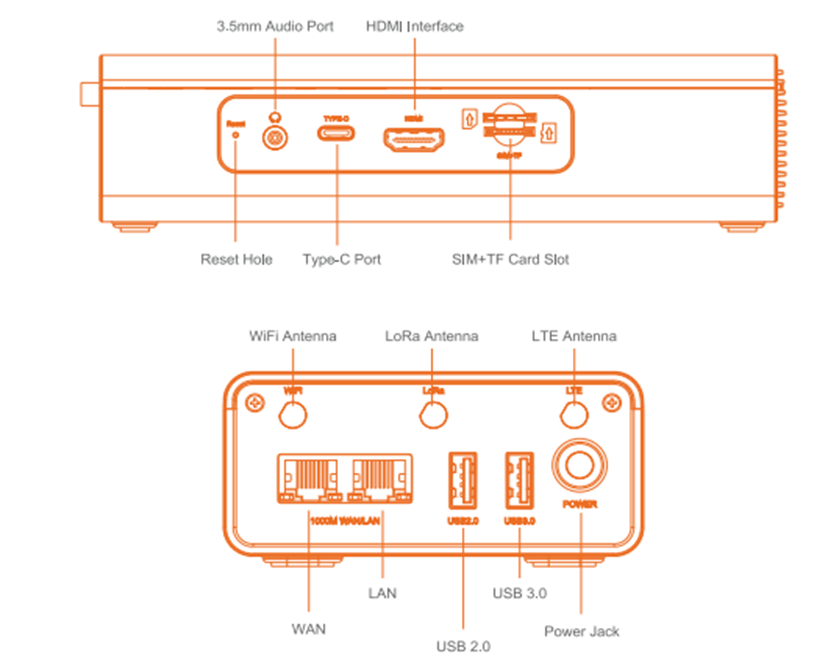
2.2 Interface
3. Target Setup
This section describes how to connect the gateway into your host computer and network.
Connecting a gateway - Power
- Make sure that the power adapter is 12V/3A.
- Select the appropriate power plug adaptor for your geographical location. Insert it into the slot on the Universal Power Supply; then plug the power supply into an outlet.
- Connect the output plug of the power supply to the gateway
Connecting a gateway – Network interface
- Connect one end of the network cable to the network port on the laptop or desktop
- Connect the other end of network cable to the network port on the gateway.
- SSH login gateway ip address,username is root passwd is root.
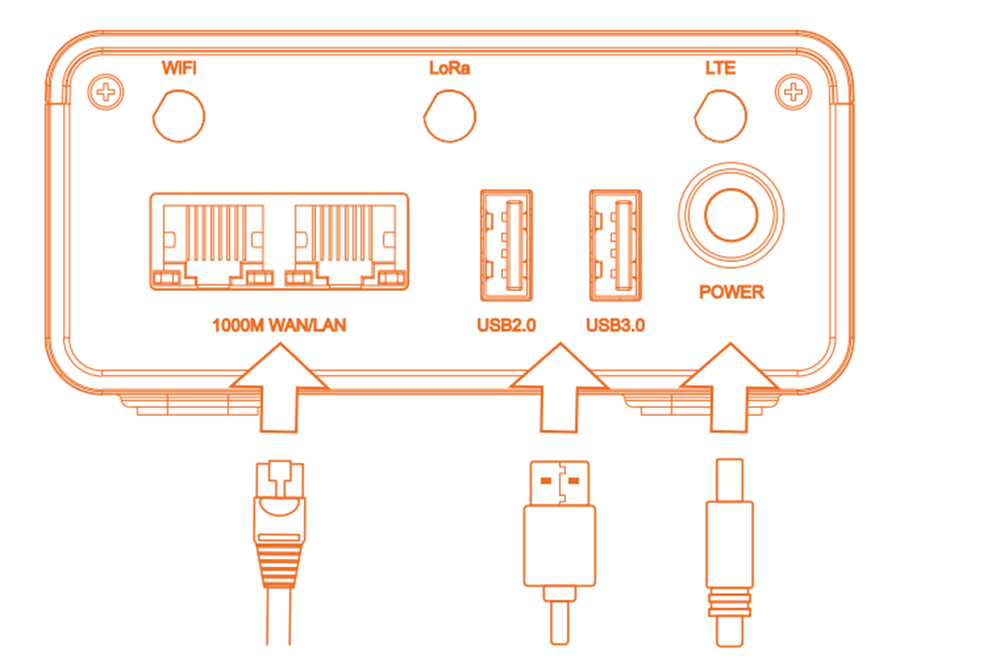
Figure3-1. Connecting a gateway via network port
4. Compile the Environment to Build
Please use ubuntu 18.04 .iso image to setup your build environment. You can use a virtual machine or a physical PC to install ubuntu 18.04.
4.1 Virtual Machine
It is recommended that novice users use virtual machines, install ubuntu 18.04 to the virtual machine, and leave enough disk space (at least 100G) for the virtual machine.
4.2 Ubuntu PC Compile the Environment to Build
The use of physical machine compilation users can use a ubuntu PC.
5. SDK Acquisition a**nd Preparation**
5.1 Download the source code from the Dusun FTP
The source package name will be rk356x_linux-*.tar.gz, get it from Dusun FTP.
5.2 Code Compression Package Check
The next step can be taken only after generating the MD5 value of the source compression package and comparing the MD5 value of the MD5 .txt text to confirm that the MD5 value is the same, and if the MD5 value is not the same, the energy code pack is damaged, please download it again.
$ md5sum rk356x_linux-*.tar.gz
5.3 The Source Compression Package is Unzipped
Copy the source code to the corresponding directory and unzip the source code compression package.
 $ sudo -i
 $ mkdir workdir
 $ cd workdir
 $ tar -zxvf /*path*/*to*/rk356x_linux-*.tar.gz
 $ cd rk356x_linux_release_20211019
6. Code Compilation
6.1 Getting started, global Compilation
6.1.1 Prepare the Root File System base
This section is for building ubuntu or debian file system. If you want to build the buildroot file system, skip this section.
Compile Ubuntu
Download the root file system compression package ubuntu.tar.gz
The Root file system compresses the package directory:
Unzip the compression package
$ tar -zxvf ubuntu.tar.gz // you get ubuntu.img
Copy the root file system to the specified path
$ cd workdir/rk356x_linux_release_20211019
$ mkdir ubuntu_rootfs
$ cp /*path*/*to*/ubuntu.img ./ubuntu_rootfs/
Change the bulidconfig
$ cd workdir/rk356x_linux_release_20211019
$ vi device/rockchip/rk356x/firefly-rk3568-ubuntu.mk
  export RK_ROOTFS_IMG=ubuntu_rootfs/ubuntu.img
Compile Debian
Download the root file system compression package debian.tar.gz
Unzip the compression package
$ tar -zxvf debian.tar.gz // you get linaro-rootfs.img
Copy the root file system to the specified path
$ cd workdir/rk356x_linux_release_20211019
$ mkdir debian
$ cp ./linaro-rootfs.img ./debian/
Change the bulidconfig
$ cd workdir/rk356x_linux_release_20211019
$ vi device/rockchip/rk356x/firefly-rk3568-ubuntu.mk
    export RK_ROOTFS_IMG=ubuntu_rootfs/linaro-rootfs.img
6.1.2 Start Compiling
Build a complete directory of firmware files: rockdev/pack/AIO-3568J_Rk356x.img and other separate images, AIO-3568J_Rk356x.img includes all firmware for full upgrade.
$ ./build.sh
The build will take a long time, please wait patiently.
After AIO-3568J_Rk356x*.img is built, burn it to the board according to chapter 7.
6.1.3 Run The Image on the board
Connect the RK3568 board serial port to the PC via a USB to UART Bridge.
Use Putty or other Terminal software as your console tool,
SERIAL CONSOLE SETTINGS:
- 115200/8N1
- Baud: 115200
- Data Bits: 8
- Parity Bit: No
- Stop Bit: 1
Power UP the board, you can see the boot log on console:
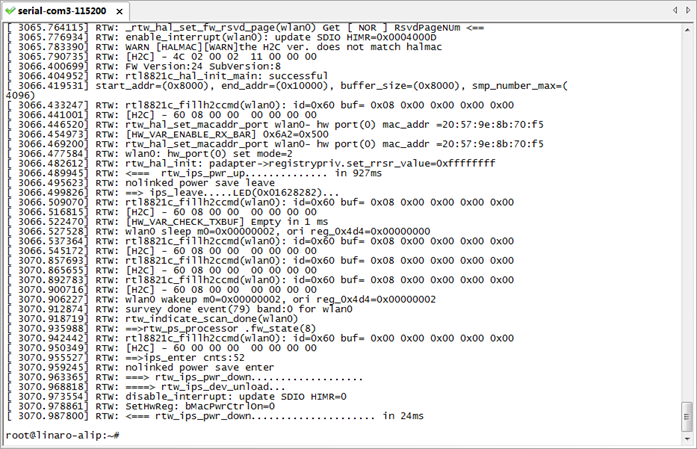
There is no default password for system login.
6.2 Compiled Each Image Part Separately
6.2.1 The build system and the image structure
The AIO-3568J_Rk356x*.img is composed of several parts. Main parts are uboot.img, boot.img, recovery.img, rootfs.img.
uboot.img contains bootloader uboot
boot.img contains the device tree .dtb image, Linux kernel image
recovery.img: The system can boot up to recovery mode, recovery.img is the rootfs used in recovery mode.
rootfs.img: The normal rootfs image. In normal mode, system boot and mount this rootfs image.
You may need to build the images separately, especially when you focus on single module (e.g. uboot or kernel driver) development. Then you can build only that part of image and update that partition in flash.
6.2.2 Build Uboot only
$ ./build.sh uboot
6.2.3 Build Linux Kernel Only
$ ./build.sh kernel
6.2.4 Build Recovery File System Only
$ ./build.sh recovery
6.2.5 Build File System Only
$ ./build.sh rootfs
6.2.6 Final Image Packaging
$ ./build.sh updateimg
This command making rockdev/*.img scatter firmware packaging builds in the directory update.img
7. Wireless development (Zigbee, Z-Wave, BLE, LoRaWAN, WIFI,Thread,SUB-G,LTE)
Please build a debian system to do the following steps. The code will be compiled on the board, not on host.
root@dusun:~# apt-get update
root@dusun:~# apt-get install libncurses5-dev
root@dusun:~# apt-get install     libncurses5
root@dusun:~# apt-get install libreadline-dev
root@dusun:~# apt-get install libssl-dev
root@dusun:~# apt-get install libjson-c-dev
root@dusun:~# apt-get install lua5.1
root@dusun:~# apt-get install liblua5.1-0-dev
root@dusun:~# apt-get install libjson-c-dev
root@dusun:~# apt-get install     libssl-dev
root@dusun:~# apt-get install     minicom
root@dusun:~# apt-get install     microcom
7.1 Zigbee
Zigbee interface is /dev/ttyS3.
Exec command: AmberGwZ3 -n1 -p /dev/ttyS3 -b115200 -d
root@dusun:~# export_zigbee_zwave_ble_gpio.sh
root@dusun:~# ubusd &
root@dusun:~# AmberGwZ3 -n1 -p /dev/ttyS3 -b115200 -d
2023-02-16T07:39:40.580 [DBG] AMBER:  WorkDir: /etc/config/dusun/amber
2023-02-16T07:39:40.582 [DBG] AMBER:  use old db : /etc/config/dusun/amber/devices.db
2023-02-16T07:39:40.583 [DBG] AMBER:  read head from /etc/config/dusun/amber/devices.db
2023-02-16T07:39:40.583 [DBG] AMBER:  ecnt : 5
2023-02-16T07:39:40.583 [DBG] AMBER:  tag: W, maxnum: 64, num: 0, size : 12, map:
2023-02-16T07:39:40.583 [DBG] AMBER:
2023-02-16T07:39:40.583 [DBG] AMBER:  tag: D, maxnum: 64, num: 0, size : 144, map:
2023-02-16T07:39:40.583 [DBG] AMBER:
2023-02-16T07:39:40.583 [DBG] AMBER:  tag: E, maxnum: 512, num: 0, size : 56, map:
2023-02-16T07:39:40.583 [DBG] AMBER:
2023-02-16T07:39:40.583 [DBG] AMBER:  tag: C, maxnum: 5120, num: 0, size : 32, map:
2023-02-16T07:39:40.583 [DBG] AMBER:
2023-02-16T07:39:40.583 [DBG] AMBER:  tag: A, maxnum: 40960, num: 0, size : 64, map:
2023-02-16T07:39:40.583 [DBG] AMBER:
2023-02-16T07:39:40.583 [DBG] AMBER:  [ds_load_alldevices] loading devices ...
2023-02-16T07:39:40.583 [DBG] AMBER:  [ds_load_alldevices] load over!
2023-02-16T07:39:40.583 [DBG] AMBER:  [ds_load_wlist] loading wlist ...
2023-02-16T07:39:40.583 [DBG] AMBER:  [ds_load_wlist] load over!
2023-02-16T07:39:40.584 [INF] AMBER:  load keypad db ok
2023-02-16T07:39:40.584 [INF] AMBER:  load siren ok
2023-02-16T07:39:40.585 [INF] AMBER:  load repeater db ok
2023-02-16T07:39:40.598 [DBG] AMBER:  oq_cnt:0, oq_head:0, oq_tail:0
2023-02-16T07:39:40.609 [DBG] AMBER:  no tz, timezone: 0
2023-02-16T07:39:40.609 [DBG] AMBER:  no winsum, winsum: 0
2023-02-16T07:39:40.618 [DBG] AMBER:  Load GreenPower Data...
2023-02-16T07:39:40.619 [DBG] AMBER:  workdir:/etc/config/dusun/amber, file:gp.db
2023-02-16T07:39:40.619 [DBG] AMBER:  cnt : 40
2023-02-16T07:39:40.619 [DBG] AMBER:  Or
2023-02-16T07:39:40.619 [DBG] AMBER:  Success Load GreenPower Data!
2023-02-16T07:39:40.619 [DBG] AMBER:  Load Greenpower Over!
Reset info: 11 (SOFTWARE)
ezsp ver 0x08 stack type 0x02 stack ver. [6.7.8 GA build 373]
Ezsp Config: set security level to 0x0005:Success: set
Ezsp Config: set address table size to 0x0002:Success: set
Ezsp Config: set TC addr cache to 0x0002:Success: set
Ezsp Config: set stack profile to 0x0002:Success: set
Ezsp Config: set MAC indirect TX timeout to 0x1E00:Success: set
Ezsp Config: set max hops to 0x001E:Success: set
Ezsp Config: set tx power mode to 0x8000:Success: set
Ezsp Config: set supported networks to 0x0001:Success: set
Ezsp Value : set end device keep alive support mode to 0x00000003:Success: set
Ezsp Policy: set binding modify to "allow for valid endpoints & clusters only":Success: set
Ezsp Policy: set message content in msgSent to "return":Success: set
Ezsp Value : set maximum incoming transfer size to 0x00000052:Success: set
Ezsp Value : set maximum outgoing transfer size to 0x00000052:Success: set
Ezsp Config: set binding table size to 0x0010:Success: set
Ezsp Config: set key table size to 0x0004:Success: set
Ezsp Config: set max end device children to 0x0020:Success: set
Ezsp Config: set aps unicast message count to 0x000A:Success: set
Ezsp Config: set broadcast table size to 0x000F:Success: set
Ezsp Config: set neighbor table size to 0x0010:Success: set
NCP supports maxing out packet buffers
Ezsp Config: set packet buffers to 83
Ezsp Config: set end device poll timeout to 0x0008:Success: set
Ezsp Config: set zll group addresses to 0x0000:Success: set
7.2 Z-Wave
Z-Wave interface is /dev/ttyS4 .
root@dusun:~# export_zigbee_zwave_ble_gpio.sh
root@dusun:~# ubusd &
root@dusun:~# zwdevd -b115200 -d/dev/ttyS4
Vesion: Z-Wave 7.18
region: 00
rf lvl:20
normal:99, measure:99
region_file:00, region:00
holding the region:00
2023-02-16T07:46:59.471 [INF] zwdevd::                            run_loop()  ubus init ok!
2023-02-16T07:46:59.471 [INF] zwdevd::                            run_loop()  cmd init ok!
2023-02-16T07:46:59.473 [WRN] zwdevd::                device_storage_check()  not exsit zdfile
2023-02-16T07:46:59.474 [INF] zwdevd::                         device_init()  create device storage file:/etc/config/dusun/zwdev/zwdevx.db...
Starting MinOZW with OpenZWave Version 1.4.164
2023-02-16 07:46:59.477 Error, Cannot find a path to the configuration files at ../../../config/, Using /etc/openzwave/ instead...
2023-02-16 07:46:59.478 Info, Reading /etc/openzwave/options.xml for Options
2023-02-16 07:46:59.479 Warning, Failed to Parse options.xml: Failed to open file
2023-02-16 07:46:59.481 Always, OpenZwave Version 1.4.164 Starting Up
2023-02-16 07:46:59.483 Info, Setting Up Provided Network Key for Secure Communications
2023-02-16 07:46:59.484 Warning, Failed - Network Key Not Set
2023-02-16 07:46:59.485 Info, mgr,     Added driver for controller /dev/ttyS4
2023-02-16 07:46:59.486 Info,   Opening controller /dev/ttyS4
2023-02-16 07:46:59.486 Info, Trying to open serial port /dev/ttyS4 (attempt 1)
2023-02-16 07:46:59.489 Info, Serial port /dev/ttyS4 opened (attempt 1)
2023-02-16 07:46:59.491 Detail, contrlr, Queuing (Command) FUNC_ID_ZW_GET_VERSION: 0x01, 0x03, 0x00, 0x15, 0xe9
2023-02-16 07:46:59.491 Detail, contrlr, Queuing (Command) FUNC_ID_ZW_MEMORY_GET_ID: 0x01, 0x03, 0x00, 0x20, 0xdc
2023-02-16 07:46:59.491 Detail, contrlr, Queuing (Command) FUNC_ID_ZW_GET_CONTROLLER_CAPABILITIES: 0x01, 0x03, 0x00, 0x05, 0xf9
2023-02-16 07:46:59.491 Detail, contrlr, Queuing (Command) FUNC_ID_SERIAL_API_GET_CAPABILITIES: 0x01, 0x03, 0x00, 0x07, 0xfb
2023-02-16 07:46:59.492 Detail, contrlr, Queuing (Command) FUNC_ID_ZW_GET_SUC_NODE_ID: 0x01, 0x03, 0x00, 0x56, 0xaa
2023-02-16 07:46:59.492 Detail,
2023-02-16 07:46:59.492 Info, contrlr, Sending (Command) message (Callback ID=0x00, Expected Reply=0x15) - FUNC_ID_ZW_GET_VERSION: 0x01, 0x03, 0x00, 0x15, 0xe9
2023-02-16T07:46:59.493 [INF] zwdevd::                            web_init()  http server start at : 0.0.0.0:9999
2023-02-16T07:46:59.493 [DBG] zwdevd::            uproto_start_auto_report()
2023-02-16 07:46:59.497 Detail, contrlr,   Received: 0x01, 0x10, 0x01, 0x15, 0x5a, 0x2d, 0x57, 0x61, 0x76, 0x65, 0x20, 0x37, 0x2e, 0x31, 0x38, 0x00, 0x07, 0x9e
[01] [10] [01] [15] [5A] [2D] [57] [61] [76] [65] [20] [37] [2E] [31] [38] [00] [07] [9E]
_data[0]:01, _data[1]&02X
2023-02-16 07:46:59.497 Detail,
2023-02-16 07:46:59.497 Info, contrlr, Received reply to FUNC_ID_ZW_GET_VERSION:
2023-02-16 07:46:59.498 Info, contrlr,     Bridge Controller library, version Z-Wave 7.18
Exec command: zwdevd -b115200 -d/dev/ttyS4
Z-Wave region
If for default Dusun built, Z-Wave frequency can be configured in
vi /etc/config/dusun/zwdev/region
Default is 0x00: EU
0x01 – US 0x02 – ANZ 0x03 – HK 0x04 – Malaysia
0x05 – India 0x06 – Israel 0x07 – Russia 0x08 – China
0x20 – Japan 0x21 - Korea
7.3 BLE
BLE interface is /dev/ttyS7.
Exec command: bul -d /dev/ttyS7 -b115200
root@dusun:~# export_zigbee_zwave_ble_gpio.sh
root@dusun:~# ubusd &
root@dusun:~# bul -d /dev/ttyS7 -b115200
2023-02-16T07:57:56.246 [INF] bul::                            run_loop()  run_loop.
2023-02-16T07:57:56.248 [INF] bul::                      monitor_thread()  monitor_thread
uci: Entry not found
uci: Entry not found
uci: Entry not found
uci: Entry not found
2023-02-16T07:57:56.321 [INF] bul::                     ble_config_load()  mac:, data_type:1, rssi:-101, interval:60, mode:5, modelstr:, name:
2023-02-16T07:57:56.321 [INF] bul::                     ble_config_load()  raw:
uci: Entry not found
2023-02-16T07:57:56.330 [INF] bul::                     ble_config_load()  realtime:0
2023-02-16T07:57:56.330 [DBG] bul::            uproto_start_auto_report()
2023-02-16T07:57:56.333 [INF] bul::                            run_loop()  ubus init ok!
2023-02-16T07:57:56.333 [DBG] bul::                      whitelist_load()  28672 - 28672
2023-02-16T07:57:56.334 [INF] bul::                            run_loop()  whitelist load ok!
2023-02-16T07:57:56.334 [INF] bul::                      whitelist_view()   support 256 whitelist device
2023-02-16T07:57:56.334 [INF] bul::              whitelist_load_unichar()  unichar:[] 1
2023-02-16T07:57:56.350 [INF] bul::                         gk_io_reset()
2023-02-16T07:57:56.350 [WRN] bul::                         gk_io_reset()  reset command not receive result, try io control
2023-02-16T07:57:56.358 [INF] bul::                              lambda()  Init Dev:/dev/ttyS7, Buad:115200
2023-02-16T07:57:56.512 [DBG] bul::__sl_bt_host_handle_command_noresponse()  ==[sl_bt_system_reset]==, 5
7.4 LoRaWAN
Choose the correct interface for LoRaWAN, for example /dev/spidev1.0.
The configuration file for it is in /root/sx1302_hal/packet_forwarder/global_conf.json.
root@dusun:~#/root/packet_forwarder/lora_pkt_fwd -c /root/packet_forwarder/global_conf.json
7.5 Thread
Note:
1、Please build a debian system to do the following steps. The code will be compiled on the board, not on host.
2、The thread here is based on the OpenThread .
7.5.1 What you need to prepare
If you want to run with thread-network correctly, the following steps should be care:
1) a thread module on the board which has been flashed the OT-RCP firmware; 2) build OTBR and its operating environment;
7.5.2 Build OT-RCP
The OT-RCP is a application running on the thread module, which may contain bootloader.
How to build OT-RCP based on the module brand and model you choose, please refer to their documents.
Burning the OT-RCP and ensure that it can run normally.
7.5.3 Build OTBR
Install dependence:
#apt update  && apt upgrade && apt install lsb-release
#apt install git python python3 cmake
#apt install bluez bluez-hcidump iptables ipset avahi-daemon libavahi-client-dev libavahi-client3 libnss-mdns
Install mDNSResponder:
#wget -4 --no-check-certificate https://opensource.apple.com/tarballs/mDNSResponder/mDNSResponder-1310.80.1.tar.gz
#tar xvf mDNSResponder-1310.80.1.tar.gz -C /tmp
# cd /tmp/mDNSResponder-1310.80.1/Clients
# sed -i '/#include <ctype.h>/a #include <stdarg.h>' dns-sd.c
# sed -i '/#include <ctype.h>/a #include <sys/param.h>' dns-sd.c
# cd /tmp/mDNSResponder-1310.80.1/mDNSPosix
# make os=linux
#sudo make install os=linux
#cp mdnsd.sh /etc/init.d/mdns
#chmod ugo+x /etc/init.d/mdns
#ln -s -f /etc/init.d/mdns /etc/rc2.d/S52mdns
#ln -s -f /etc/init.d/mdns /etc/rc3.d/S52mdns
#ln -s -f /etc/init.d/mdns /etc/rc4.d/S52mdns
#ln -s -f /etc/init.d/mdns /etc/rc5.d/S52mdns
#ln -s -f /etc/init.d/mdns /etc/rc0.d/K16mdns
#ln -s -f /etc/init.d/mdns /etc/rc6.d/K16mdns
#cp build/prod/mdnsd /usr/sbin/mdnsd
#cp ../Clients/build/dns-sd /usr/bin/dns-sd
Clone source code :
#cd you_thread_path/ot-br-posix
#git init
#git clone https://github.com/openthread/ot-br-posix
If need support web:
#cd you_thread_pathot-br-posix
#WEB_GUI=1 ./script/bootstrap
Build (INFRA_IF_NAME is based on your Ethernet network on your system, it may be eth1 or other; and if you are using wifi-network, INFRA_IF_NAME may be wlan0 or other; set WEB_GUI value to 1 if you need web, or 0):
#INFRA_IF_NAME=eth0 WEB_GUI=1 ./script/setup
Building success:
You will find Executable program:
otbr-agent : you_thread_path/ot-br-posix/build/otbr/src/agent/
otbr-web(If you have enabled web): you_thread_path/ot-br-posix/build/otbr/src/web/
ot-ctl: you_thread_path/ot-br-posix/build/otbr/third_party/openthread/repo/src/posix/
7.5.4 Configure otbr
The default path of configure file :
/etc/default/otbr-agent
The content is like:
OTBR_AGENT_OPTS="-I wpan0 -B eth0 spinel+hdlc+uart:///dev/ttyACM0 trel://OTBR_INFRA_IF_NAME"
OTBR_NO_AUTO_ATTACH=0
The eth0 is same to before.
The /dev/ttyACM0 is the device name of your thread module which has burned OT-RCP firmware. So you have to change to the device name of your own equipment.
Note: After modifying, reboot your gateway !!!
The otbr-agent will connect OT-RCP automatically after rebooting.
7.5.5 Start/Stop/Status otbr
#sudo systemctl start otbr-agent.service
#sudo systemctl status otbr-agent.service
#sudo systemctl stop otbr-agent.service
7.5.6 Log
# tail -f /var/log/syslog | grep otbr
7.5.7 Debug thread-network with ot-ctl
#sudo ot-ctl
>
>state
leader
Done
>help
......
Other command about ot-ctl, you can input help to learn.
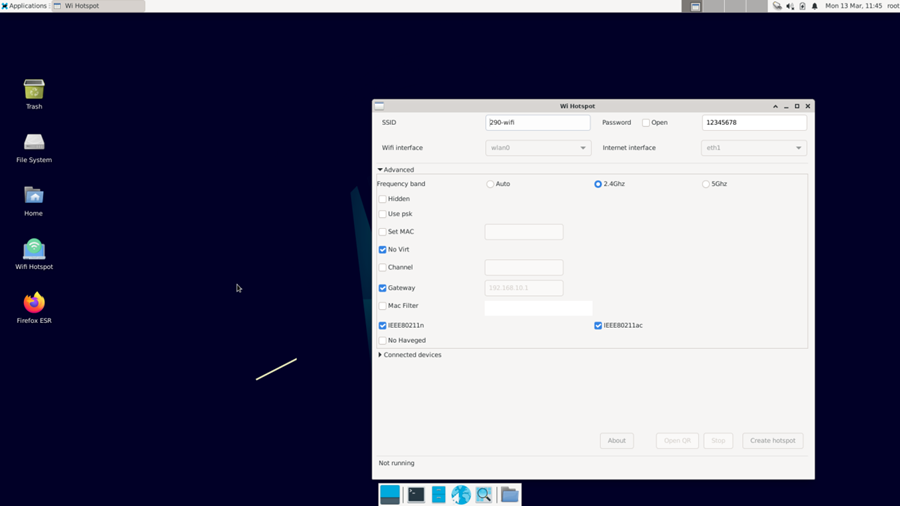
7.6 WIFI
WIFI is used by desktop system. wifi supports sta and ap modes.
Ap used by wifi hotspot
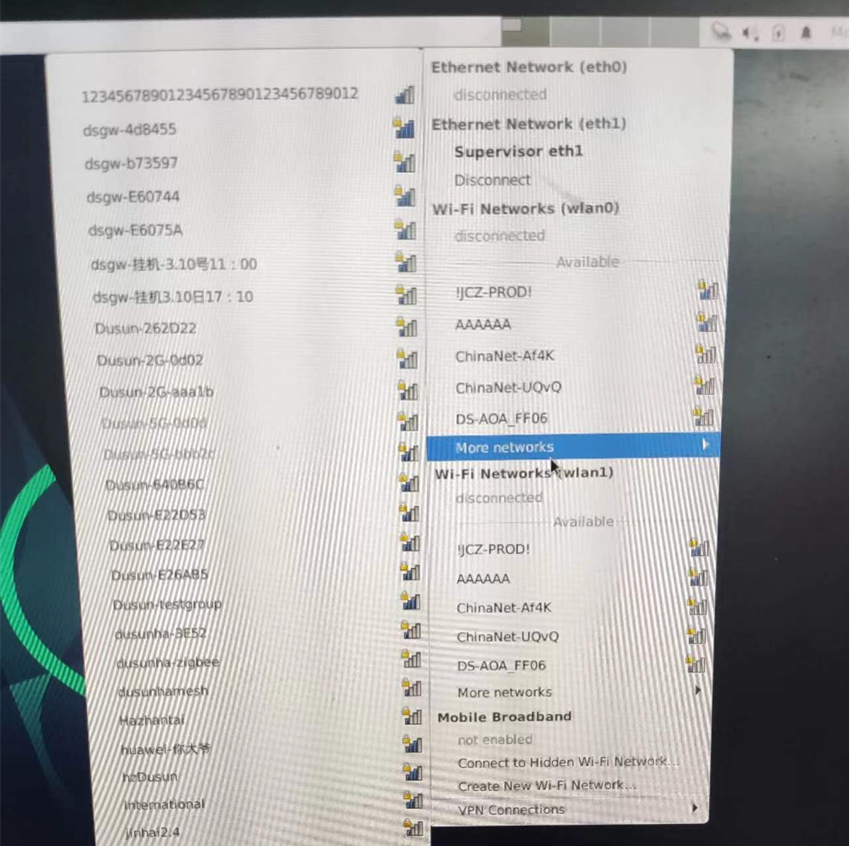
STA modes
7.7 SUB-G
SUB-G interface is /dev/ttyS9.
Exec command: microcom -s 115200 -p /dev/ttyS9
#microcom -s 115200 -p /dev/ttyS9
Type the escape character to get to the prompt.
> help
_________________________________
____Application_Configuration____
setEventConfig      Control RAIL events.
                    [uint32] eventsMask<31:0>
                    [uint32] eventsValues<31:0>
                    [uint32opt] eventsMask<63:32>
                    [uint32opt] eventsValues<63:32>
resetCounters       Resets the TX and RX counters.
setPeripheralEnable Control LEDs and LCD peripherals.
                    [uint8] [0=Disable] 1=Enable
setNotifications    Control asynchronous status prints (rxPacket,txEnd,txError).
                    [uint8] 0=Disable [1=Enable]
getLogLevels        Show whether notifications or peripherals are enabled.
getVersion          Get version information.
getVersionVerbose   Get verbose version information.
setPtiProtocol      Set PTI protocol for Network Analyzer.
                    [uint8] 0=Custom 2=Thread 3=BLE 4=Connect 5=Zigbee 6=Z-Wave
getPti              Get PTI configuration.
setPrintingEnable   Control all printing in RAILtest, except CLI.
                    [uint8] 0=Disable [1=Enable]
7.8 LTE
LTE used by ModemManager.
Print general mmcli help message: mmcli --help
ModemManager normally listen, probes and detects cellular devices automatically when operating correctly but a forced scan can be triggered with command: mmcli --scan-modems << successfully requested to scan devices
To list detected cellular devices use command: mmcli --list-modems << /org/freedesktop/ModemManager1/Modem/0 [Sierra Wireless, Incorporated] MC7455
Here ModemManager have detected a Sierra Wireless cellular device and it has here been given the the identifier number 0 by ModemManager.
To acquire more device information and status use the --modem command and identifier value. mmcli --modem=0
root@firefly:~# mmcli --scan-modems
successfully requested to scan devices
root@firefly:~# mmcli --list-modems
     /org/freedesktop/ModemManager1/Modem/0 [Quectel] EG95
root@firefly:~# mmcli --modem=0
     -----------------------------
     General  |              path: /org/freedesktop/ModemManager1/Modem/0
               |         device id: 3740231b64713ea188d5d50035fb1f39705abeea
     -----------------------------
     Hardware |      manufacturer: Quectel
               |             model: EG95
               | firmware revision: EG95EXGAR08A02M1G
               |         supported: gsm-umts, lte
               |           current: gsm-umts, lte
               |      equipment id: 864004046663164
     -----------------------------
     System   |            device: /sys/devices/platform/fd880000.usb/usb2/2-1
               |           drivers: qmi_wwan_q, option
               |            plugin: quectel
               |      primary port: ttyUSB2
               |             ports: ttyUSB0 (qcdm), ttyUSB1 (gps), ttyUSB2 (at), ttyUSB3 (at),
               |                    wwan0 (net)
     -----------------------------
     Status   |             state: failed
               |     failed reason: sim-missing
               |       power state: on
               |    signal quality: 0% (cached)
     -----------------------------
     Modes    |         supported: allowed: 2g, 3g, 4g; preferred: none
               |           current: allowed: any; preferred: none
     -----------------------------
8. Hardware interface development
8.1 HDMI
Access to HDMI can display the desktop system.
8.2 Headphone
Codec can be show by command: arecord -l
#arecord -l
**** List of CAPTURE Hardware Devices ****
card 1: rockchiprk809co [rockchip,rk809-codec], device 0: fe410000.i2s-rk817-hifi rk817-hifi-0 [fe410000.i2s-rk817-hifi rk817-hifi-0]
Subdevices: 1/1
Subdevice #0: subdevice #0
Sound can be recording and play
#arecord -Dhw:1,0 -d 10 -f cd -r 44100 -c 2 -t wav test.wav
#aplay test.wav
8.3 Sata
If you use a SSD,the following operations are required
#fdisk  -l
#mkfs.ext4  /dev/nvme0n1
#mount /dev/nvme0n1  /mnt
8.4 Beeper
Beeper can be open and close.
Open beeper: echo 0 > /sys/class/leds/firefly\:beeper/brightness
Close beeper: echo 1 > /sys/class/leds/firefly\:beeper/brightness
#echo 1 >  /sys/class/leds/firefly\:beeper/brightness
#echo 0 >  /sys/class/leds/firefly\:beeper/brightness
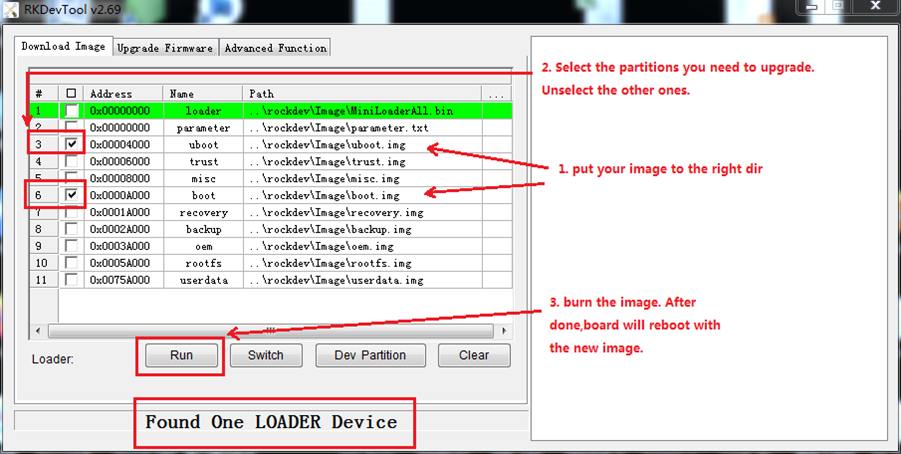
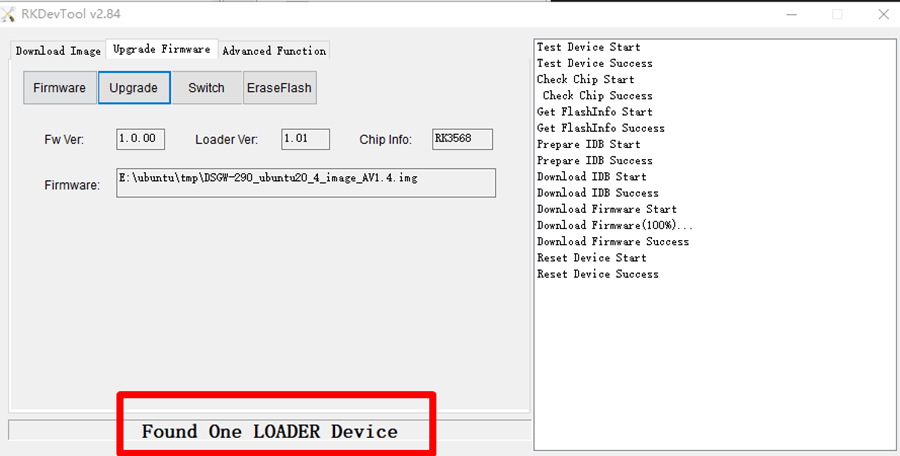
9. Image Upgrade
9.1 Upgrade Tool
Upgrade tool:AndroidTool_Release_v2.84.
9.2 Go into Upgrade Mode
- Connect the OTG port to the burning computer USB port, it's also act as 12V power supply
- Press "reboot loader" when ssh login:
root@dusun:~# reboot loader
- system reboot the board into LOADER mode, for a complete "update.img" upgrade.
9.3 The Entire Package of Firmware "XXX*.img" Upgrade
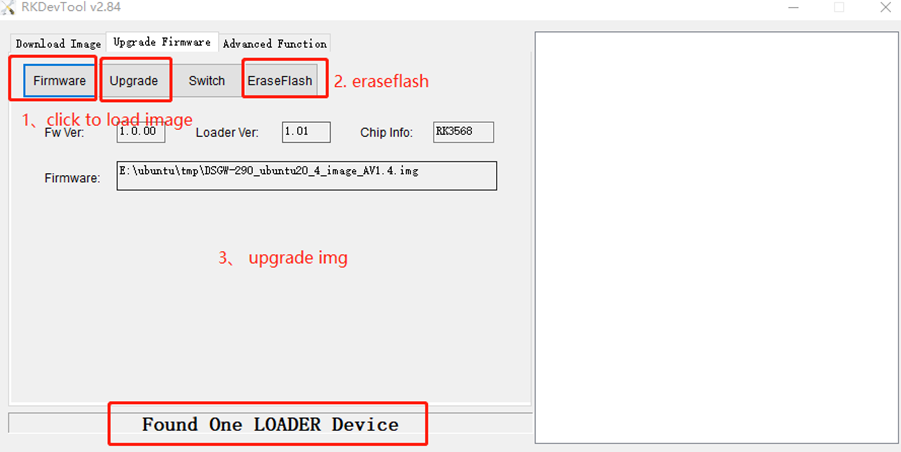
9.4 Upgrade the Firmware Separately