Quick Start Guide
1. Introduction
This Quick Start Guide explains the basics: how to connect and set up your target on the network. The Linux Software Developer’s Kit is an embedded hardware and software suite that enables Linux developers to create applications on Dusun’s DSGW-380 gateway. Base on the 4.4 Linux kernel, and leveraging existing open source software, simplifies the process of adding custom applications. Device drivers, GNU toolchain, Pre- defined configuration profiles, and sample applications are all in included.
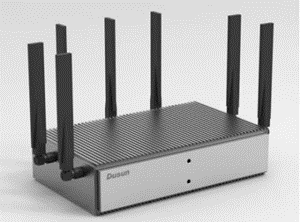
2. Gateway Information
2.1 Basic information
OS: Debian
USB 12V Power supply
Processor: Rk3588 quad-core Cortex-A76 and quad-core Cortex-A55,2.4GHz
RAM: 8G
eMMC:64GB
Support IEEE802.11n, IEEE802.11g, IEEE 802.11b, IEEE 802.11ac, IEEE 802.11ax Protocol
Support WIFI
Support LTE
Support Bluetooth 5.2
Support Lora
One WAN/LAN variable network port
2.2 Interface
3. Target Setup
This section describes how to connect the gateway into your host computer and network.
- Connecting a gateway - Power
Make sure that the power adapter is 12V/3A.
Select the appropriate power plug adaptor for your geographical location. Insert it into the slot on the Universal Power Supply; then plug the power supply into an outlet.
Connect the output plug of the power supply to the gateway
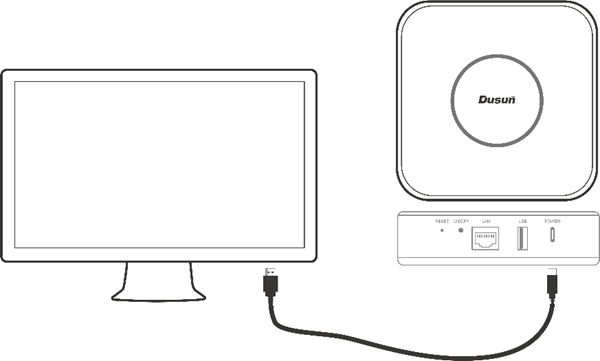
- Connecting a gateway – USB port
- Connect one end of the USB cable to the USB port on the laptop or desktop
- Connect the other end of USB cable to the USB port on the gateway.
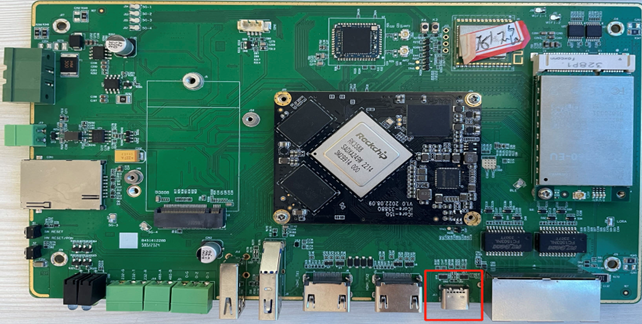
- Connecting a PCBA board – Serial Port
If you want to debug the gateway, you can open the shell, Connect the PC to the PCBA board via Serial to USB tool.


4. Start board
4.1 Getting started
Run The Image on the board
Connect the RK3588 board serial port to the PC via a USB to UART Bridge. Use Putty or other Terminal software as your console tool,
SERIAL CONSOLE SETTINGS:
115200/8N1
Baud: 115200
Data Bits: 8
Parity Bit: No
Stop Bit: 1
Power UP the board, you can see the boot log on console:

4.2 Download SDK and compile
4.2.1 Download SDK
You can get the SDK from https://drive.google.com/file/d/1dRNIEFEpRUcsQI2o0N0aUmPj9qXy46/view?usp=drive_link
4.2.2 Untar file
tar -zxvf DSGW-380-Debian_sdk_RV1.1.1.tar.gz
4.2.3 Compile
Goto the untar folder then execute ./build.sh
4.2.4 Firmware Location
The firmware will be generated to location: rockdev/pack/AIO-3588Q_xxxxxx.img
5. Test hardware components
The following testing are done by the UI.
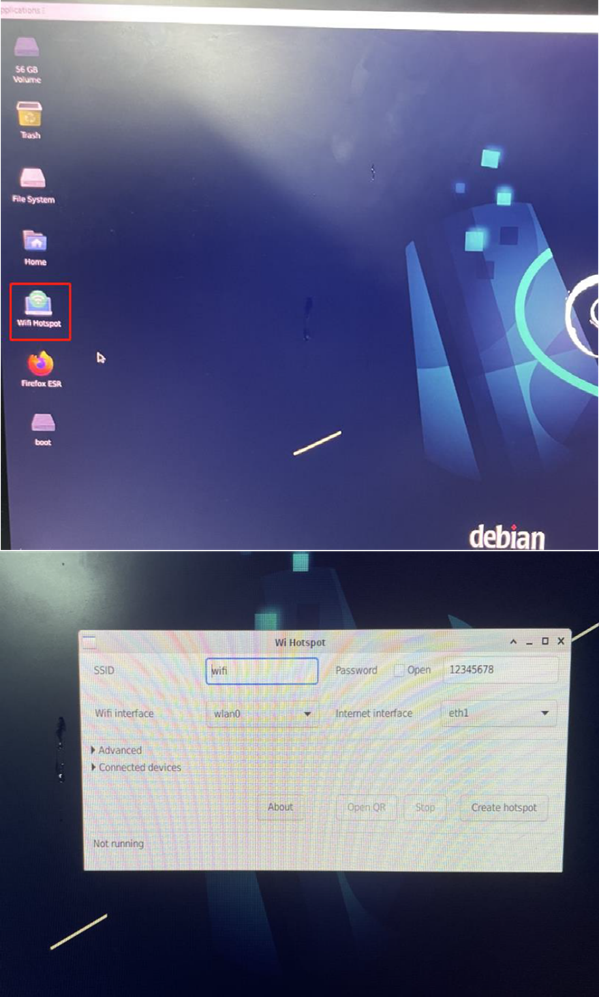
5.1 Test Wi-Fi as AP
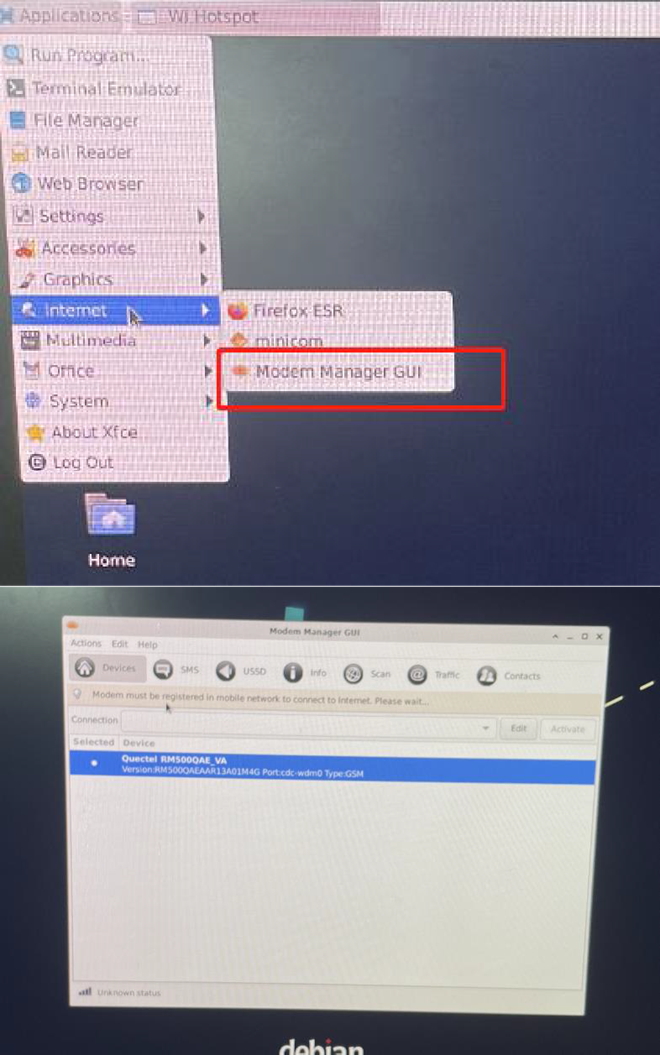
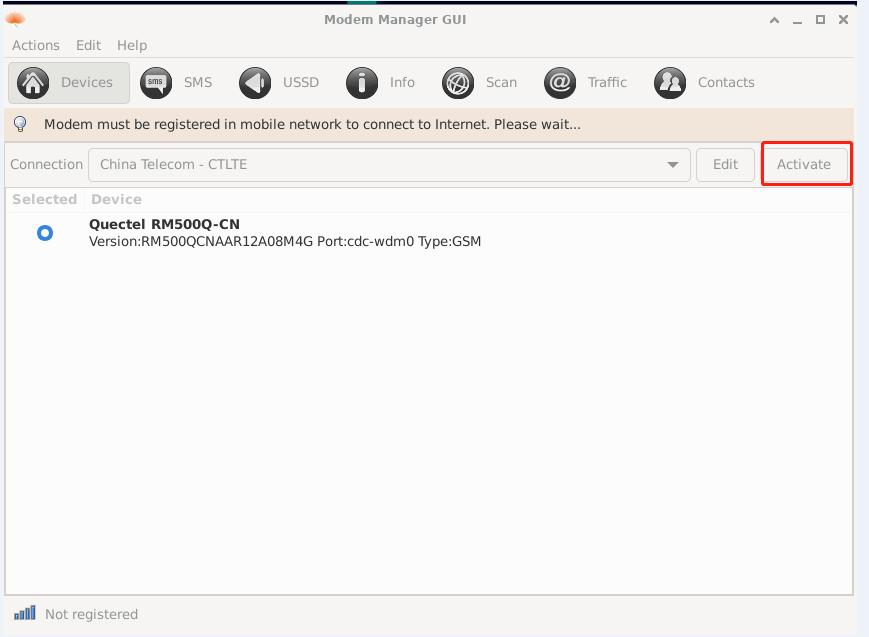
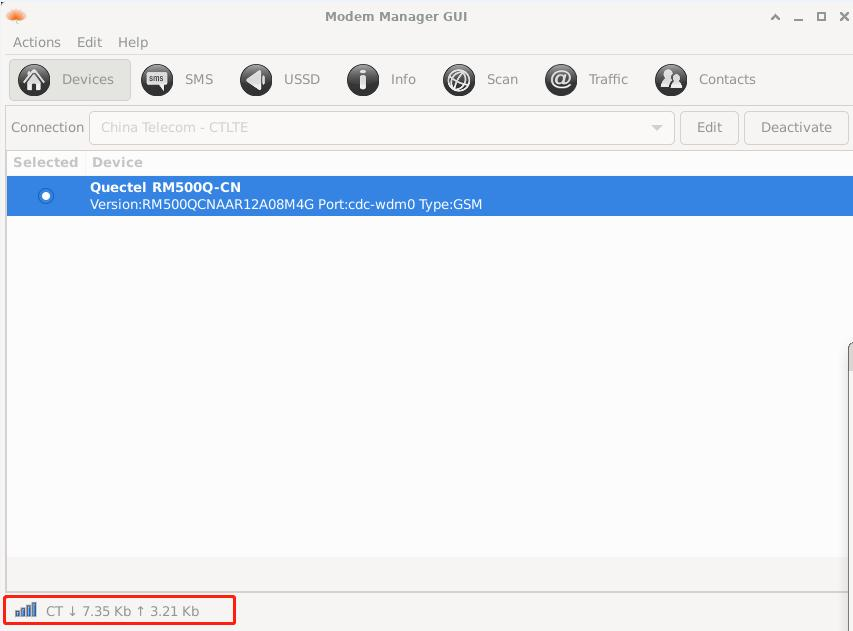
5.2 Test LTE


5.3 Test LED
control wifi led
# echo 1 > /sys/class/leds/wifi_led/brightness //on
# echo 0 > /sys/class/leds/wifi_led/brightness //off control lora led
# echo 1 > /sys/class/leds/lora_led/brightness //on
# echo 0 > /sys/class/leds/lora_led/brightness //off control lte led
# echo 1 > /sys/class/leds/lte_led/brightness //on
# echo 0 > /sys/class/leds/lte_led/brightness //off control power led
# echo 1 > /sys/class/leds/pwr_led/brightness //on
# echo 0 > /sys/class/leds/pwr_led/brightness //off
5.4 Test I2C
# i2cdetect -y 0
0 1 2 3 4 5 6 7 8 9 a b c d e f
00: -- -- -- -- -- -- -- --
10: -- -- -- -- -- -- -- -- -- -- -- -- -- -- -- --
20: -- -- -- -- -- -- -- -- -- -- -- -- -- -- -- --
30: -- -- -- -- -- -- -- -- -- -- -- -- UU -- -- --
40: -- -- UU UU -- -- -- -- -- -- -- -- -- -- -- --
50: -- -- -- -- -- -- -- -- -- -- -- -- -- -- -- --
60: -- -- -- -- -- -- -- -- -- -- -- -- -- -- -- --
70: -- -- -- -- -- -- -- --
#
6. Wireless development (BLE, LoRaWAN)
Please build a debian system to do the following steps. The code will be compiled on the board, not on host.
root@linaro-alip:~# apt-get update
root@linaro-alip:~# apt-get install libncurses5-dev
root@linaro-alip:~# apt-get install libreadline-dev
root@linaro-alip:~# apt-get install libssl-dev
root@linaro-alip:~# apt-get install libjson-c-dev
- Prepare some library on the board
- Power on wireless modules on board.
6.1 BLE
BLE interface is /dev/ttyS0.
root@linaro-alip:~# hciattach /dev/ttyS0 any 115200 noflow
root@linaro-alip:~# bluetoothd&
root@linaro-alip:~#

6.2 LoRaWAN
Choose the correct interface for LoRaWAN, for example /dev/spidev1.0.
The configuration file for it is in . sx1302_hal/packet_forwarder/global_conf.json.
Download "sx1302_hal_0210.tar.gz" from Dusun FTP, and copy it to board, under /root.
root@linaro-alip:~# tar xvzf sx1302_hal_0210.tar.gz
root@linaro-alip:~# cd sx1302_hal/
Untar it and you can get ./sx1302_hal
build LoRaWAN sample code sx1302_hal and run:
More information about the LoRaWAN code, please visit https://www.semtech.com/products/wireless-rf/lora-core/sx1302 for more information.
root@linaro-alip:~/sx1302_hal# make all <========== wait for build OK, and you get ./packet_forwarder/
root@linaro-alip:~/sx1302_hal/packet_forwarder# ./test_loragw_hal_tx -c 0 -k 0 -r 1250 -b 500 -m LORA --pa 1 --pwid 15 -f 927.5 -n 1000000000

6.3 key
root@DUSUN:~# echo 28 > /sys/class/gpio/export
root@DUSUN:~# echo in > /sys/class/gpio/gpio28/direction
Key release:
root@DUSUN:~# cat /sys/class/gpio/gpio28/value
1
Key pressed:
root@DUSUN:~# cat /sys/class/gpio/gpio28/value
0
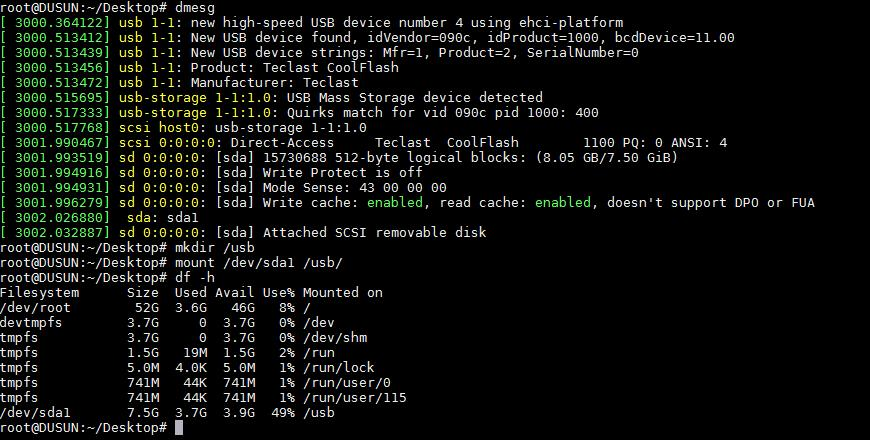
6.4 USB
Plugin USB disk
6.5 IO
root@DUSUN:~# echo 154 > /sys/class/gpio/export
root@DUSUN:~# echo in > /sys/class/gpio/gpio154/direction
root@DUSUN:~# echo 155 > /sys/class/gpio/export
root@DUSUN:~# echo in > /sys/class/gpio/gpio155/direction
In mode
input high leve:
root@DUSUN:~# cat /sys/class/gpio/gpio154/value 1
input low leve:
root@DUSUN:~# cat /sys/class/gpio/gpio154/value 0
Out mode
root@DUSUN:~# echo out > /sys/class/gpio/gpio154/direction
root@DUSUN:~# echo 1 /sys/class/gpio/gpio154/value
IO port is high
root@DUSUN:~# echo 0 /sys/class/gpio/gpio154/value
IO port is low
6.6 RS232
Port: /dev/ttyS5
6.7 RS485
Port: /dev/ttyS1
6.8 Can

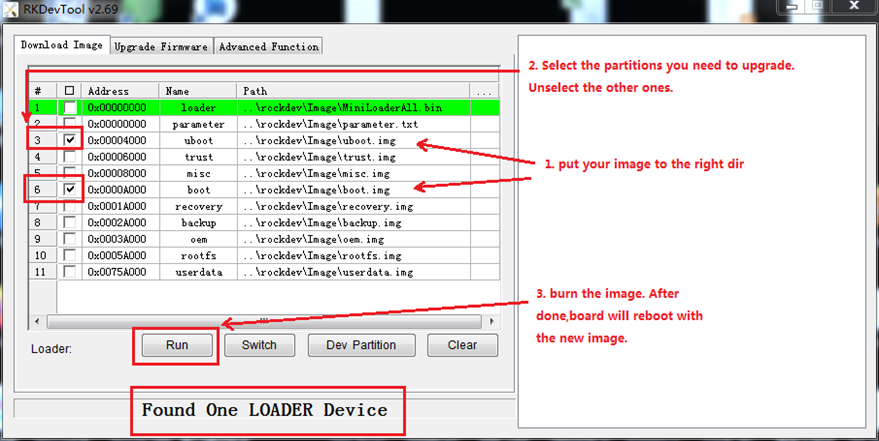
7. Image Upgrade
7.1 Upgrade Tool
Upgrade tool:AndroidTool_Release_v2.69
7.2 Go into Upgrade Mode
- Connect the OTG port to the burning computer USB port, it's also act as 5V power supply
- Press the factory reset button and hold on, then plugin power when you see
RKTool show Found one MASKROM Device can release the button
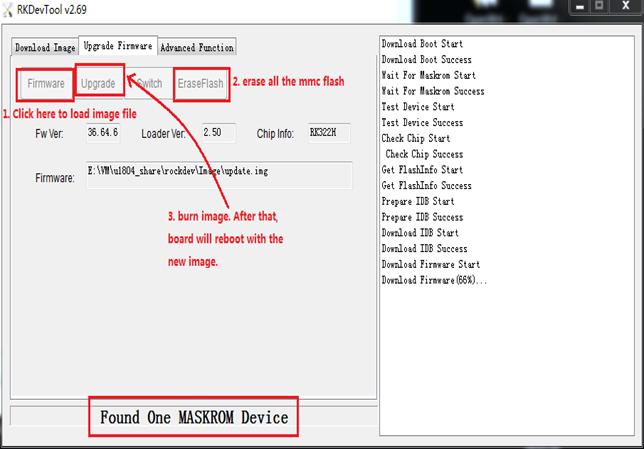

The Entire Package of Firmware "update.img" Upgrade
7.3 Upgrade the Firmware Separately