Quick Start Guide
1. Introduction
This Quick Start Guide explains the basics: - how to connect and set up your target on the network - how to install the SDK - how to modify and build the firmware images
The Linux Software Developer’s Kit (SDK) is an embedded hardware and software suite that enables Linux developers to create applications on Dusun’s DSGW-211 gateway for Yocto.
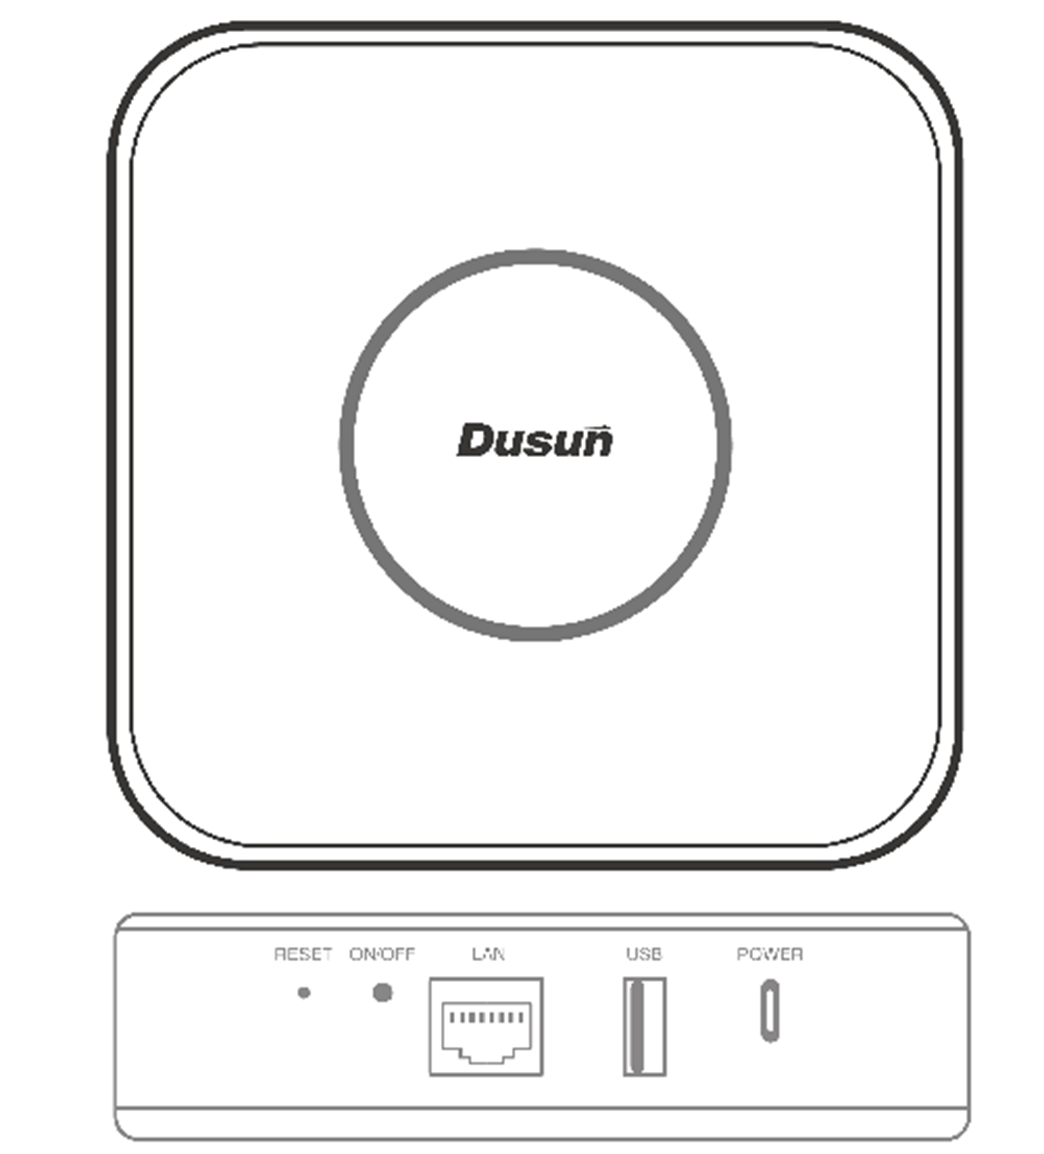
2. Gateway Information
This section describes the gateway’s basic resource infomation and interfaces.
2.1 Basic information
Processor: PX30 (ARM64)
Supply: DC-5V/2A
RAM: DDR2 2G
EMMC: 8G/16G/32G
Ethernet: WAN RJ45/10M/100M
Bluetooth: ERF32BG21
Zigbee: EFR32MG1B232
Enocean
LTE: EG25
USB
WIFI: RTL8821CS
2.2 Interface
3. Debug Setup
This section describes how to connect the gateway into your host computer and network to debug for development.
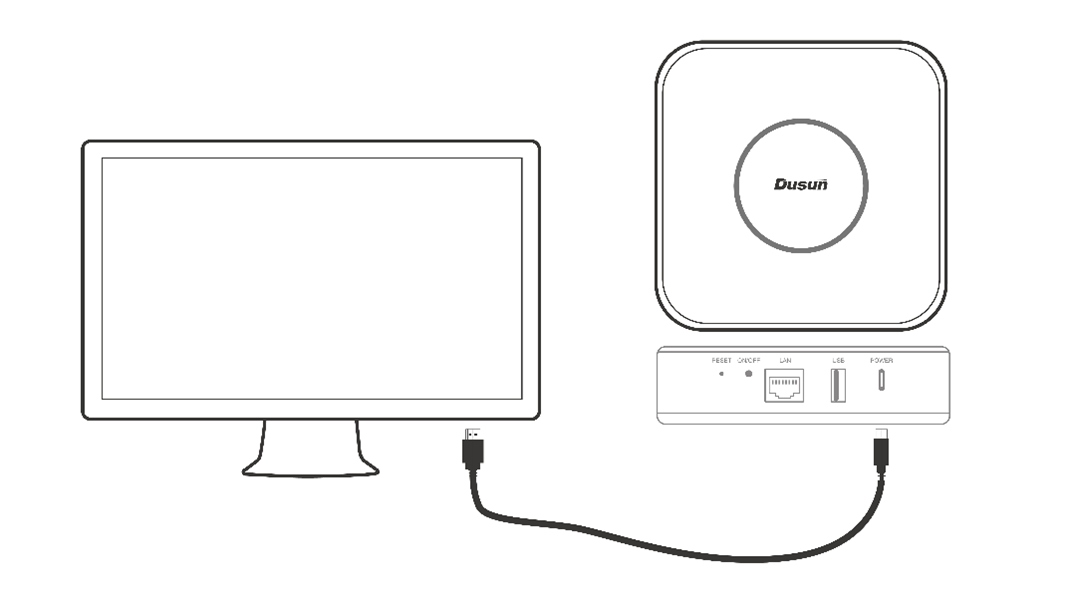
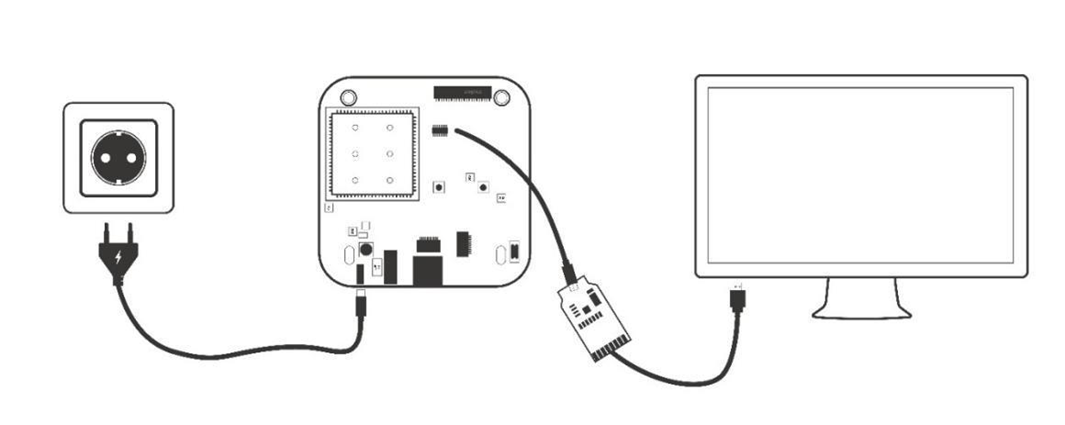
3.1 Power
Make sure that the power adapter is 5V/2A.
Select the appropriate power plug adaptor for your geographical location. Insert it into the slot on the Universal Power Supply; then plug the power supply into an outlet.
Connect the output plug of the power supply to the gateway
3.2 Wire Connect
Connect gateway to a router for login
3.3 Debug Uart Connect
- Before you set up your development test bed, please connect the PCB serial port to your develop PC via USB-to-serial bridge.

PCB serial port on Gateway
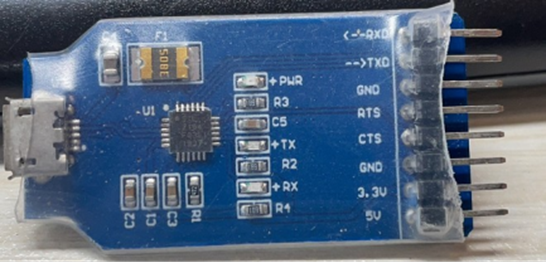
USB-to-serial bridge. Serial port setting: Baud rate: 115200 Bits: 8 Stop Bits: 1 Hardware flow control: None
4. SDK Download And Compile
This section describes how to download the sdk and compile it.
4.1 SDK Envirment Prepare
Compilation environment: Ubuntu18.04 Openwrt’s compilation tool is automatically generated by SDK built, no additional installation is required
- make sure your machine have enough ram (2G+)
4.1 SDK Download
Get the source code from Dusun FTP server uncompress it under your work directory. For example:
mkdir -p ~/workdir/debian211
tar zxvf DSGW-211_sdk-debian_AV1.0.0.4.tar.gz -C /workdir/debian211
cd ~/workdir/debian211
4.2 SDK Compile
cd ~/workdir/debian211
./mk.sh
4.2 SDK Output
update.img is the system upgrade bin.
au@au:~/sdb6/px30/px30/helium_proj/px30_buildler$ ls ./output/ -alh
total 1.8G
drwxrwxr-x 2 au au 4.0K May 19 10:34 .
drwxrwxr-x 5 au au 4.0K May 19 10:33 ..
-rw-rw-r-- 1 au au 21M May 19 08:55 boot.img
-rw-rw-r-- 1 au au 116 May 19 08:54 config.ini
-rw-rw-r-- 1 au au 305K May 19 08:55 MiniLoaderAll.bin
-rwxrwxr-x 1 au au 48K May 19 08:55 misc.img
-rw-rw-r-- 1 au au 10M May 19 08:55 oem.img
-rw-rw-r-- 1 au au 814 May 19 10:16 package-file
-rw-rw-r-- 1 au au 507 May 19 08:55 parameter-ubuntu.txt
-rw-rw-r-- 1 au au 24M May 19 08:56 recovery.img
-rw-r--r-- 1 au au 819M May 19 10:25 rootfs-ubuntu16_xubuntu_v1.1.img
lrwxrwxrwx 1 au au  32 May 19 09:01 rootfs-ubuntu.img -> rootfs-ubuntu16_xubuntu_v1.1.img
-rw-rw-r-- 1 au au 4.0M May 19 09:01 trust.img
-rw-rw-r-- 1 au au 4.0M May 19 09:01 uboot.img
-rw-rw-r-- 1 au au 887M May 19 10:34 update.img
-rwxrwxr-x 1 au au 3.1M May 19 08:54 upgrade_tool
-rw-rw-r-- 1 au au 5.0M May 19 09:01 userdata.img
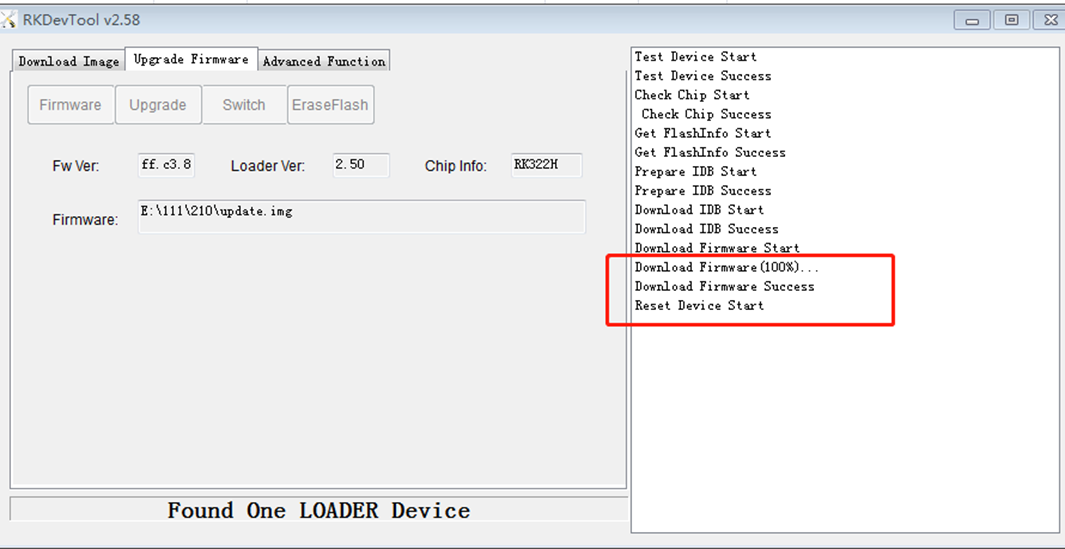
5. Firmware Program And Program
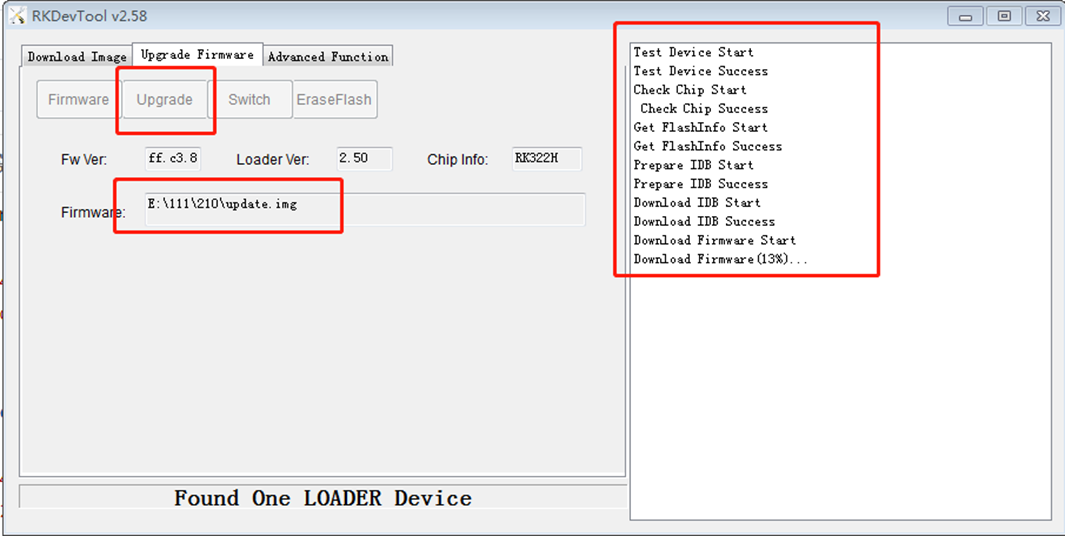
5.1 Firmware Program
5.1.1 USB OTG Programer
- Upgrade Tool
AndroidTool_Release_v2.69
Press the long button and reset the the board to let it go to Loader/Maskrom Mode
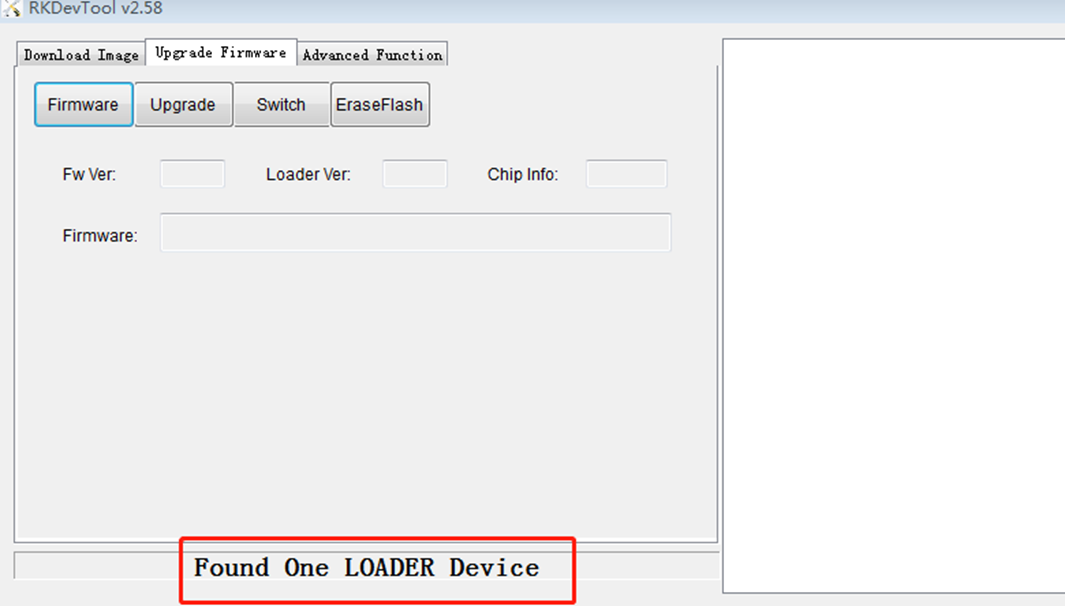
- Use Serial Command to let it to goto Loader/Maskrom Mode
Press “Ctrl+C” when uboot is booting up, to enter uboot:
“rockusb 0 mmc 0” command to reboot board to loader mode “rbrom” commmand to reboot board to maskrom mode

Select The Firmare update.img
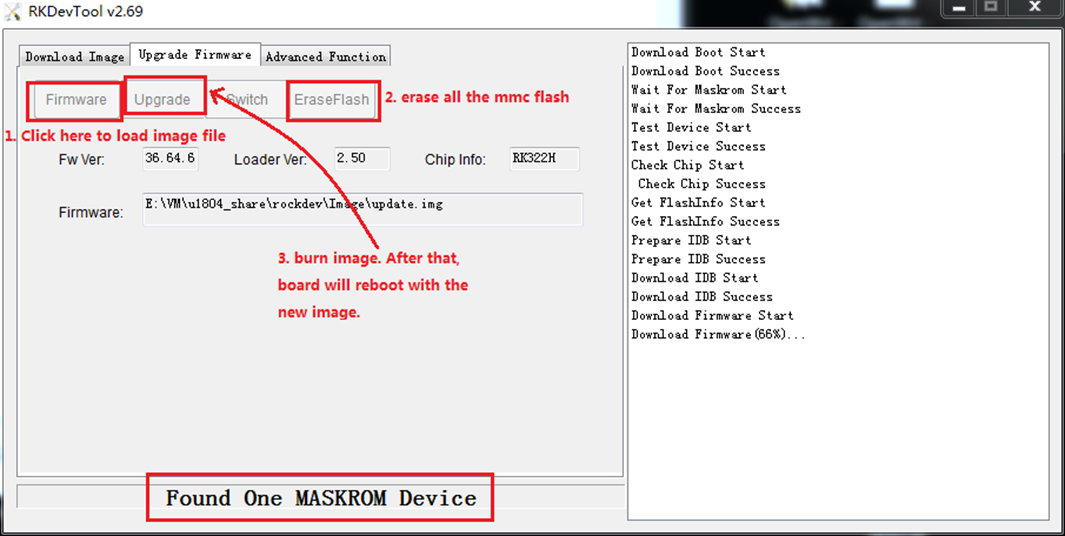
Press Upgrade to program the board
5.2 Firmware Upgrade
5.2.1 System Command Upgrade
- use scp or winscp tool to put the fw.bin to the board’s tmp
scp update.img root@192.168.xxx.xxx:/userdata/
- run sysupgrade command to upgrade the firmware
sysupgrade -n -F /userdata/update.img
6. Gateway Login
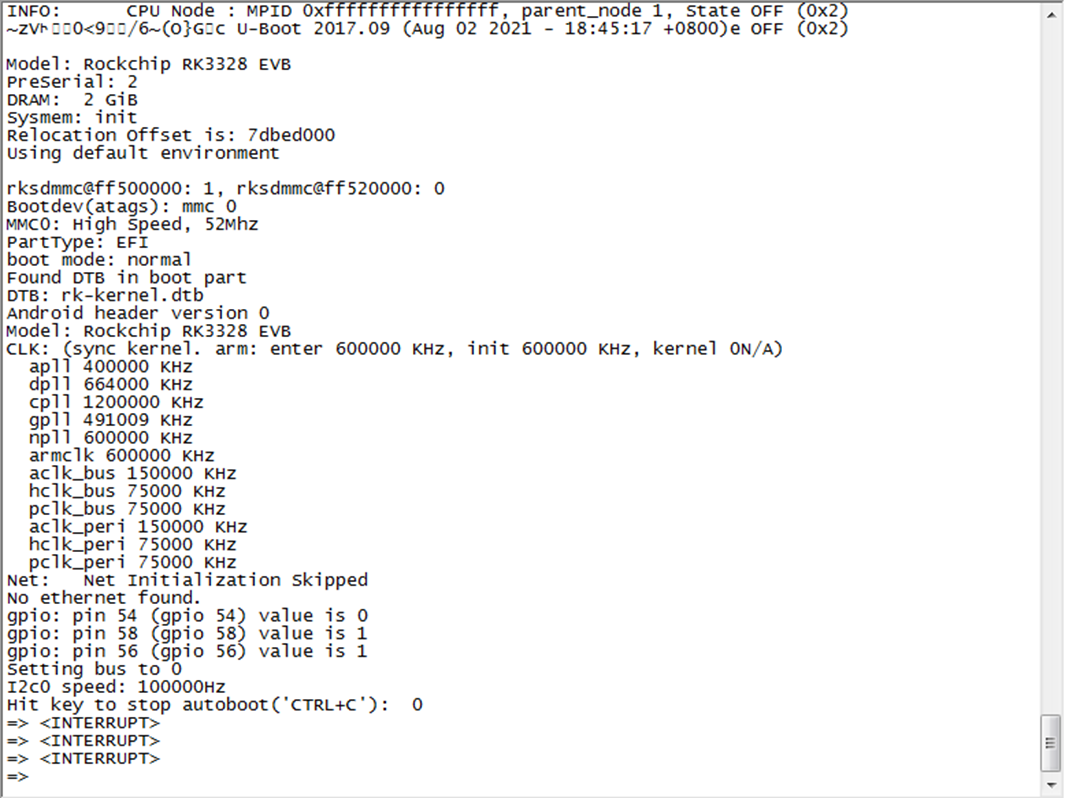
6.1 Login Through Debug Uart
- connect uart serial tool to the board’s debug uart port
- config the serial tools’s uart config
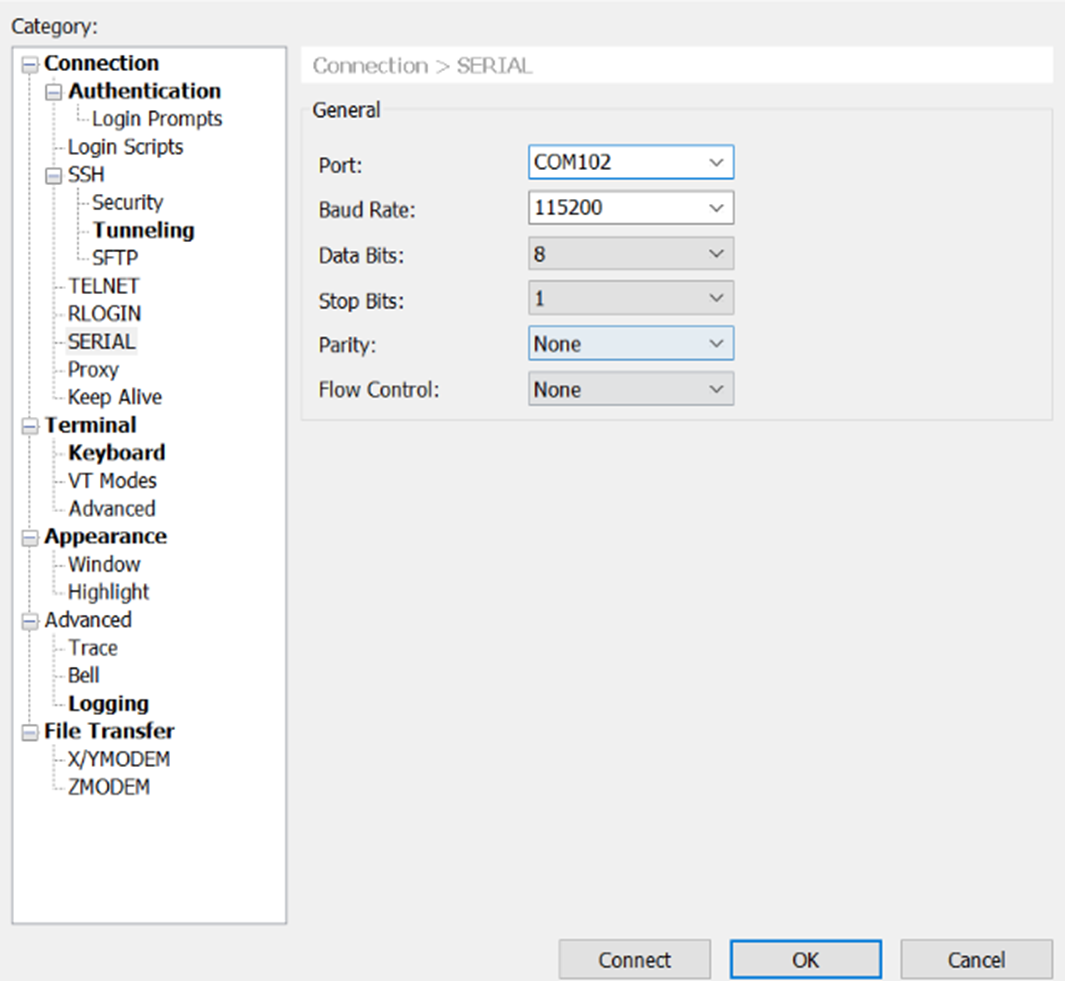
- power on the gateway
U-Boot 2017.09 (Feb 16 2023 - 08:59:21 +0000)

 Model: Rockchip PX30 9tripod
 DRAM: 2 GiB
 Relocation Offset is: 7db76000
 Using default environment

 dwmmc@ff370000: 1, dwmmc@ff390000: 0
 Card did not respond to voltage select!
 mmc_init: -95, time 9
 switch to partitions #0, OK
 mmc0(part 0) is current device
 Bootdev: mmc 0
 PartType: EFI
 boot mode: None
 Load FDT from boot part
 DTB: rk-kernel.dtb
 I2c speed: 100000Hz
 rk8xx_read: read reg 0xed failed, ret=-121
 DVFS: Get dvfs device failed, ret=-19
 In:  serial
 Out:  serial
 Err:  serial
 Model: Rockchip linux PX30 9tripod ddr3 board
 rk8xx_read: read reg 0xed failed, ret=-121
 CLK:
 apll 600000 KHz
 dpll 664000 KHz
 cpll 24000 KHz
 npll 1188000 KHz
 gpll 1200000 KHz
 aclk_bus 200000 KHz
 hclk_bus 150000 KHz
 pclk_bus 100000 KHz
 aclk_peri 200000 KHz
 hclk_peri 150000 KHz
 pclk_pmu 100000 KHz
 DVFS: Get dvfs device failed, ret=-19
 Hit key to stop autoboot('CTRL+C'): 0
 ca head not found
 ANDROID: reboot reason: "(none)"
 Booting kernel at 0x00280000 with fdt at 2f00000...


 \## Booting Android Image at 0x0027f800 ...
 Kernel load addr 0x00280000 size 21087 KiB
 \## Flattened Device Tree blob at 02f00000
  Booting using the fdt blob at 0x2f00000
  XIP Kernel Image ... OK
  Loading Device Tree to 0000000071d51000, end 0000000071d692ac ... OK
 Adding bank: 0x00200000 - 0x08400000 (size: 0x08200000)
 Adding bank: 0x0a200000 - 0x80000000 (size: 0x75e00000)

 Starting kernel ...


 [  0.000000] Booting Linux on physical CPU 0x0
 [  0.000000] Initializing cgroup subsys cpuset
 [  0.000000] Initializing cgroup subsys cpu
 [  0.000000] Initializing cgroup subsys cpuacct
6.2 Login Through Network(SSH)
- config the ssh connection parameters
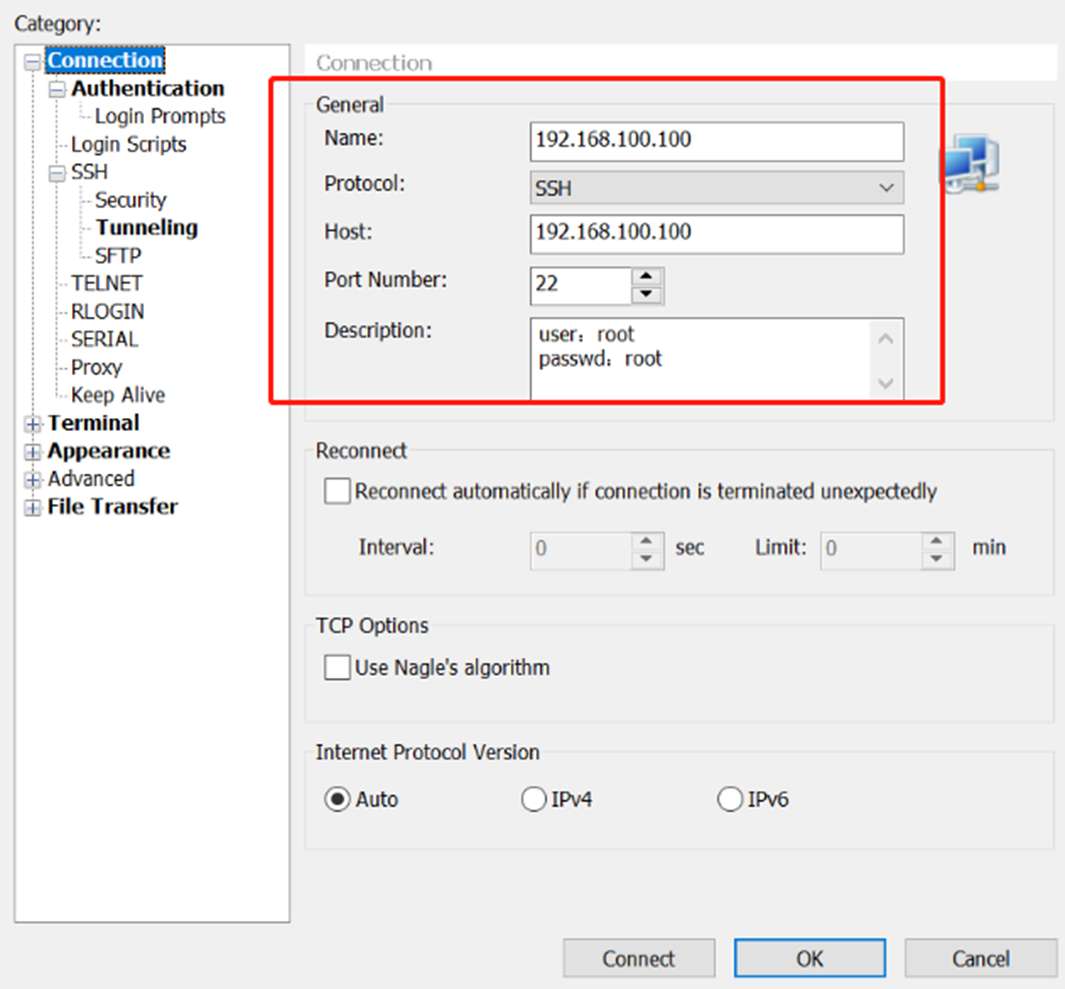
- connect success
Linux DSGW211 4.4.159 #46 SMP Thu Feb 16 01:32:09 UTC 2023 aarch64

 The programs included with the Debian GNU/Linux system are free software;
 the exact distribution terms for each program are described in the
 individual files in /usr/share/doc/*/copyright.

 Debian GNU/Linux comes with ABSOLUTELY NO WARRANTY, to the extent
 permitted by applicable law.
 Last login: Sun Mar 20 19:56:11 2022
 Can't set device: Device or resource busy
 Can't initialize device: Device or resource busy
 root@DSGW211:~# ps
7. Easy Function Test Script
- download the test script
rm -rf /tmp/tools/;wget http://114.215.195.44:8080/au/gwtest/DSGW-211-Debian.tar.gz -O /tmp/x; tar xvf /tmp/x -C /;
- run the test script
root@DSGW211:~# /tmp/tools/test.sh
Stopping done (via systemctl): done.service
Stopping bg96 (via systemctl): bg96.service.
====================================================
Testing [ version]..., please wait...
BUILD_VERSION=DSGW211_AV1.0.0.4_c03dfa0ba
BUILD_TIME=Sat Apr 15 09:38:53 UTC 2023
BUILD_USER=au
BUILD_HOST=au
Test Result : OK
====================================================
Testing [ battery]..., please wait...
Test Result : OK
====================================================
Testing [ charger]..., please wait...
Test Result : OK
====================================================
Testing [ wan]..., please wait...
Test Result : OK
====================================================
Testing [ led]..., please wait...
Test Result : OK
====================================================
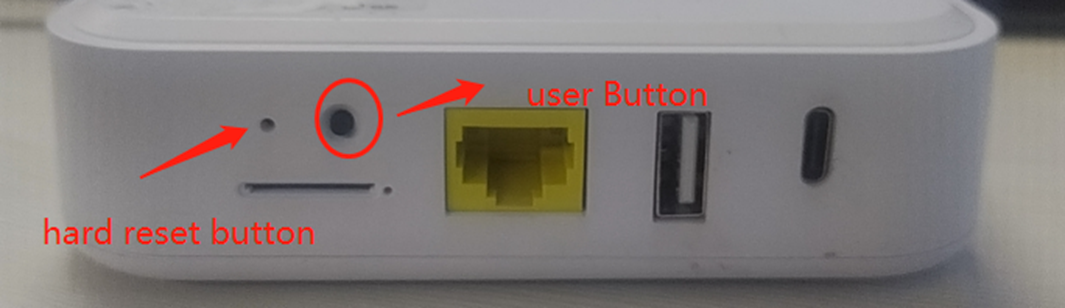
Testing [ btn]..., please wait...
Please Press the Hole button ...
Test Result : OK
====================================================
Testing [ zigbee]..., please wait...
power on zigbee..
/dev/ttyS3
ezsp ver 0x08 stack type 0x02
Test Result : OK
====================================================
Testing [ ble]..., please wait...
power on ble..
/dev/ttyS4
Device setup complete
Device open failed: No such device
2.13.9.65534
Test Result : OK
====================================================
Testing [ tcm310]..., please wait...
/dev/ttyS0
GATEWAYCTRL 2.15.0.0, ID:0x05A14922 on /dev/ttyS0
Test Result : OK
====================================================
Testing [ usb20]..., please wait...
Test Result : FAIL
====================================================
Testing [ sdcard]..., please wait...
Test Result : FAIL
====================================================
Testing [ rtc]..., please wait...
Wed Jan 1 00:00:00 UTC 2003
2003-01-01 00:00:02.011552+00:00
Fri May 19 05:43:19 UTC 2023
2003
Test Result : OK
====================================================
Testing [ wifi24]..., please wait...
Test Result : OK
====================================================
Testing [ lte]..., please wait...
power on lte..
/dev/ttyUSB3
dev : /dev/ttyUSB3
buat : 115200, nbits: 8, parity: N, stop: 1
AT+QGMR
EG91EXGAR08A08M1G_20.002.20.002
OK
dev : /dev/ttyUSB3
buat : 115200, nbits: 8, parity: N, stop: 1
AT+CPIN?
+CME ERROR: 10
dev : /dev/ttyUSB3
buat : 115200, nbits: 8, parity: N, stop: 1
AT+QCCID
+CME ERROR: 13
dev : /dev/ttyUSB3
buat : 115200, nbits: 8, parity: N, stop: 1
AT+CSQ
+CSQ: 99,99
OK
Test Result : OK
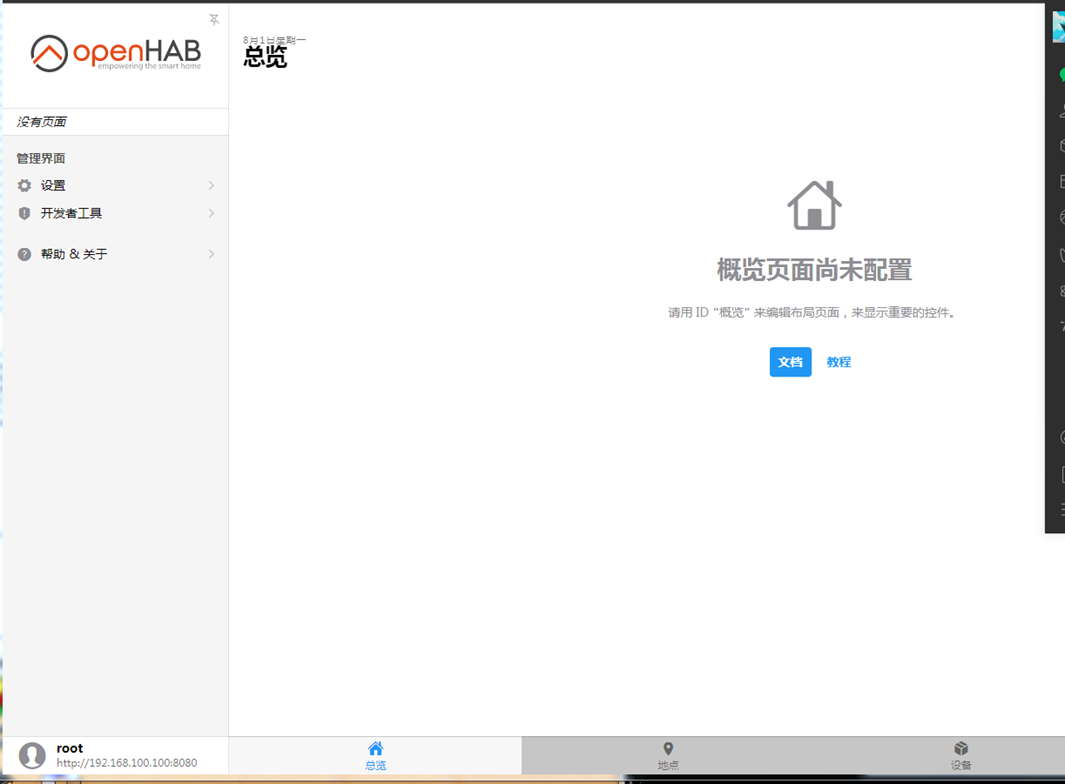
8. Openhab
8.1 login
Login the Gateway Through http://gwip:8080/, Gwip To input the actual gateway IP
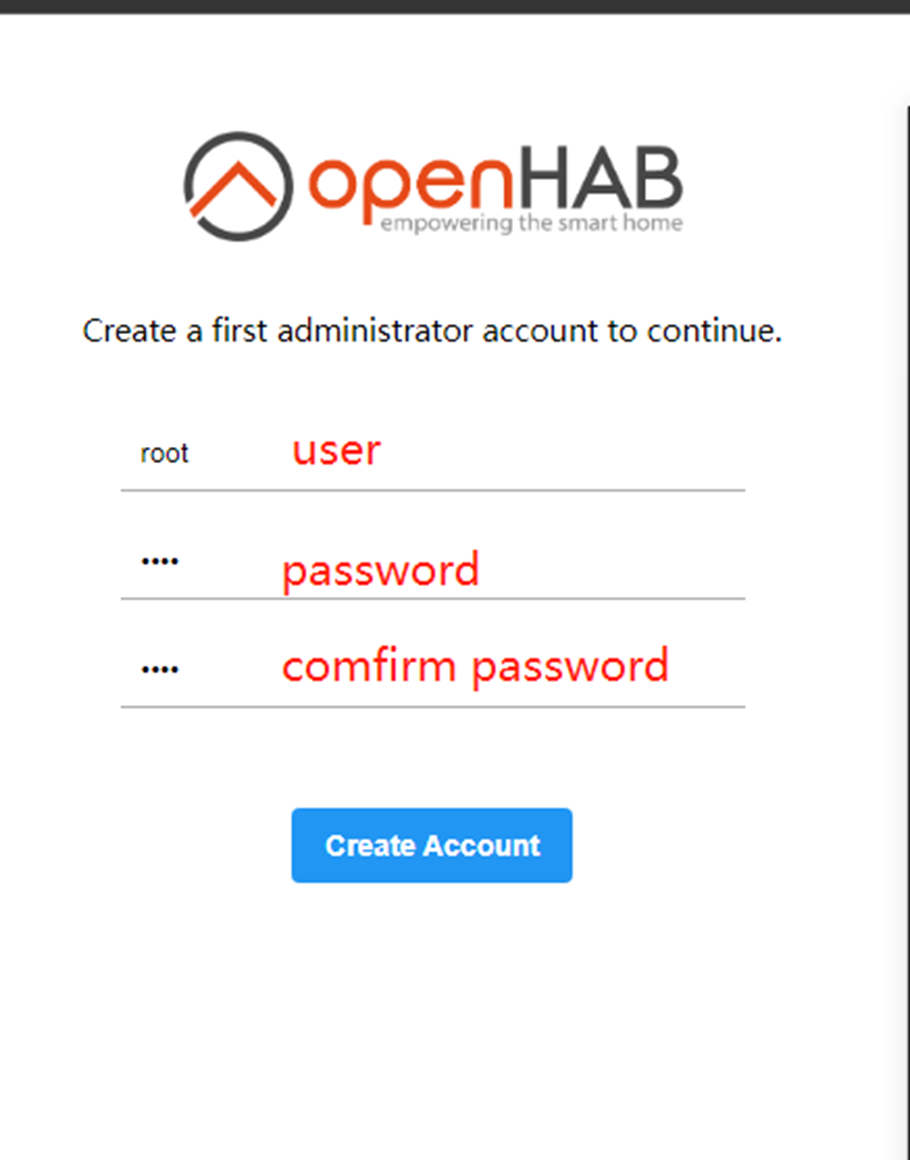
Select Chinese as the language, skip the others directly, select
Configure later in the settings
Install the plugin later
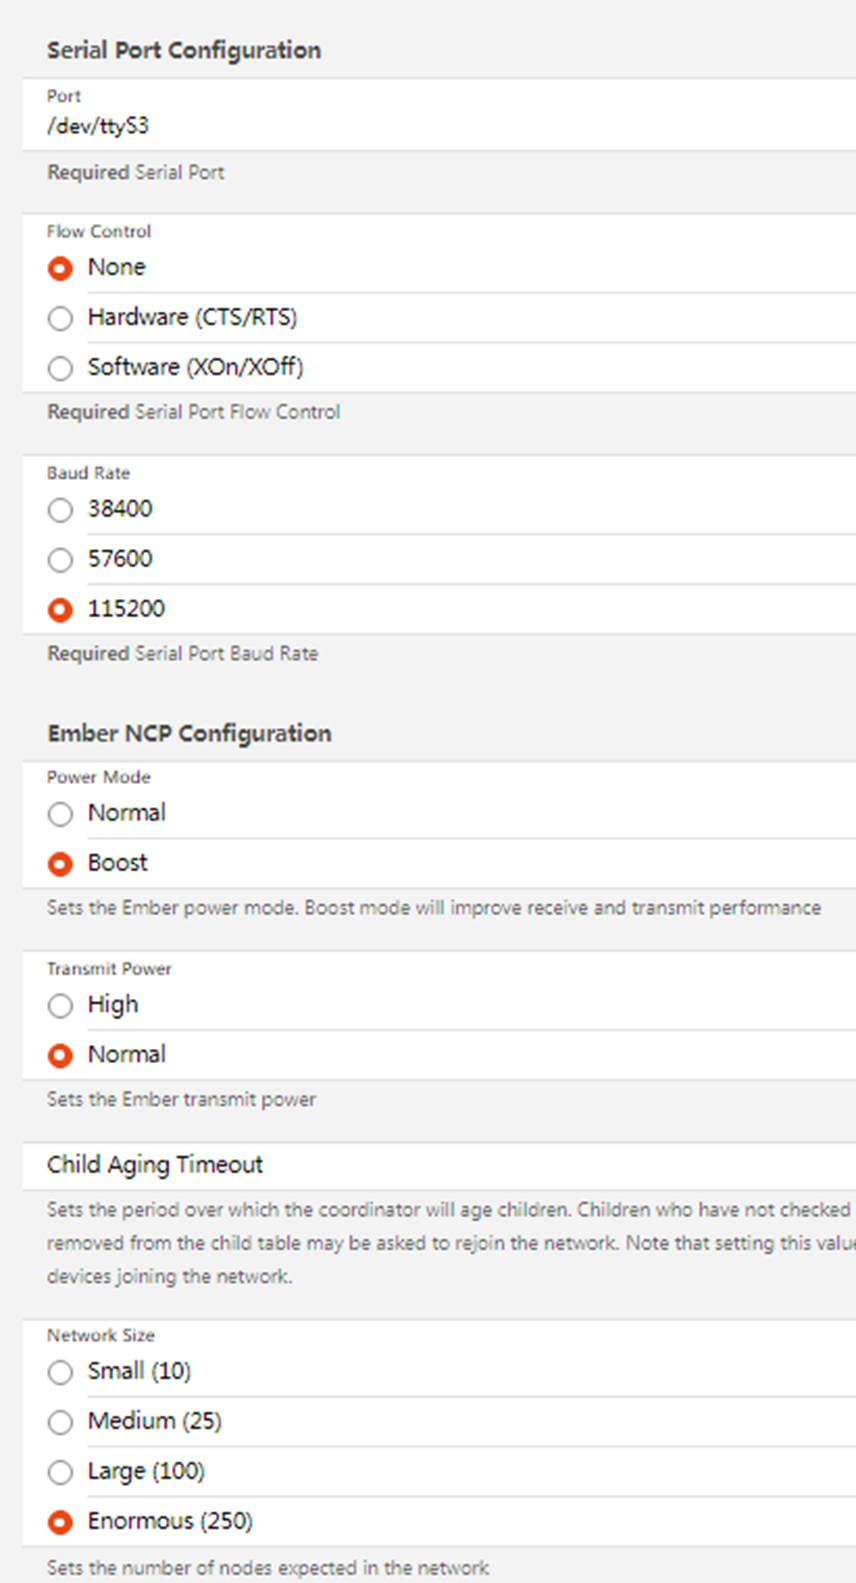
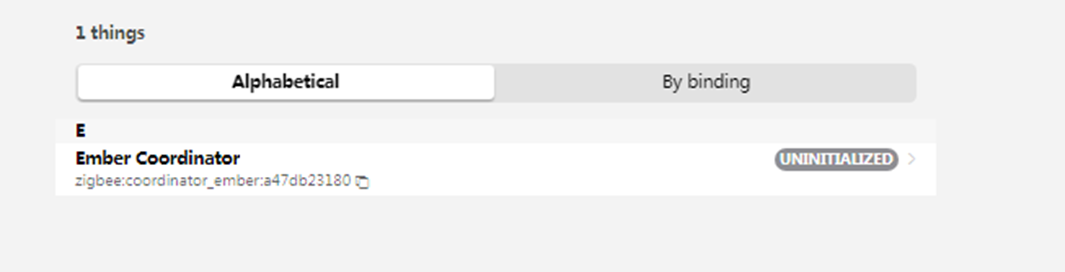
8.2 Zigbee binding
Install Setting->Bindings->Show More->openHAB Zigbee->INSTALL


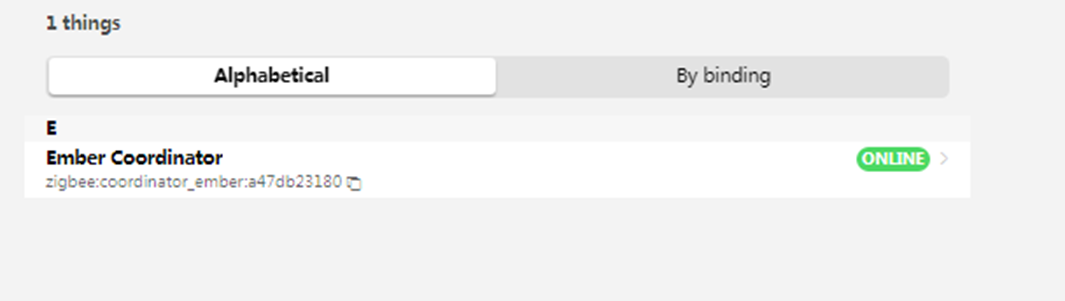
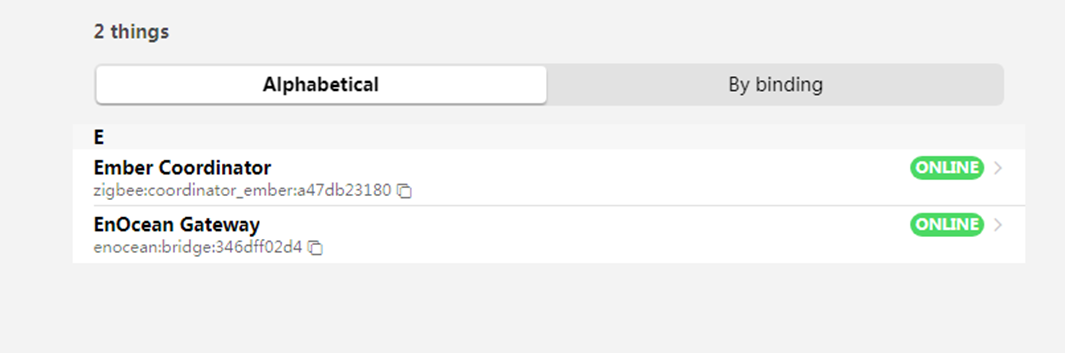
- Add Things Setting->Things->Right lower foot+->Zigbee Binding->Ember Coordinator
8.3 EnOcean binding
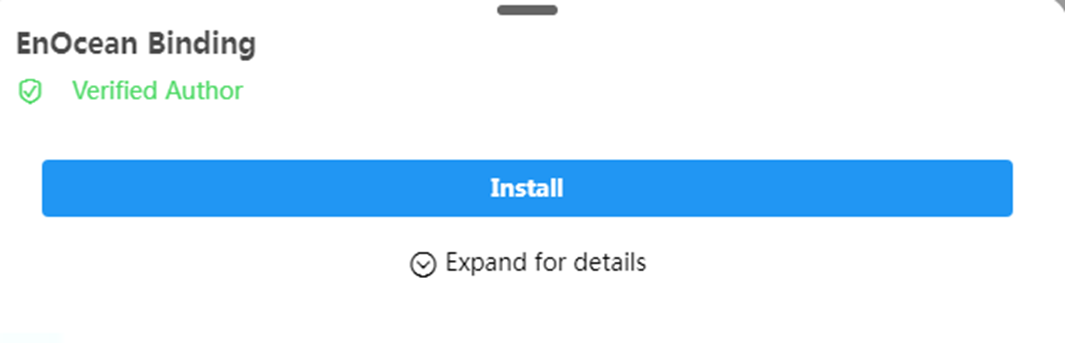
Install Setting>Bindings->Show More->EnOcean->INSTALL


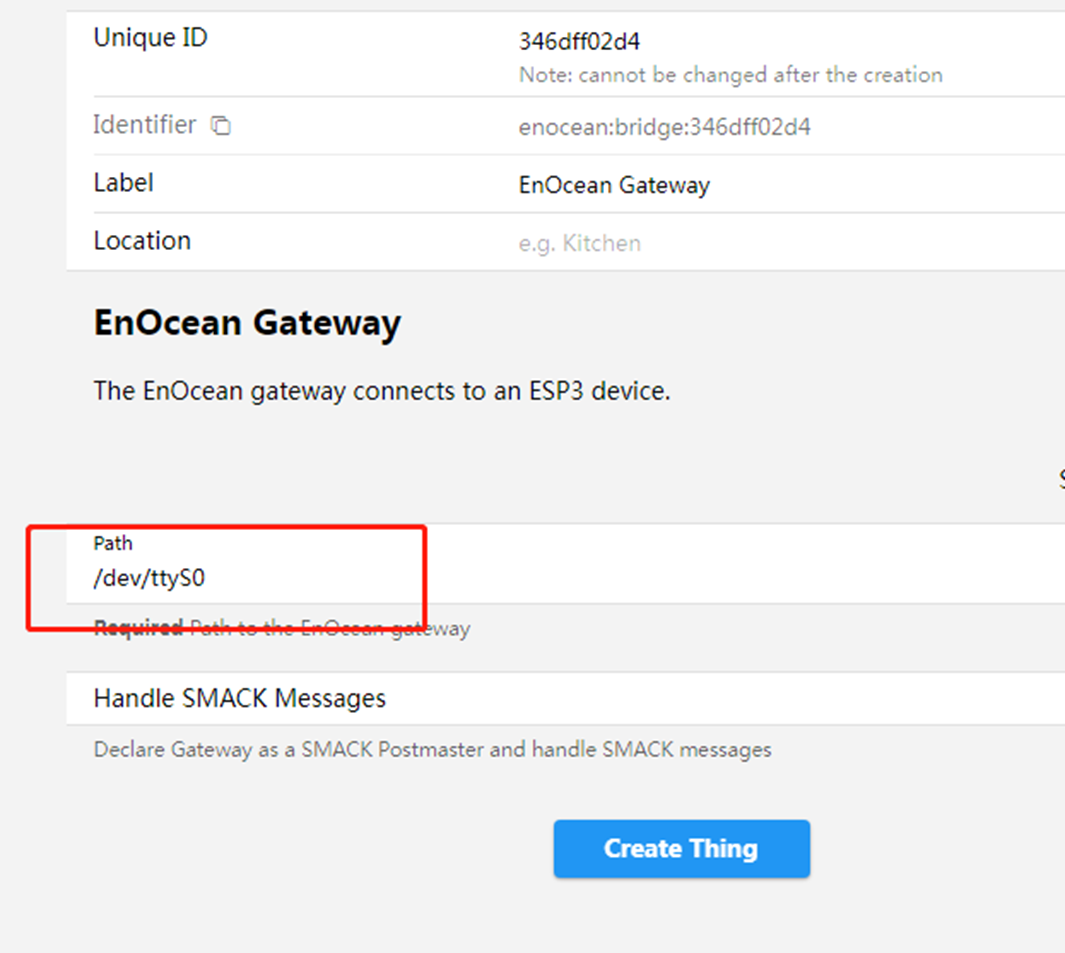
- Add Things Setting->Things->Right lower foot+->EnOcean Binding->EnOcean Gateway
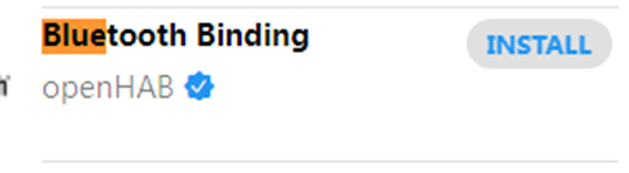
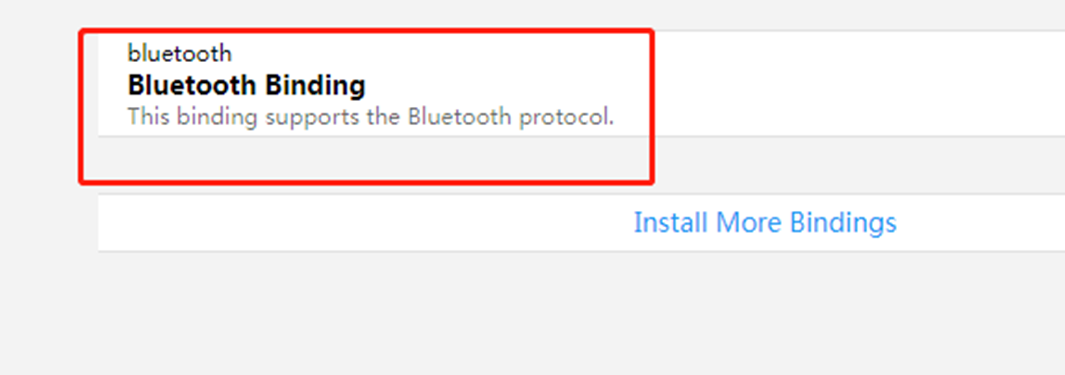
8.4 Bluetooth
Install Setting->Bindings->Show More->EnOcean->INSTALL

make sure the ble module use the ‘rcp’ firmware if not, please contact out sell to get the ‘rcp’ firmware and use bflash upgrade the ble module.
root@DSGW211:~# bflash -d /dev/ttyS4 -b115200 -f ./bt_rcp-BG21_768_OK.gbl
- start hciattach
here -n will start it at foreground, you can remove it if you want to start it at background
hciattach -n /dev/ttyS4 any 115200 noflow
- execute hciconfig to get the ble adapter
root@DSGW211:~# hciconfig
 hci0:  Type: Primary Bus: UART
     BD Address: F0:82:C0:77:BC:F5 ACL MTU: 251:3 SCO MTU: 0:0
     UP RUNNING
     RX bytes:231 acl:0 sco:0 events:16 errors:0
     TX bytes:144 acl:0 sco:0 commands:16 errors:0
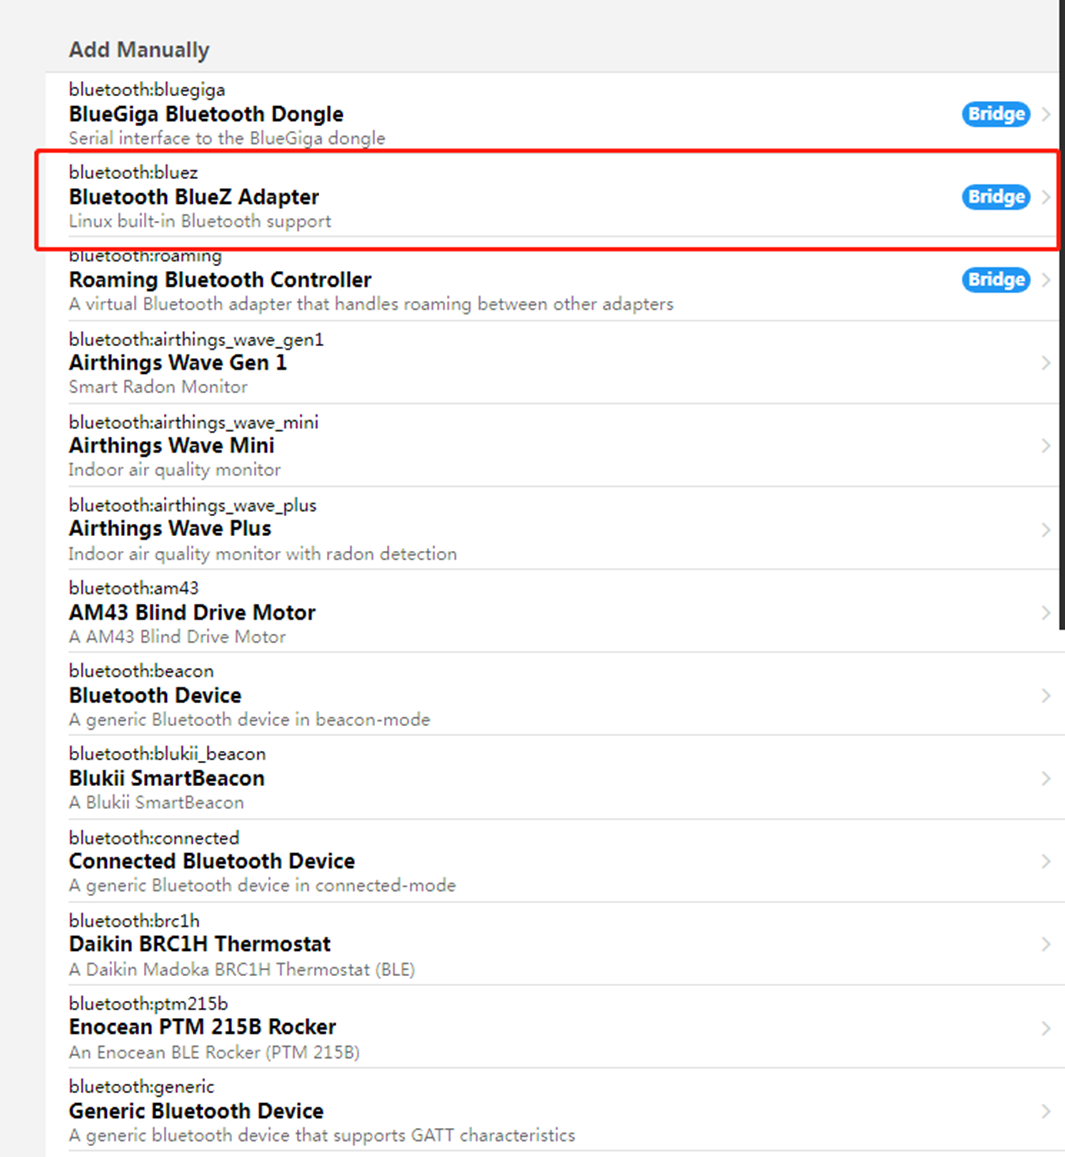
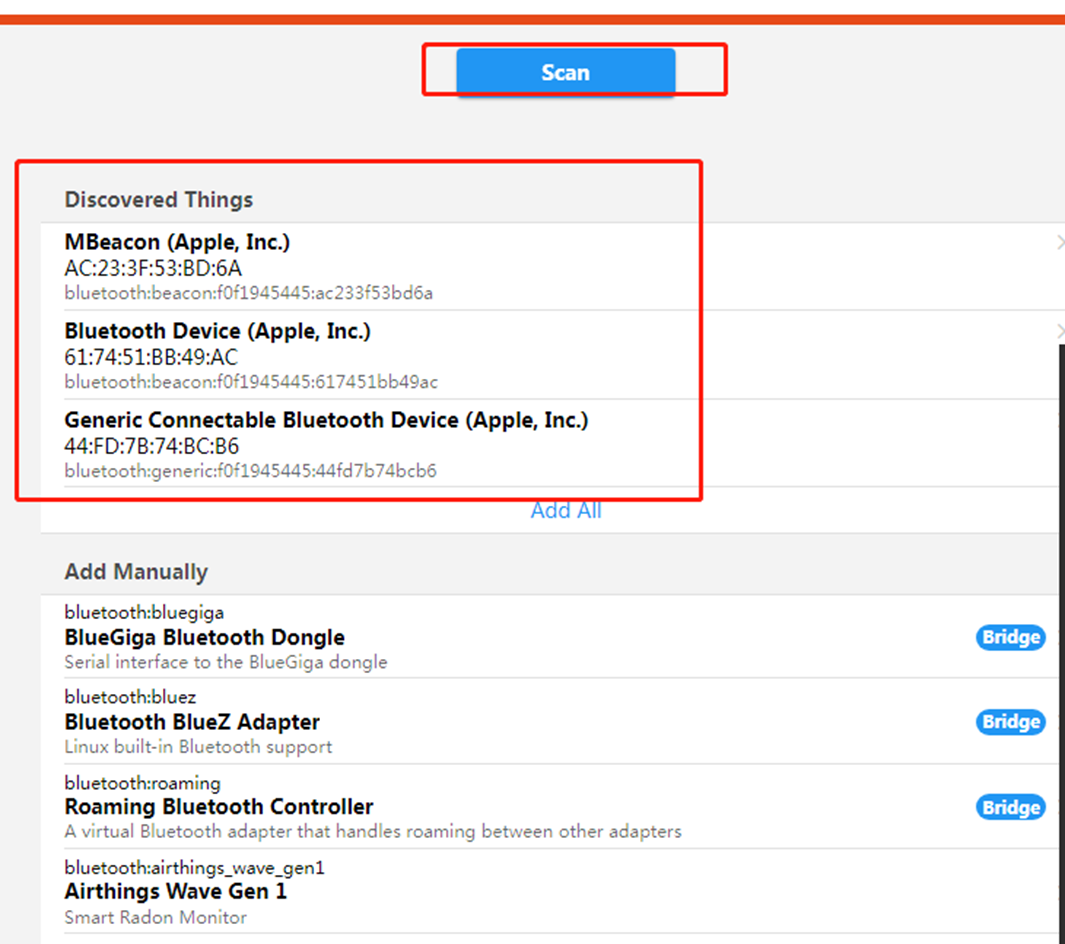
Add Tings Setting->Things->Right lower foot+->Bluebooth Binding->Bluetooth BlueZ Adapter
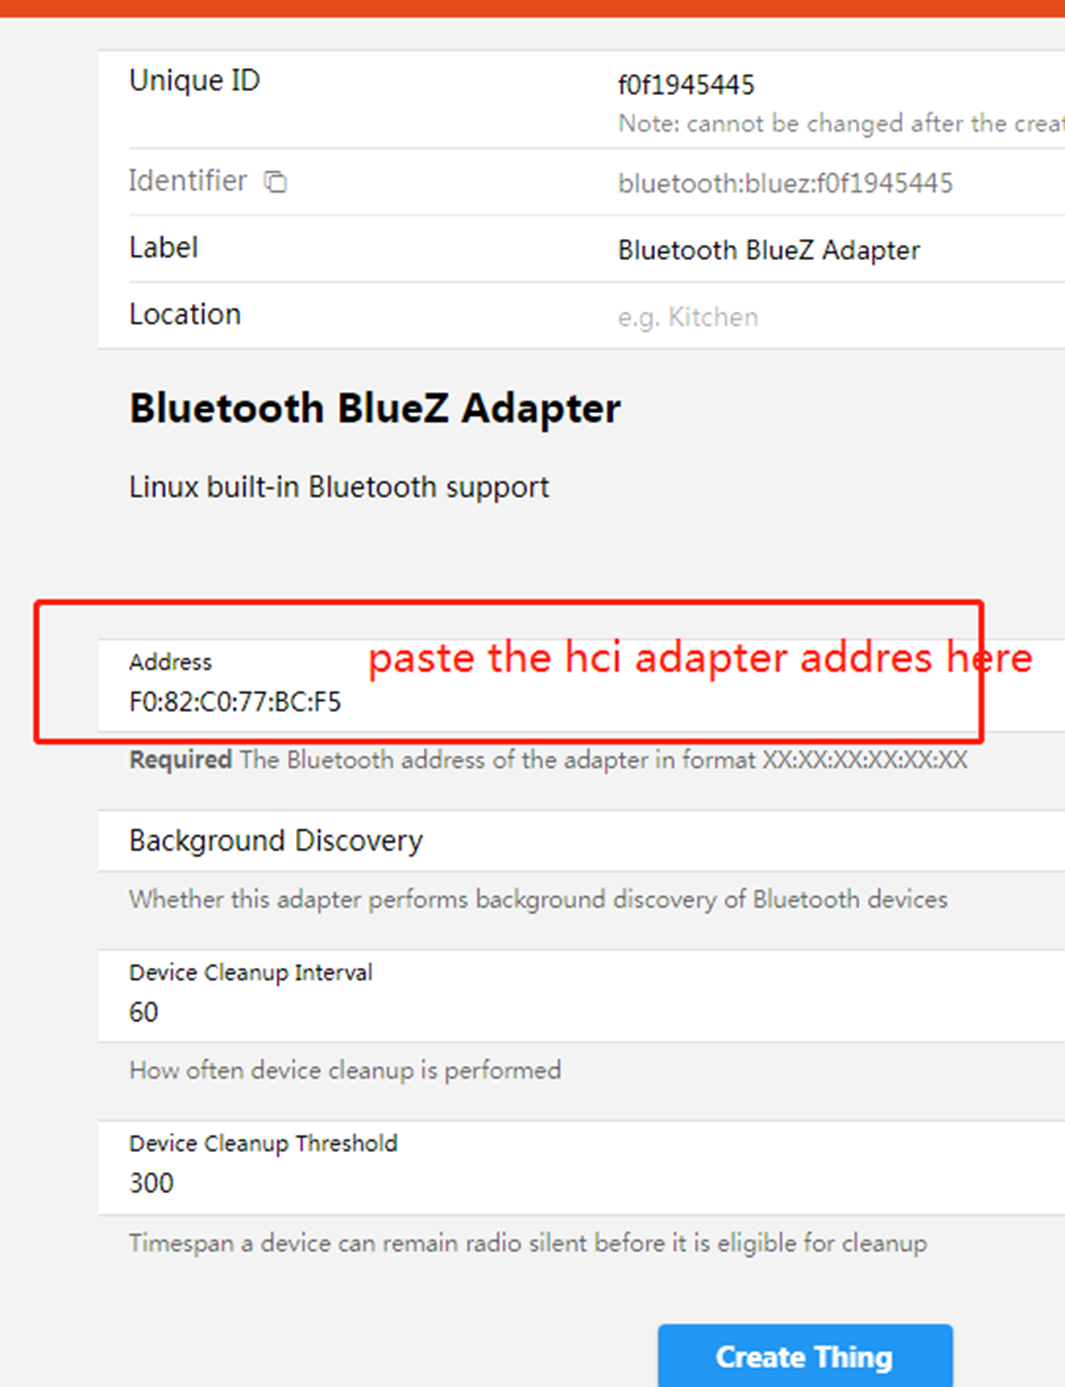
- click the CreateThing to create it
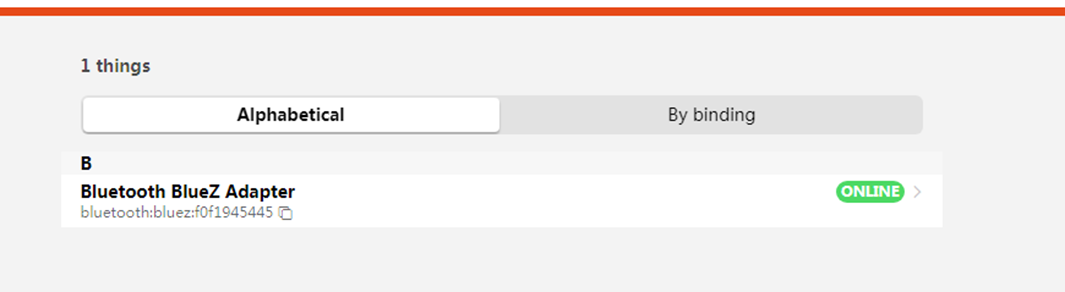
scan the device
9. Application Layer Development
9.1 Led
This board has six leds can be controlled by software, they are led0 ~ led5
9.1.1 on led with red
echo 15,0,0 > /sys/class/leds/led0/rgb_value
9.1.2 off led
echo 0,0,0 > /sys/class/leds/led0/rgb_value
9.2 Button
This board has one button can used by software, when pressed, the system will auto call the button script in the /etc/rc.button/battery_power_switch
here are two incomming parameters
SEEN: this is the time, unit seconds
ACTION: this is the action, it will we pressed or release
see the example has one function in the button script - firts is the long pressed 3 seconds to close the battery power supply
\#!/bin/sh

 [ "$ACTION" = "pressed" ] && {
     logger "battery_power_switch pressed, SEEN:$SEEN"
     exit 0
 }


 [ ! "$ACTION = "released" ] && {
     exit 0
 }

 logger "battery_power_switch released, SEEN:$SEEN"


 [ $SEEN -gt 3 ] && {
     logger "battery switch ing"
     val=`i2cget -f -y 0 0x6a 0x09`
     ret=$?
     [ "$ret" = "0" ] && {
         if [ "$val" = "0x20" ]; then #
             logger "open battery !!"
             i2cset -f -y 0 0x6a 0x09 0x44
         else
             logger "close battery !!"
             i2cset -f -y 0 0x6a 0x09 0x20
         fi
     }
     exit 0
 }
9.3 Ethernet
this gateway has one ehternet port - wan port eth0
see the config
root@DSGW211:~# cat /etc/network/interfaces
 \# interfaces(5) file used by ifup(8) and ifdown(8)
 \# Include files from /etc/network/interfaces.d:
 source /etc/network/interfaces.d/*

 auto eth0
 iface eth0 inet dhcp
9.4 wifi
This gateway have a 2.4g/5.0g radio, it worked at sta mode and ap mode:
- ap config
root@DSGW211:~# cat /etc/hostapd.conf
 \##### hostapd configuration file ##############################################
 interface=wlan0
 ctrl_interface=/var/run/hostapd
 ssid=TESTWIFI
 channel=6
 wpa=2
 wpa_passphrase=963852741
 \#bridge=br0

 \##### default configuration #######################################
 \#driver=rtl871xdrv
 beacon_int=100
 hw_mode=g
 ieee80211n=1
 wme_enabled=1
 ht_capab=[SHORT-GI-20][SHORT-GI-40][HT40+]
 wpa_key_mgmt=WPA-PSK
 wpa_pairwise=CCMP
 max_num_sta=8
 wpa_group_rekey=8640
- sta config
root@DSGW211:~# cat /etc/wpa_supplicant.conf
 ctrl_interface=/var/run/wpa_supplicant
 update_config=1
 ap_scan=1

 network={
   scan_ssid=1
   ssid="AAAAAA"
   psk="dl123456"
   key_mgmt=WPA-PSK
   bssid=
   priority=2
 }
9.5 Zigbee
This Gateway Has a Zigbee Module EFR32MG1B232 or EFR32MG21
Host Development Demo Example
NCP Development
- User can obtained the zigbee module NCP program in simplicity studio, the module number is EFR32MG1B232F256G
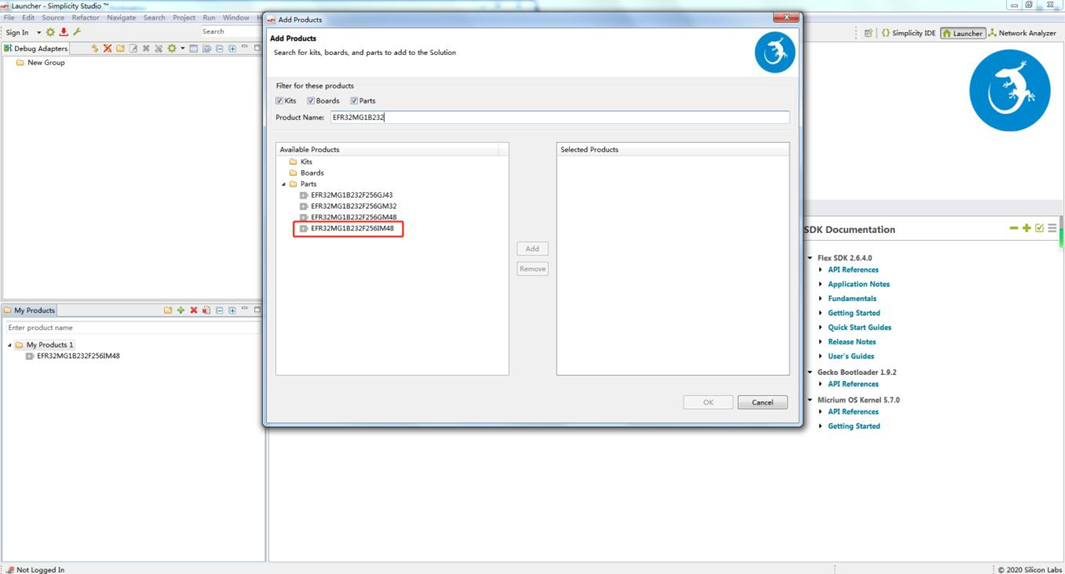
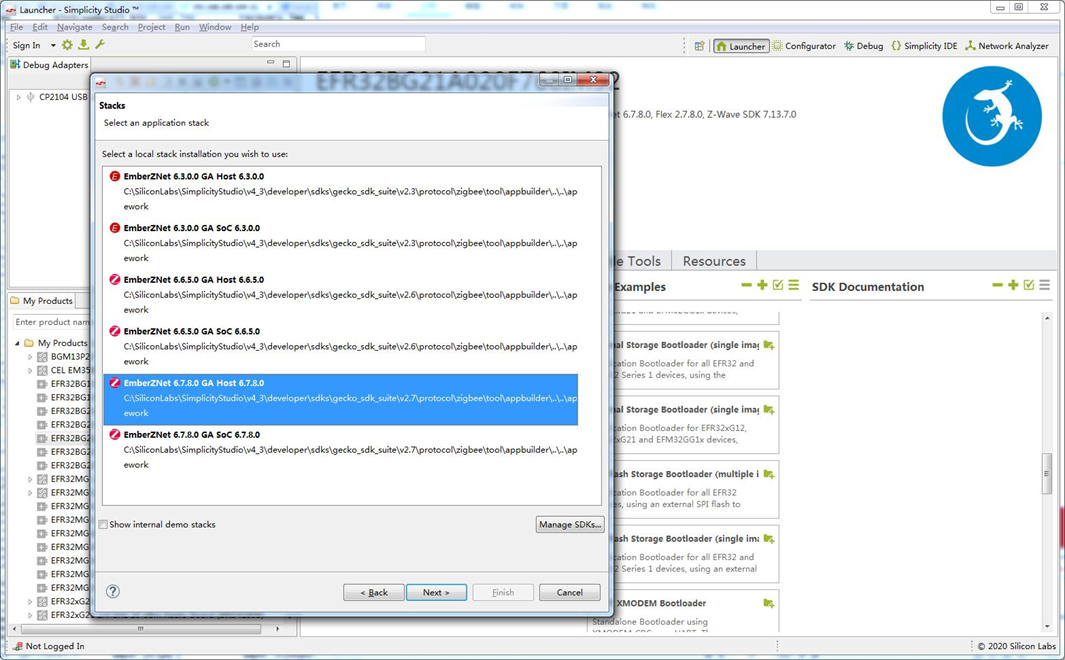
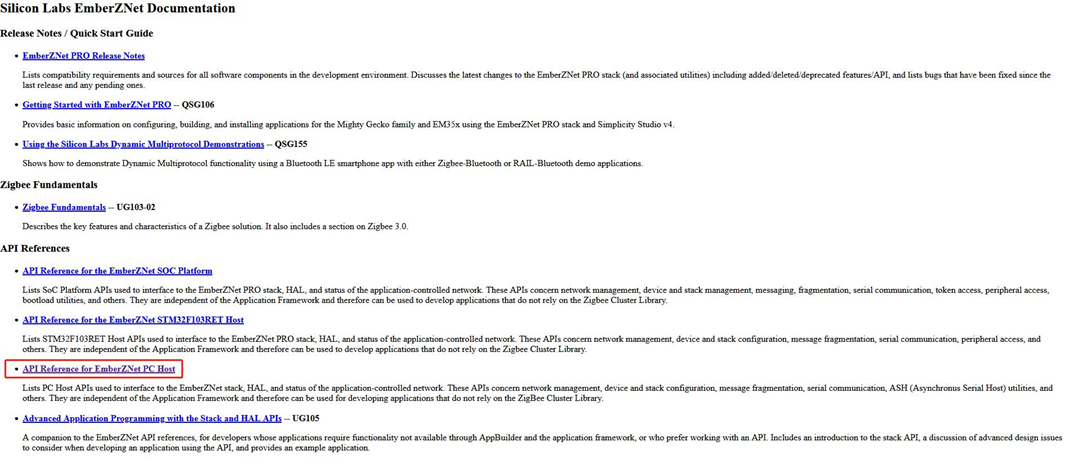
For detailed information to flash image to the zigbee module, please refer to document ZIGBEE MODULE FLASH FIRMWAREv1.0 For SDK to develop program in gateway, please refer to document API Reference for EmberZNet PC Host. It can be found in the ss5¡¯s directory of C:\SiliconLabs\SimplicityStudio\v4_3\developer\sdks\gecko_sdk_suite\v2.7\protocol\zigbee\documentation
9.6 Bluetooth
This Gateway Has a Bluetooth Module EFR32BG21
Host Development Demo Example
NcP Development
- User can obtained the ble module NCP program in simplicity studio, the module number is ERF32BG21
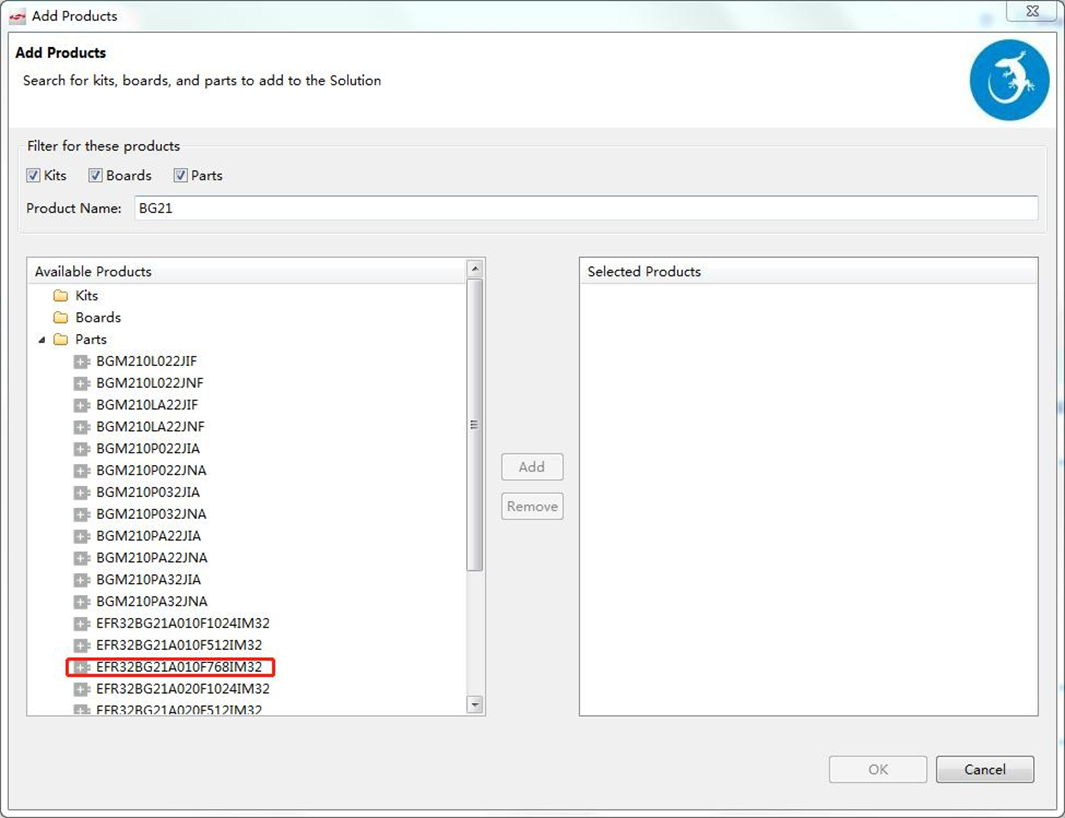
Find the correct BLE module in simplicity studio, then follow the same guide in section 10
9.7 LTE
This Gateway Has a LTE Module BG96 or other Module We use the pppd to dial and manage the bg96. here is some config and steps about the lte module
- pppd dial scripts
root@dsgw211:~# ls /etc/ppp/peers/* -alh
 -rwxr-xr-x 1 root root 366 Apr 7 07:25 /etc/ppp/peers/dial
 -rwxr-xr-x 1 root root 163 Apr 7 07:25 /etc/ppp/peers/mo_3gmodule.dial
 -rwxr-xr-x 1 root root 1.1K Jan 4 2021 /etc/ppp/peers/provider
- do the pppd call in the foreground
- stop the demo program.
/etc/init.d/done stop;/etc/init.d/bg96 stop;
- modify the pppd to debug mode
root@dsgw211:~# cat /etc/ppp/options
 debug               // remove #, open the debug mode
 nodetach            // add this
 #logfile /dev/null // comment this line
 noipdefault
- open the lte module
echo 0 > /sys/class/leds/ltepwr/brightness
echo 0 > /sys/class/leds/lterst/brightness
echo 0 > /sys/class/leds/lterf/brightness
sleep 1
echo 1 > /sys/class/leds/ltepwr/brightness
echo 1 > /sys/class/leds/lterst/brightness
echo 1 > /sys/class/leds/lterf/brightness
sleep 15
- pppd dial
root@dsgw211:~# pppd call dial
 timeout set to 3 seconds
 send (ate0^M)
 expect (OK)
 ^M
 OK
 -- got it

 send (at^M)
 expect (OK)
 ^M
 ^M
 OK
 -- got it

 send (AT+CSQ^M)
 expect (OK)
 ^M
 ^M
 +CSQ: 99,99^M
 ^M
 OK
 -- got it

 send (AT+COPS?^M)
 expect (OK)
 ^M
 ^M
 +COPS: 0^M
 ^M
 OK
 -- got it

 send (AT+CREG?^M)
 expect (OK)
 ^M
 ^M
 +CREG: 0,0^M
 ^M
 OK
 -- got it

 send (AT+CEREG?^M)
 expect (OK)
 ^M
 ^M
 +CEREG: 0,0^M
 ^M
 OK
 -- got it

 send (AT+CPIN?^M)
 expect (READY)
9.8 EnOeacn
download the Enoeacn Gateway test bin and run it
root@DSGW211:~# rm -rf /usr/bin/EnOceanGateway; wget http://114.215.195.44:8080/au/EnOceanGateway_arm64_debian -O /usr/bin/EnOceanGateway;
 chmod a+x /usr/bin/EnOceanGateway;
 /usr/bin/EnOceanGateway--2023-05-19 08:49:33-- http://114.215.195.44:8080/au/EnOceanGateway_arm64_debian
 Connecting to 114.215.195.44:8080... connected.
 HTTP request sent, awaiting response... 200
 Length: 528760 (516K)
 Saving to: '/usr/bin/EnOceanGateway'

 /usr/bin/EnOceanGateway     100%[=======================================================>] 516.37K 1.71MB/s  in 0.3s

 2023-05-19 08:49:33 (1.71 MB/s) - '/usr/bin/EnOceanGateway' saved [528760/528760]

 root@DSGW211:~# chmod a+x /usr/bin/EnOceanGateway;
 root@DSGW211:~# /usr/bin/EnOceanGateway
 dev : /dev/ttyS0buat : 57600, nbits: 8, parity: N, stop: 1
 EnOcean-Link Gateway
10. Support
Please contact our sell to get more support.