Quick Start Guide
1. Introduction
This Quick Start Guide explains the basics: how to connect and set up your target on the network; how to install the SDK; and how to build the firmware images. The Linux Software Developer’s Kit (SDK) is an embedded hardware and software suite that enables Linux developers to create applications on Dusun’s DSOM-090M gateway. and leveraging existing open source software, the SDK simplifies the process of adding custom applications. Device drivers, GNU toolchain, Pre- defined configuration profiles, and sample applications are all in included.
2. Gateway Information
2.1 Basic information
Embedded MIPS1004Kc(880 MHz) with 32 KB I-Cache and 32 KB D-Cache for each core 16-bit DDR2/3 up to 256/512 Mbytes
SPI, NAND Flash, SDXC
1x USB 3.0, 2x USB 2.0, 3x PCle host
5-port 10/100/1000 SW/PHY and one RGMIl
Green
Intelligent Clock Scaling (exclusive)
DDRII/Il1: ODT off,Self-refresh mode
I2C, I2S, SPI, PCM, UART,JTAG,MDC, MDIO, GPIO,SPDIF-TX
Hardware NAT with IPv6 and 2 Gbps wired speed
Firmware: Linux 2.6 SDK, eCOS with IPv6
RGMll iNIC Driver: Linux 2.4/2.6
3. Target Setup
This section describes how to connect the gateway into your host computer and network.
Connecting a gateway - Power
- Make sure that the power adapter is 12.0V.
- Select the appropriate power plug adaptor for your geographical location. Insert it into the slot on the Universal Power Supply; then plug the power supply into an outlet.
- Connect the output plug of the power supply to the gateway
Connecting a gateway – Network interface

- Connect one end of the network cable to the network port on the laptop or desktop
- Connect the other end of network cable to the network port on the gateway.
- SSH login gateway ip address,username is root passwd is admin.
4.Compile the Environment to Build
Please use ubuntu 18.04 .iso image to setup your build environment. You can use a virtual machine or a physical PC to install ubuntu 18.04.
4.1 Virtual Machine
It is recommended that novice users use virtual machines, install ubuntu 18.04 to the virtual machine, and leave enough disk space (at least 100G) for the virtual machine.
4.2 Ubuntu PC Compile the Environment to Build
The use of physical machine compilation users can use a ubuntu PC.
5.SDK Acquisition and Preparation
5.1 Download the source code from the Dusun FTP
The source package name will be openwrt_MT7621.tar.gz, get it from Dusun FTP. openwrt_MT7621.tar.gz
5.2 Code Compression Package Check
The next step can be taken only after generating the MD5 value of the source compression package and comparing the MD5 value of the MD5 .txt text to confirm that the MD5 value is the same, and if the MD5 value is not the same, the energy code pack is damaged, please download it again.
$ md5sum openwrt_MT7621.tar.gz
5.3 The Source Compression Package is Unzipped
Copy the source code to the corresponding directory and unzip the source code compression package.
$ sudo -i
$ mkdir 7621_test
$ tar -zxf openwrt_MT7621.tar.gz -C ./7621_test/
$ cd 7621_test/
6. Code Compilation
6.1 Getting started
We have improved the compilation script so that you only need to execute the command ". /all_files/shell/release_all.sh" The first time you run the script ". /all_files/shell/release_all.sh", which will create the environment needed to compile Next, extract some of the required configuration Compile the extracted file again
$. /all_files/shell/release_all.sh
$ tar -zxf DSGW-7621_V0.1.tar.gz
This process may create some unwanted files, so we need to remove them deleted.
rm ./build_dir/target-mipsel_24kec+dsp_uClibc-0.9.33.2/linux-ramips_mt7621/linux-3.10.108/drivers/char/*.o -rf;
rm ./build_dir/target-mipsel_24kec+dsp_uClibc-0.9.33.2/linux-ramips_mt7621/linux-3.10.108/drivers/char/*.cmd -rf;
rm ./build_dir/target-mipsel_24kec+dsp_uClibc-0.9.33.2/linux-ramips_mt7621/linux-3.10.108/arch/mips/ralink/*.cmd -rf;
rm ./build_dir/target-mipsel_24kec+dsp_uClibc-0.9.33.2/linux-ramips_mt7621/linux-3.10.108/arch/mips/ralink/*.o -rf;
rm ./build_dir/target-mipsel_24kec+dsp_uClibc-0.9.33.2/linux-ramips_mt7621/linux-3.10.108/drivers/mmc/core/*.o -rf;
rm ./build_dir/target-mipsel_24kec+dsp_uClibc-0.9.33.2/linux-ramips_mt7621/linux-3.10.108/drivers/mmc/core/*.cmd -rf;
rm ./build_dir/target-mipsel_24kec+dsp_uClibc-0.9.33.2/linux-ramips_mt7621/linux-3.10.108/drivers/mmc/host/mtk-mmc/*.cmd -rf;
rm ./build_dir/target-mipsel_24kec+dsp_uClibc-0.9.33.2/linux-ramips_mt7621/linux-3.10.108/drivers/mmc/host/mtk-mmc/*.o -rf;
rm ./build_dir/target-mipsel_24kec+dsp_uClibc-0.9.33.2/linux-ramips_mt7621/linux-3.10.108/drivers/mtd/ralink/*.o -rf;
rm ./build_dir/target-mipsel_24kec+dsp_uClibc-0.9.33.2/linux-ramips_mt7621/linux-3.10.108/drivers/mtd/ralink/*.cmd -rf;
rm ./build_dir/target-mipsel_24kec+dsp_uClibc-0.9.33.2/linux-ramips_mt7621/linux-3.10.108/drivers/usb/serial/*.cmd -rf;
rm ./build_dir/target-mipsel_24kec+dsp_uClibc-0.9.33.2/linux-ramips_mt7621/linux-3.10.108/drivers/usb/serial/*.o -rf;
rm ./build_dir/target-mipsel_24kec+dsp_uClibc-0.9.33.2/linux-ramips_mt7621/linux-3.10.108/drivers/i2c/busses/*.o -rf;
rm ./build_dir/target-mipsel_24kec+dsp_uClibc-0.9.33.2/linux-ramips_mt7621/linux-3.10.108/drivers/i2c/busses/*.cmd -rf;
rm ./build_dir/target-mipsel_24kec+dsp_uClibc-0.9.33.2/linux-ramips_mt7621/linux-3.10.108/drivers/i2c/algos/*.cmd -rf;
rm ./build_dir/target-mipsel_24kec+dsp_uClibc-0.9.33.2/linux-ramips_mt7621/linux-3.10.108/drivers/i2c/algos/*.o -rf;
rm ./build_dir/target-mipsel_24kec+dsp_uClibc-0.9.33.2/linux-ramips_mt7621/linux-3.10.108/drivers/leds/*.o -rf;
rm ./build_dir/target-mipsel_24kec+dsp_uClibc-0.9.33.2/linux-ramips_mt7621/linux-3.10.108/drivers/leds/*.cmd -rf;
rm ./build_dir/target-mipsel_24kec+dsp_uClibc-0.9.33.2/linux-ramips_mt7621/linux-3.10.108/drivers/rtc/*.cmd -rf;
rm ./build_dir/target-mipsel_24kec+dsp_uClibc-0.9.33.2/linux-ramips_mt7621/linux-3.10.108/drivers/rtc/*.o -rf;
rm ./build_dir/target-mipsel_24kec+dsp_uClibc-0.9.33.2/linux-ramips_mt7621/linux-3.10.108/drivers/net/*.o -rf;
rm ./build_dir/target-mipsel_24kec+dsp_uClibc-0.9.33.2/linux-ramips_mt7621/linux-3.10.108/drivers/net/raeth/*.o -rf;
rm ./build_dir/target-mipsel_24kec+dsp_uClibc-0.9.33.2/linux-ramips_mt7621/linux-3.10.108/drivers/net/raeth/*.cmd -rf;
rm ./build_dir/target-mipsel_24kec+dsp_uClibc-0.9.33.2/linux-ramips_mt7621/linux-3.10.108/kernel/*.o -rf;
rm ./build_dir/target-mipsel_24kec+dsp_uClibc-0.9.33.2/linux-ramips_mt7621/linux-3.10.108/kernel/*.cmd -rf;
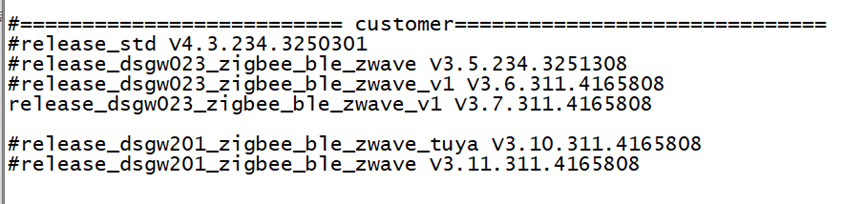
We here we choose release_dsgw023_zigbee_ble_zwave_v1 V3.7.311.4165808
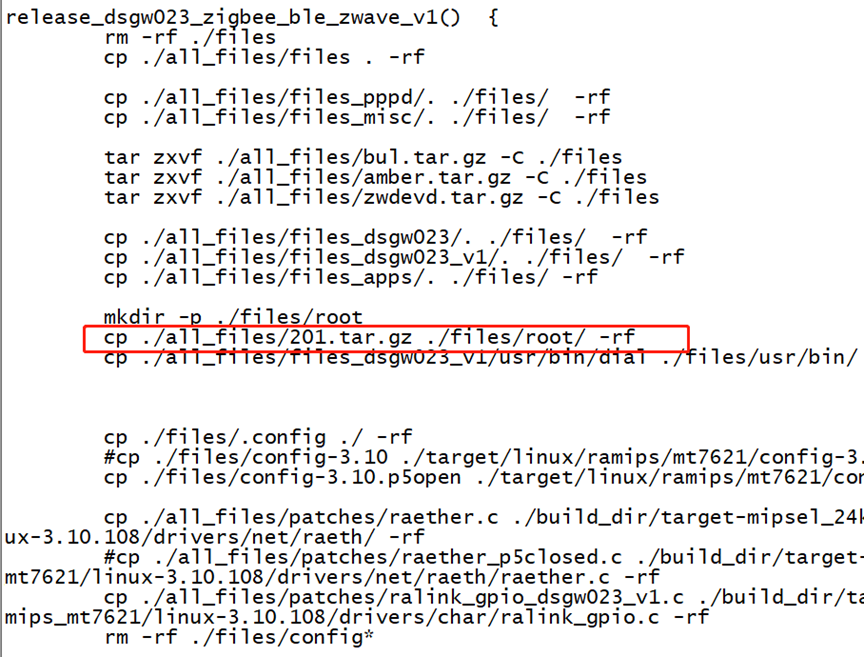
need to modify . /all_files/shell/release_all.sh script to make it match our board,
In "release_dsgw023_zigbee_ble_zwave_v1", there is a custom code segment for dusun, which can be removed if not needed.
Run the script to generate the image file we need
$. /all_files/shell/release_all.sh

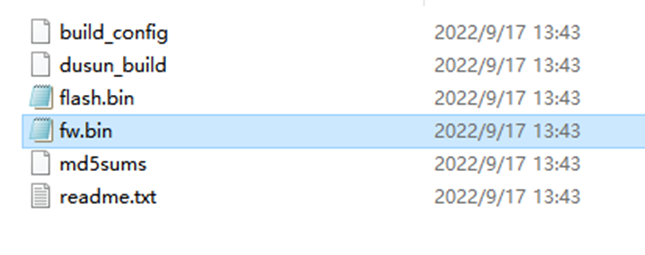
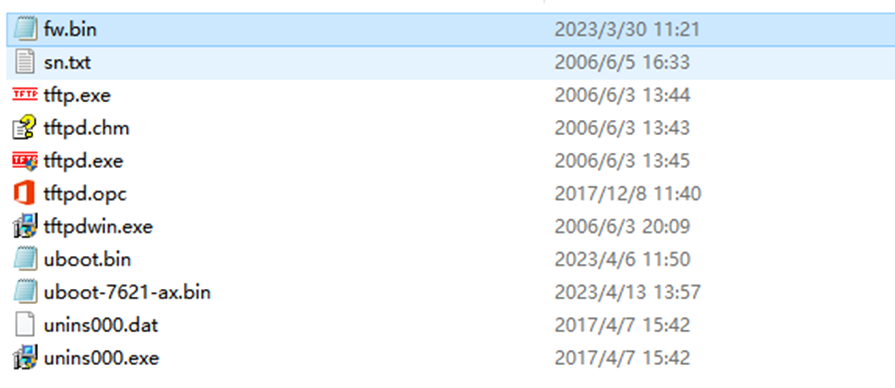
Unpacking the file we can get the fw.bin file
We can now upgrade our image via tftp and web upgrade Install the ftp software, set the output directory and other configurations The tftp tool can be downloaded from this connection
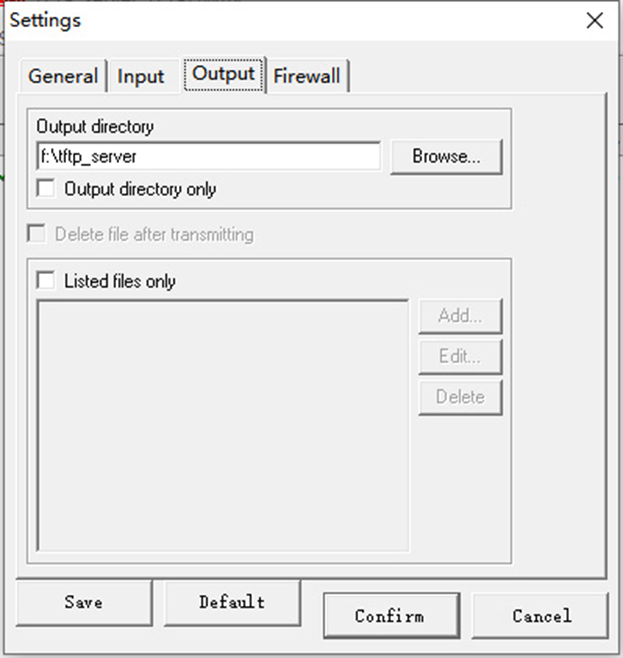
Next place the fw.bin file in the path set
Run The Image on the board
Connect the RK3568 board serial port to the PC via a USB to UART Bridge.

Use Putty or other Terminal software as your console tool, SERIAL CONSOLE SETTINGS:
- 115200/8N1
- Baud: 115200
- Data Bits: 8
- Parity Bit: No
- Stop Bit: 1
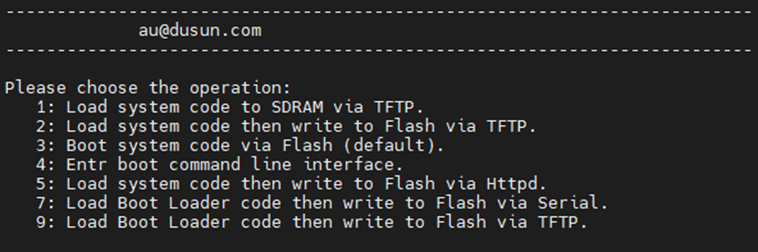
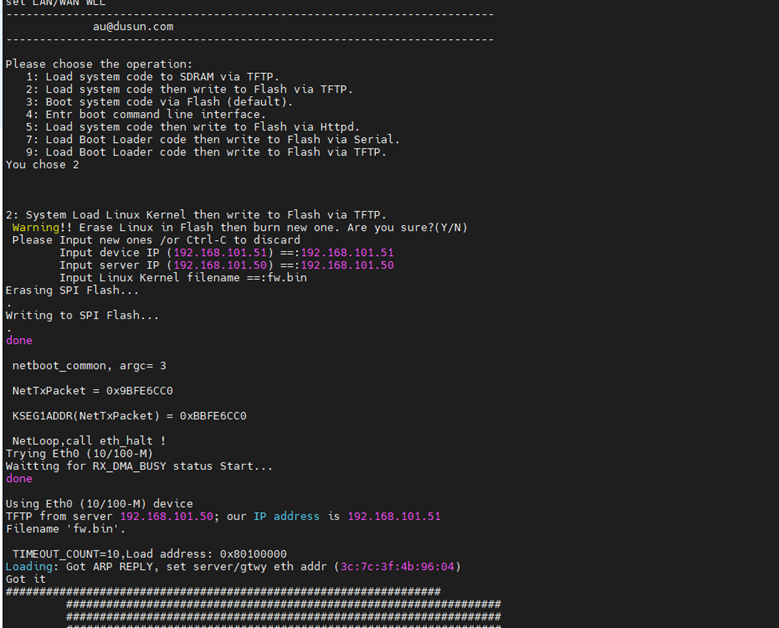
Power UP the board, you can see the boot log on console: Here we enter 2, 2: Load system code then write to Flash via TFTP.
Fill in the IP of the board and the IP of the server.Make sure the TFTP server is turned on
You can download fw.bin from here for testing
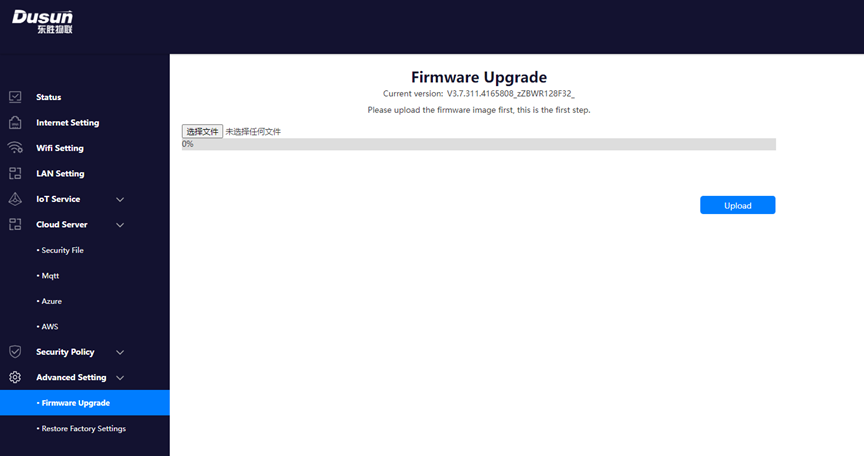
In addition, there is an option for web upgrade If you use dusun's code, you can access the web interface through the IP of the gateway
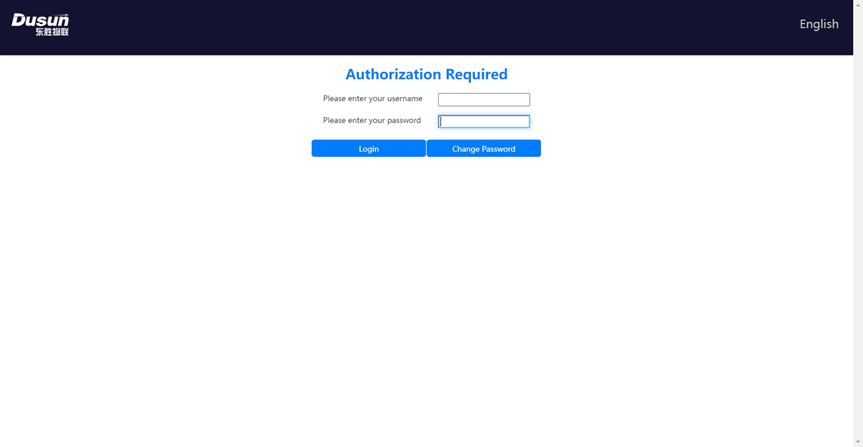
You can see some of the customization features
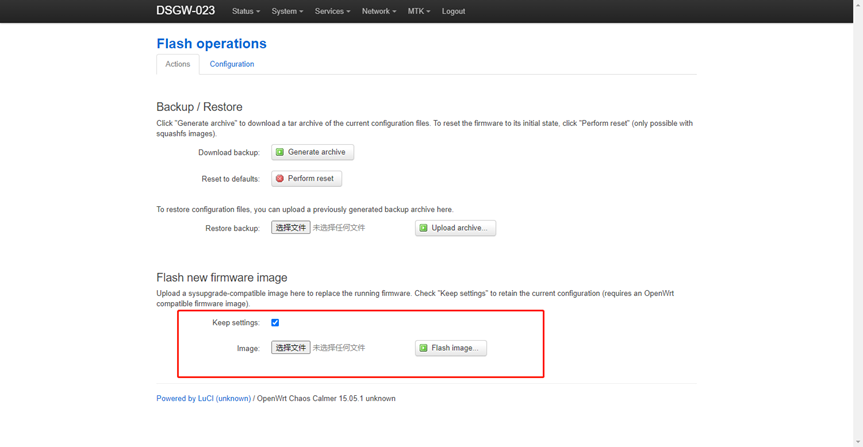
If you do not use dusun's extension code, you can access the page through the gateway IP
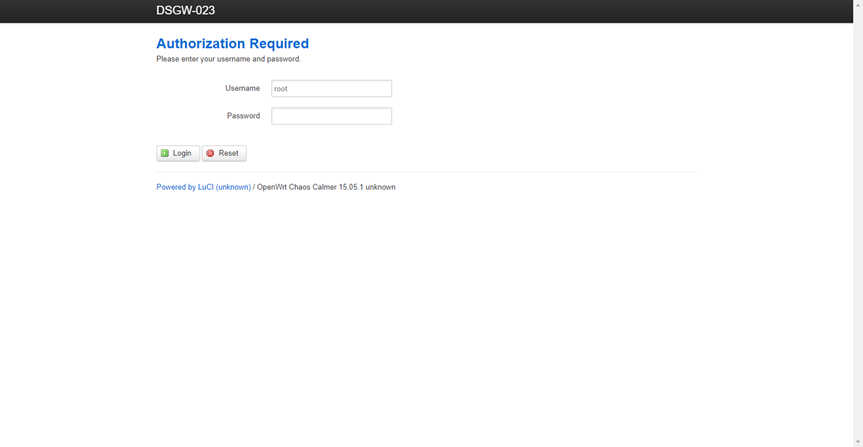
Gateway upgrades can be performed under this option.
7. Simple test
7.1 Eth_test
ifconfig eth1 2>/dev/null | grep UP | wc -l

ifconfig eth1 2>/dev/null | grep RUNNING | wc -l

ifconfig eth1 2>/dev/null | grep inet | grep -v inet6 | wc -l
7.2 Emmc_test
df -h | grep mmcblk | awk '{print $2}' | head -n1
7.3 wifi24_test
ifconfig ra0 2>/dev/null |grep UP |wc -l

ifconfig ra0 2>/dev/null |grep RUNNING |wc -l
7.4 wifi50_test
&

ifconfig rai0 2>/dev/null |grep UP |wc -l

ifconfig rai0 2>/dev/null |grep RUNNING |wc -l
7.5 network
Run the command "cat /etc/config/network" to view the network configuration
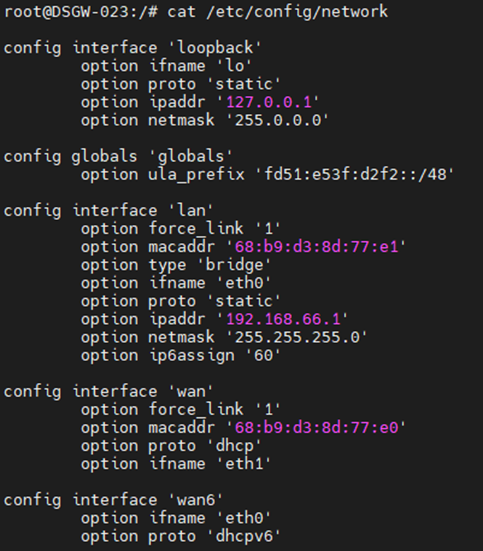
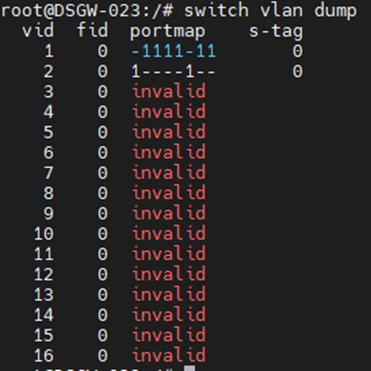
You can view the network port configuration by plugging and unplugging the network port, currently using port0 as WAN port and port1 2 3 as LAN port.

Run the command "switch vlan dump" to view the Portmap