Quick Start Guide
1. Introduction
This Quick Start Guide explains the basics:
how to connect and set up your target on the network
how to install the SDK
how to modify and build the firmware images
The Linux Software Developer’s Kit (SDK) is an embedded hardware and software suite that enables Linux developers to create applications on Dusun’s DSOM-080M Module.
2. Baseboard Information
This section describes the baseboard’s basic resource infomation and interfaces.
2.1 Basic information
1 CORE CPU(MT7628AN)
1 led
1 button
1 wan(10/100M)
4 lan(10/100M)
2 uart
2.2 Interface

3. Debug Setup
This section describes how to connect the board into your host computer and network to debug for development.
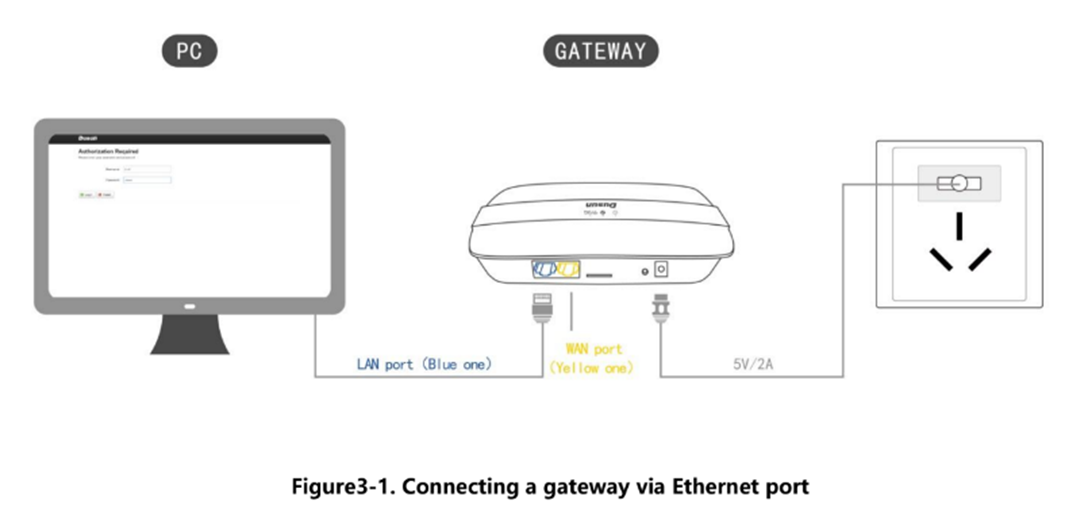
3.1 Power
Make sure that the power adapter is 5V/2A.
Select the appropriate power plug adaptor for your geographical location. Insert it into the slot on the Universal Power Supply; then plug the power supply into an outlet.
Connect the output plug of the power supply to the gateway
3.2 Wire Connect
Connect gateway to a router for login
3.3 Debug Uart Connect
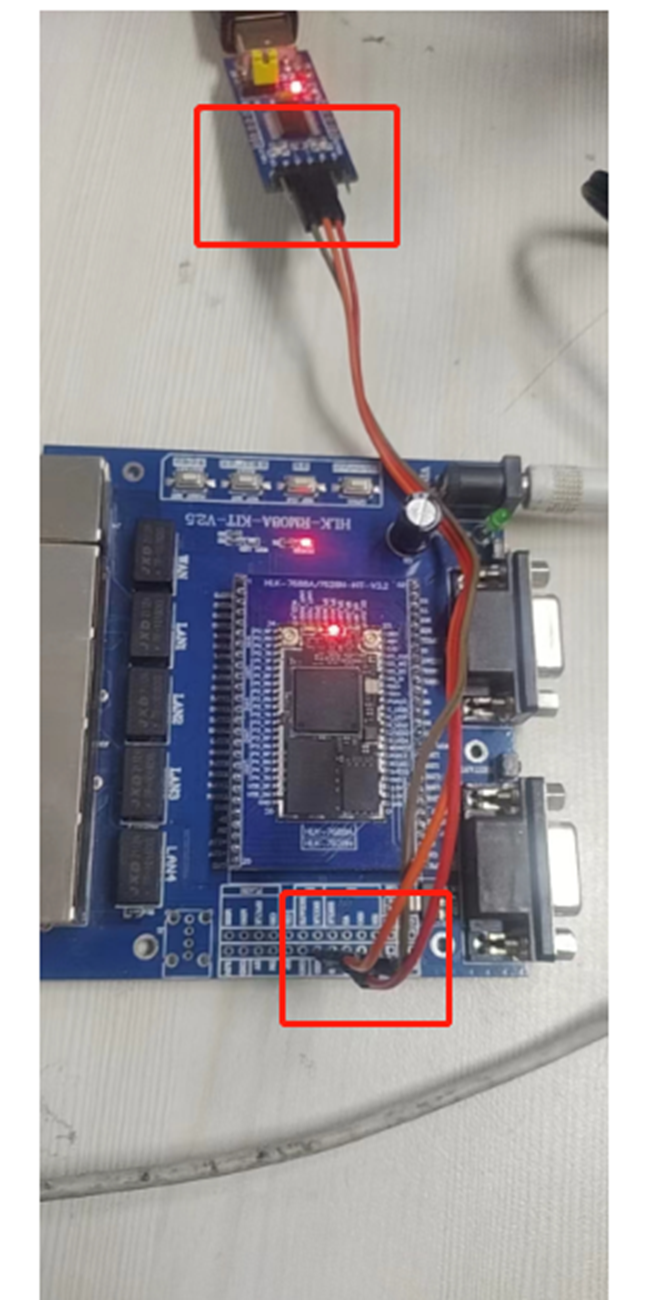
- Before you set up your development test bed, please connect the PCB serial port to your develop PC via USB-to-serial bridge.
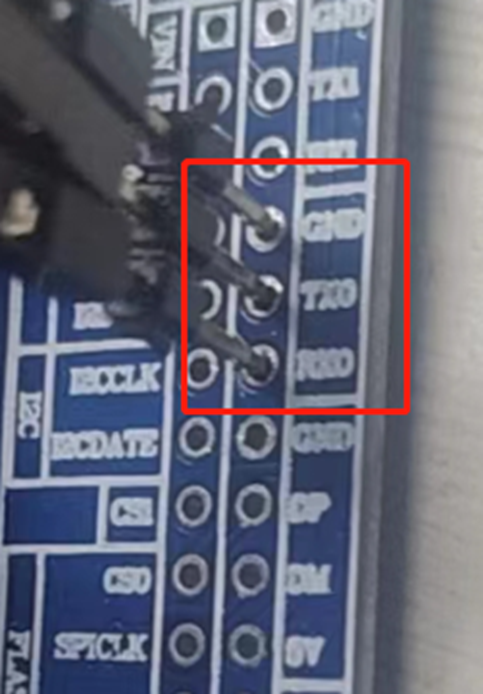
PCB serial port on Gateway
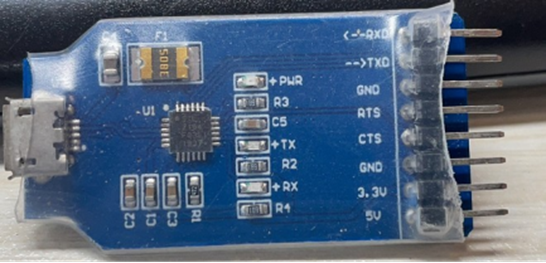
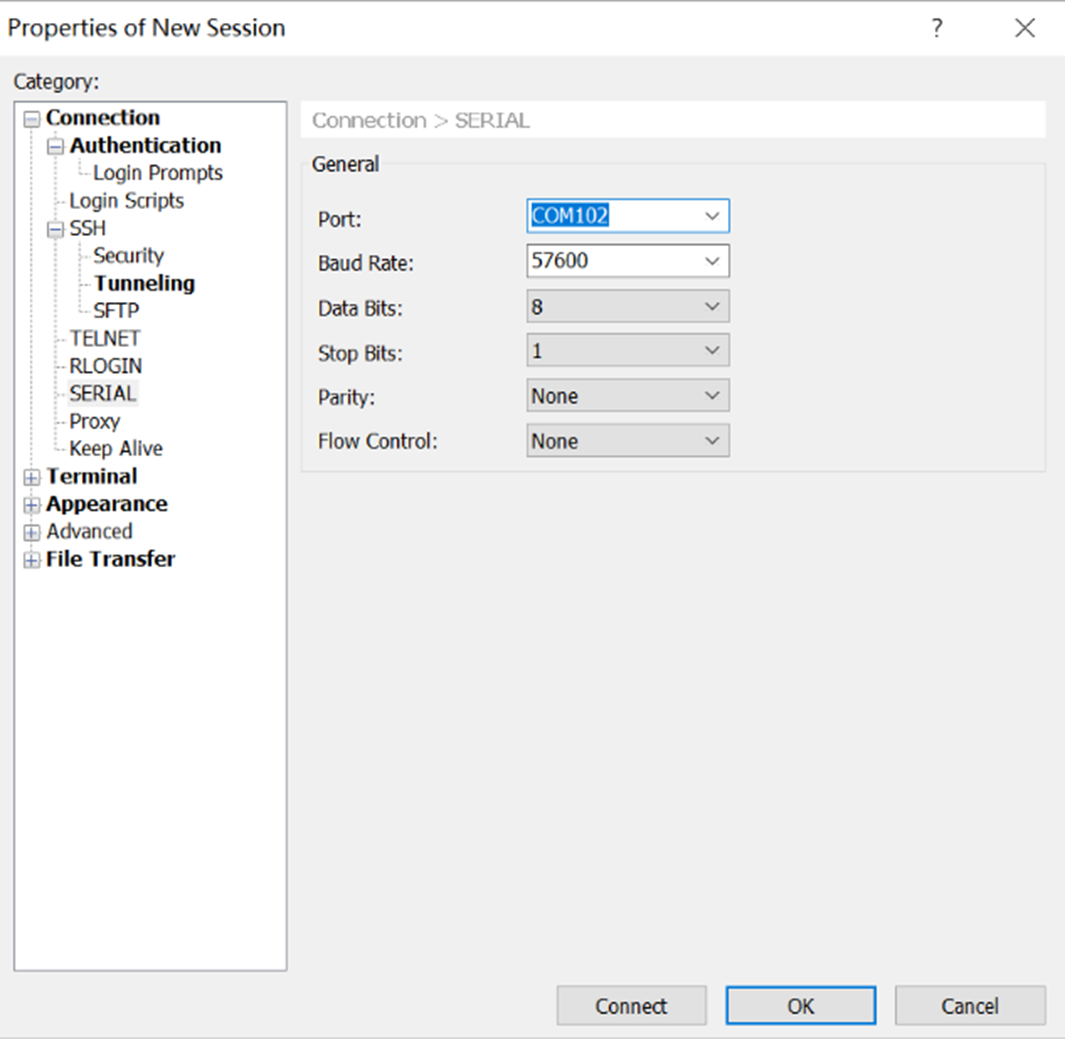
USB-to-serial bridge. Serial port setting: Baud rate: 57600 Bits: 8 Stop Bits: 1 Hardware flow control: None
4. SDK Download And Compile
This section describes how to download the sdk and compile it.
4.1 SDK Envirment Prepare
Compilation environment: Ubuntu20.4 Yocto compilation tool is automatically generated by SDK built, no additional installation is required
4.2 SDK Download
Get the source code from Dusun FTP server uncompress it under your work directory. For example:
mkdir -p ~/workdir/dsom080m
tar zxvf DSOM-080M_sdk_AV1.0.0.0.tar.gz -C /workdir/dsom080m
cd ~/workdir/dsom080m
4.3 SDK Compile
run build.sh
cd ~/workdir/dsom060r
./build.sh
4.4 SDK Output
uboot.bin is the uboot
openwrt-ramips-mt7628-mt7628-squashfs-sysupgrade.bin firmware
drwxr-xr-x 3 au au 4.0K Apr 18 15:19 .
drwxr-xr-x 3 au au 4.0K Apr 18 15:13 ..
-rw-r--r-- 1 au au 360 Apr 18 15:32 md5sums
-rw-r--r-- 1 au au 4.1M Apr 18 15:32 openwrt-ramips-mt7628-mt7628-squashfs-sysupgrade.bin
-rw-r--r-- 1 au au 2.8M Apr 18 15:32 openwrt-ramips-mt7628-root.squashfs
-rw-r--r-- 1 au au 1.3M Apr 18 15:31 openwrt-ramips-mt7628-uImage.bin
-rwxr-xr-x 1 au au 3.6M Apr 18 15:31 openwrt-ramips-mt7628-vmlinux.bin
-rwxr-xr-x 1 au au 3.7M Apr 18 15:31 openwrt-ramips-mt7628-vmlinux.elf
drwxr-xr-x 3 au au 4.0K Apr 18 15:13 packages
-rwxrwxr-x 1 au au 91K Apr 18 15:32 uboot.bin
-rw-rw-r-- 1 au au 212 Mar 31 2017 uboot_version.h
5. Firmware Program And Program
5.1 Firmware Upgrade
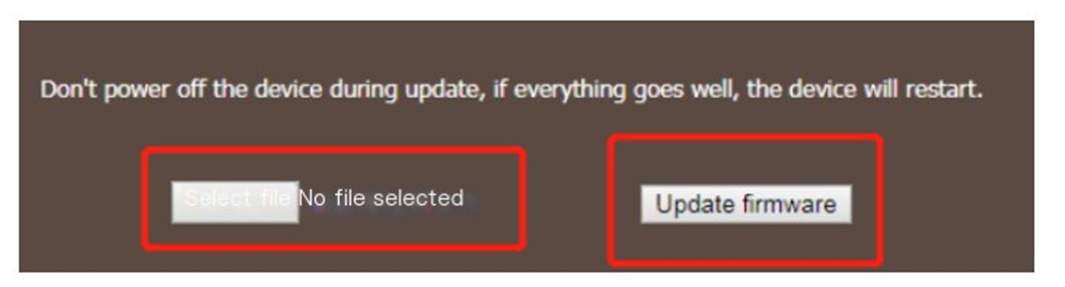
5.1.2 Uboot Web Upgrade
- Press n when power on or reset use serial login
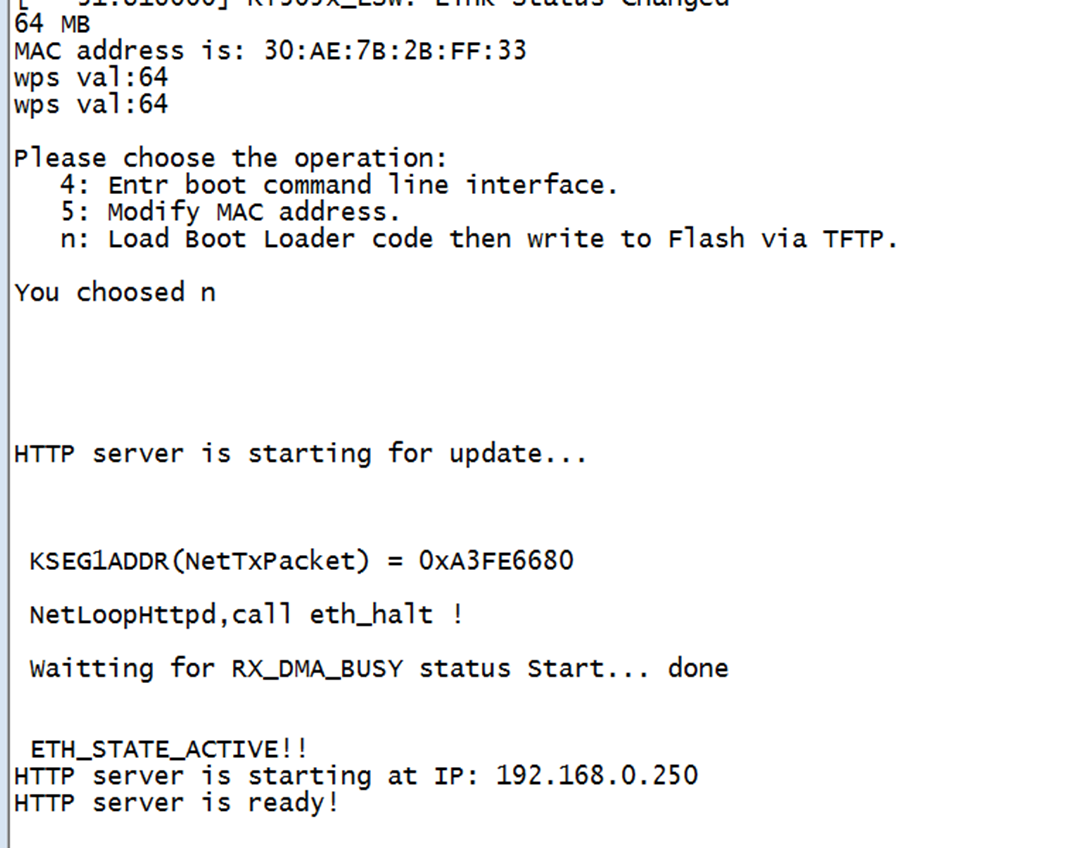
- Connect the gateway and computer directly with a network cable, and set the IP address of the computer to 192.168.0.222,
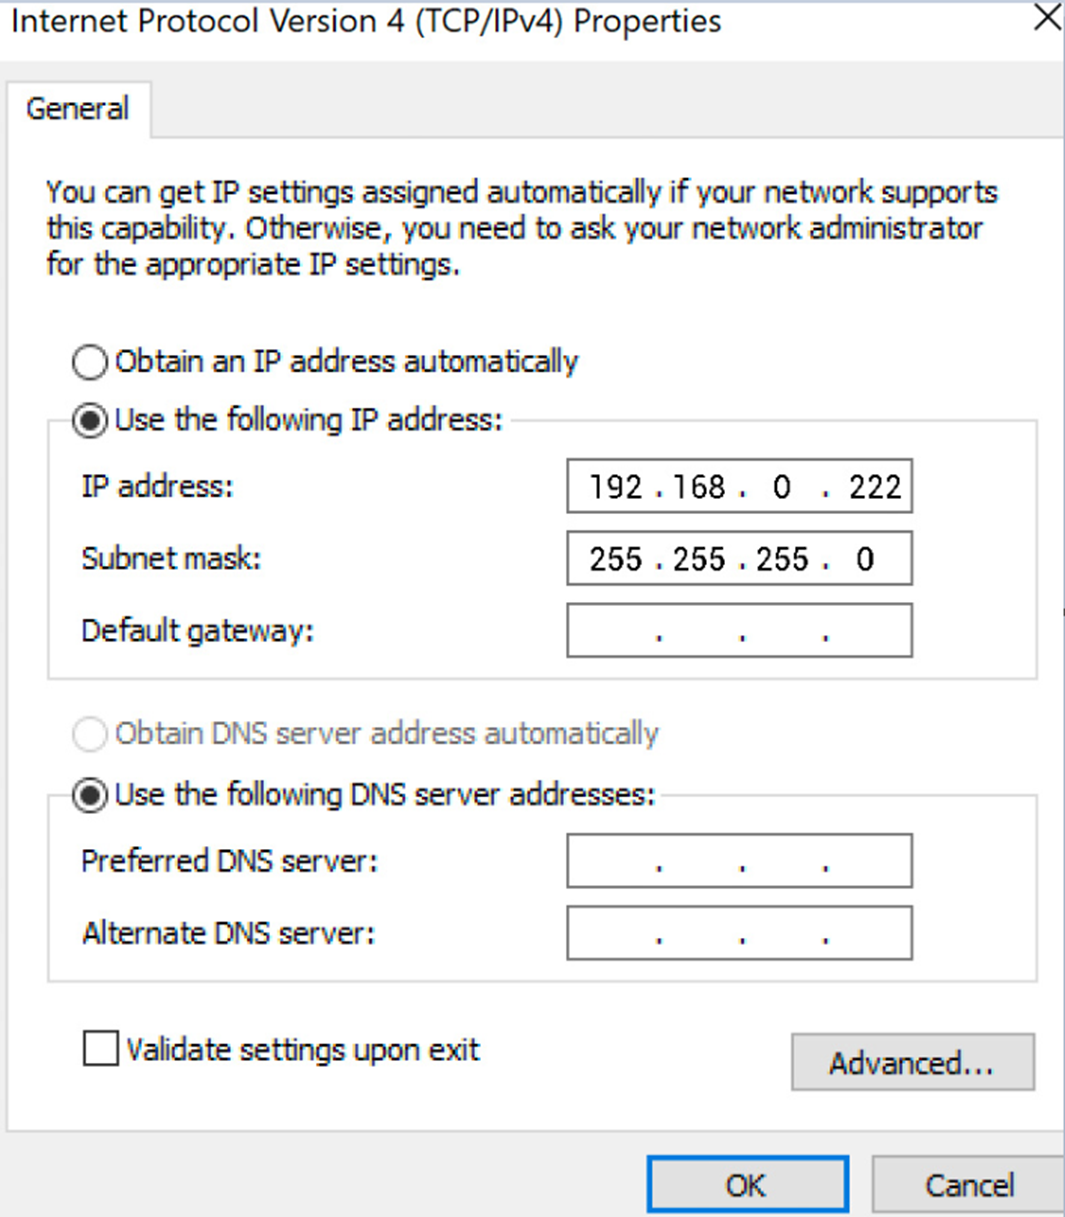
- Enter 192.168.0.250 in the browser to open the uboot upgrade page
5.1.3 System Command Upgrade
- use scp or winscp tool to put the fw.bin to the board’s tmp
scp openwrt-ramips-mt7628-mt7628-squashfs-sysupgrade.bin@192.168.xxx.xxx:/tmp/
- run sysupgrade command to upgrade the firmware
sysupgrade -n -F openwrt-ramips-mt7628-mt7628-squashfs-sysupgrade.bin
6. Gateway Login
6.1 Login Through Debug Uart
- connect uart serial tool to the board’s debug uart port
- config the serial tools’s uart config
- power on the gateway
6.2 Login Through Network(SSH)
config the ssh connection parameters
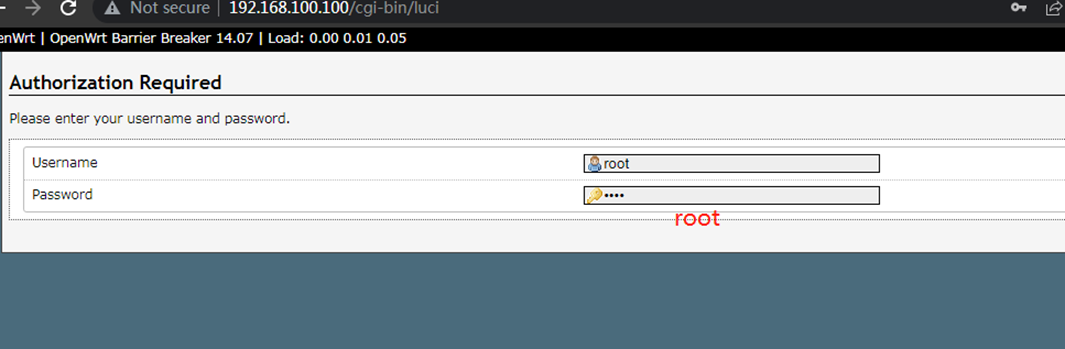
set the password to root use serial login or web page
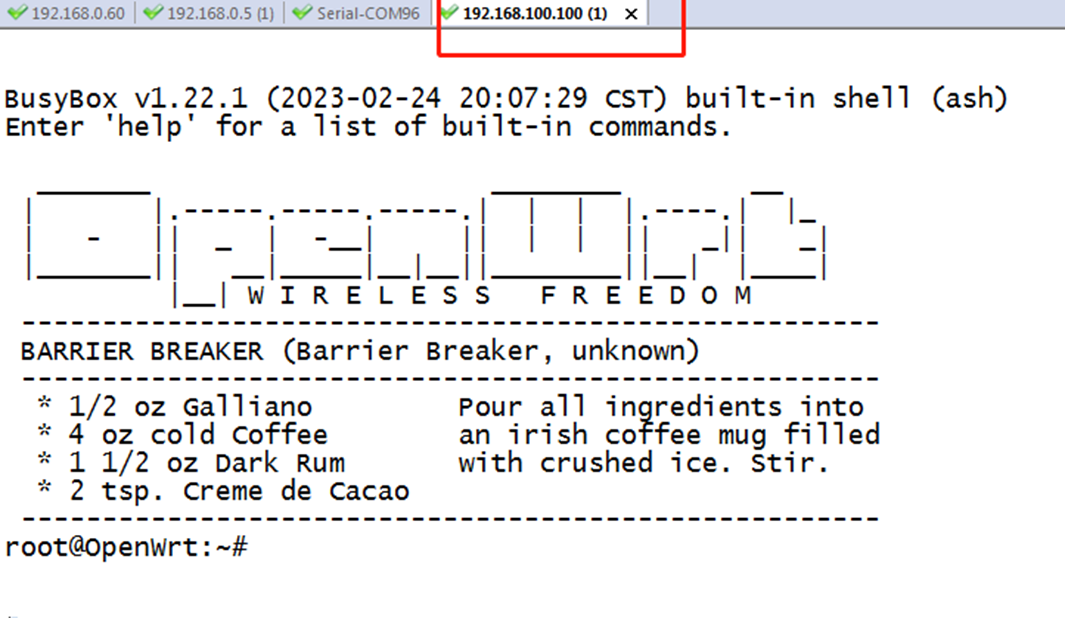
serial :

root@OpenWrt:/# passwd root
Changing password for root
New password:
Bad password: too short
Retype password:
Password for root changed by root
web page
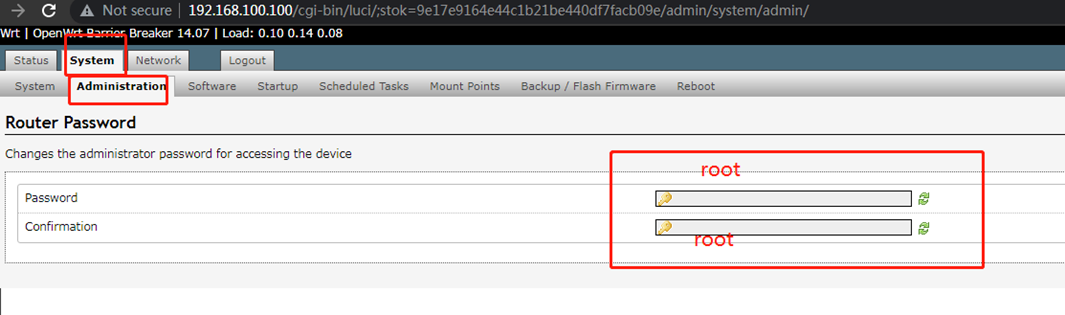
connect success
7. Application Layer Development
7.1 Led
This board has one leds can be controlled by software, it connect to the WIFI_LED(GPIO#44)
- switch pin to gpio mode
reg w 64 1
- on led
gpio l 44 4000 0 1 0 4000
- off led
gpio l 44 0 4000 0 1 4000
- blink led
gpio l 44 1 1 4000 0 4000
7.2 Button
This board has three buttons can used by software, we can use gpio command to read it
- switch to gpio mode
reg w 60 0x55144051
- read wdt rst value before pressed
root@OpenWrt:/# gpio r
gpio 95~64 = 0x0
gpio 63~32 = 0x77cd
gpio 31~00 = 0x80002400
- read wdt rst value when pressed
root@OpenWrt:/# gpio r
gpio 95~64 = 0x0
gpio 63~32 = 0x778d
gpio 31~00 = 0x80002400
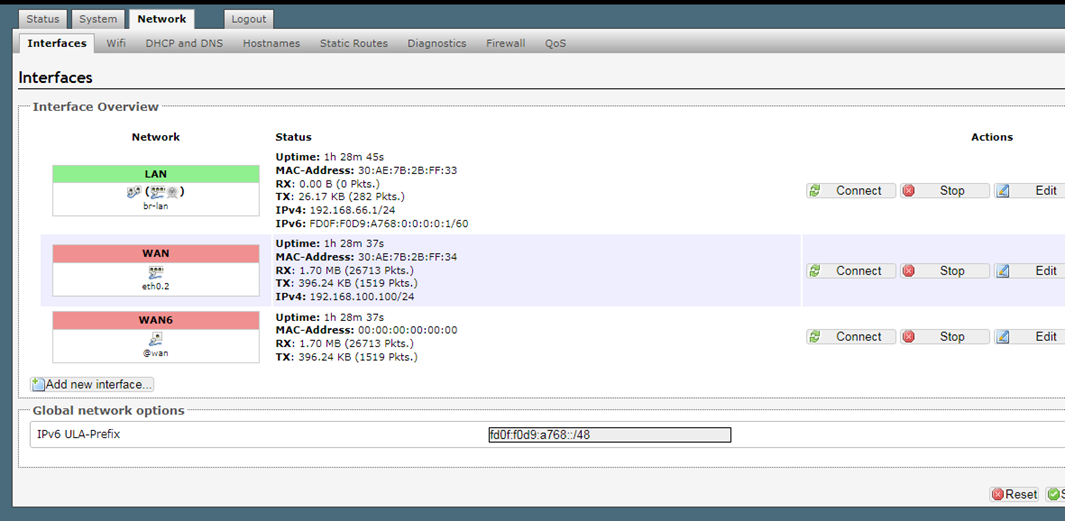
7.3 Ethernet
this board one wan port and four lan port bridged at lan - wan port eth0.2 - lan port br-lan
- see the config
root@OpenWrt:/# cat /etc/config/network

 config interface 'loopback'
     option ifname 'lo'
     option proto 'static'
     option ipaddr '127.0.0.1'
     option netmask '255.0.0.0'

 config globals 'globals'
     option ula_prefix 'fd0f:f0d9:a768::/48'

 config interface 'lan'
     option ifname 'eth0.1'
     option force_link '1'
     option type 'bridge'
     option proto 'static'
     option ipaddr '192.168.66.1'
     option netmask '255.255.255.0'
     option ip6assign '60'
     option macaddr '30:AE:7B:2B:FF:33'

 config interface 'wan'
     option ifname 'eth0.2'
     option proto 'dhcp'
     option macaddr '30:AE:7B:2B:FF:34'

 config interface 'wan6'
     option ifname '@wan'
     option proto 'dhcpv6'
7.4 wifi
This board has a internal wifi mt7603
- see the config
root@OpenWrt:/# cat /etc/config/wireless
 config wifi-device   mt7628
     option type   mt7628
     option vendor  ralink
     option band   2.4G
     option channel 0
     option auotch  2

 config wifi-iface
     option device  mt7628
     option ifname  ra0
     option network lan
     option mode   ap
     option ssid   mt7628-FF33
     option encryption psk2
     option key   12345678
- scan ssid
root@OpenWrt:/# iwpriv ra0 set SiteSurvey=1;sleep 3;iwpriv ra0 get_site_survey
 ra0    get_site_survey:
 Ch SSID               BSSID        Security        Siganl(%)W-Mode ExtCH NT WPS DPID
 1                  90:5d:7c:97:ba:04  NONE          7    11b/g/n NONE  In NO
- config sta
/etc/config/wireless:
 config wifi-iface
     option device  mt7628
     option ifname  ra0
     option network lan
     option mode   ap
     option ssid   mt7628-FF33
     option encryption psk2
     option key   12345678

     option ApCliEnable '1'
     option ApCliSsid 'WIFI-mark'
     option ApCliAuthMode 'WPA2PSK'
     option ApCliEncrypType 'AES'
     option ApCliWPAPSK '13590297795'

 /etc/config/network:
 config interface 'wan'
     option proto 'dhcp'
     option ifname 'apcli0'
7.5 uart
this board has there uart ttyS0, ttyS1
ttyS0 not be used
ttyS1 has been used as debug uart
8. web description
8.1 login web
8.2 Status

8.3 System
8.4 network
8.5 login out

9. Support
Please contact our sell to get more support.