Quick Start Guide
1. Introduction
This Quick Start Guide explains the basics:
- how to connect and set up your target on the network
- how to install the SDK
- how to modify and build the firmware images
The Linux Software Developer’s Kit (SDK) is an embedded hardware and software suite that enables Linux developers to create applications on Dusun’s DSOM-020R gateway.
2 Basic Information
- Processor: PX30
- Core:ARM Cortex-A35 quad-core
- Main frequency: 1.3GHz*4.
- Memory: 1GB/2GB DDR3/DDR4, with 1GB DDR3 as standard.
- Flash: support 4GB/8GB/16GB/32GB/64GB emmc optional, 8GB emmc standard.
- Three-way USB HOST2.0 interface.
- One-way OTG interface.
- 3-way TTL serial port (with UART2 for debugging).
- 1 TF card interface (TF card data bits D0 and D1 are multiplexed with UART0)
- Reset button.
- 4 independent buttons.
- Software on/off button.
- External speaker interface.
- MIC input.
- Headphone output interface.
- Support for stepless backlight adjustment;
- Multi-point capacitive touch support.
- On-board AP6212 WIFI/BT.
- G-sensor support.
- Supports MPEG-4, , H.264, H.265/HEVC, VC-1,VP8 video decoding.
- Supports H.264 video encoding.
- Supports 2D, 3D high performance graphics acceleration.
- Supports real-time RTC clock saving.
- Supports 100 Gigabit wired Ethernet.
- Supports CSI camera head interface.
- Supports external USB 3G module and PCIE interface module.
- Supports USB mouse and keyboard.
- Supports infrared integrated receiver head.
3 target Setup
This section describes how to connect the gateway into your host computer and network.
3.1 Connecting a gateway - Power
- Make sure that the power adapter is 12V/3A.
- Select the appropriate power plug adaptor for your geographical location. Insert it into the slot on the Universal Power Supply; then plug the power supply into an outlet.
3.2 Connecting a gateway – Network interface
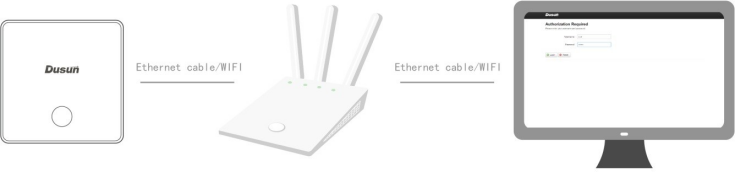
- Connect one end of the network cable to the network port on the laptop or desktop
- Connect the other end of network cable to the network port on the gateway.
- SSH login gateway ip address,username is root passwd is root.
4. Compile the Environment to Build
4.1 Yocto Compile the Environment to Build
Build a local environment for RK LINUX development, either on Linux or Mac OS, we recommend using It is recommended to use ubuntu16.04 64bit, etc. to avoid environmental problems; if your computer is a Windows environment, you can install the virtual machine software VMware and install ubuntu16.04 64bit in the virtual machine.
If your computer is a Windows environment, you can install the virtual machine software VMware, and install ubuntu16.04 64bit in the virtual machine. The Linux SDK is not as large as Android, and the compilation environment is not as demanding as Android, so you can install a virtual machine to compile it to meet your needs.
Note: Running Linux in a virtual machine requires at least 2GB of RAM/swap or 30GB of disk space to create the compilation environment. Install the required packages with the following command:
sudo apt-get update
sudo apt-get install git gnupg flex bison gperf libsdl1.2-dev libwxgtk3.0-dev buildessential zip
curl zlib1g-dev gcc-multilib g++-multilib genromfs libc6-dev-i386 libncurses5-dev x11proto-core-dev libx11-dev ccache libgl1-mesa-dev libxml2-utils xsltproc unzip gperf lsb-core lib32z1-dev lib32ncurses5-dev lzop liblz4-tool proot libssl1.0.0 libssl-dev genext2fs
$ sudo apt-get install git gnupg flex bison gperf build-essential \
zip tar curl libc6-dev libncurses5-dev:i386 x11proto-core-dev \
libx11-dev:i386 libreadline6-dev:i386 libgl1-mesa-glx:i386 \
libgl1-mesa-dev g++-multilib mingw32 cmake tofrodos \
python-markdown libxml2-utils xsltproc zlib1g-dev:i386 lzop libssl1.0.0 libssl-dev
$ sudo ln -s /usr/lib/i386-linux-gnu/mesa/libGL.so.1 /usr/lib/i386-linux-gnu/libGL.so
sudo apt-get install git-core gnupg flex bison gperf build-essential zip curl zlib1g-dev gcc-multilib g++-multilib libc6-dev-i386 lib32ncurses5-dev x11proto-core-dev libx11-dev lib32z1-dev ccache libgl1-mesa-dev libxml2-utils xsltproc unzip device-tree-compiler
If the compiler encounters an error, you can install the corresponding package depending on the error message.
4.1.1 SDK Download
Get the source code from Dusun and extract it to your working directory. For example
mkdir -p ~/workdir/yocto020
tar -zxvf DSOM-020R-Yocto.tar.gz -C /workdir/yocto020
cd ~/workdir/yocto020
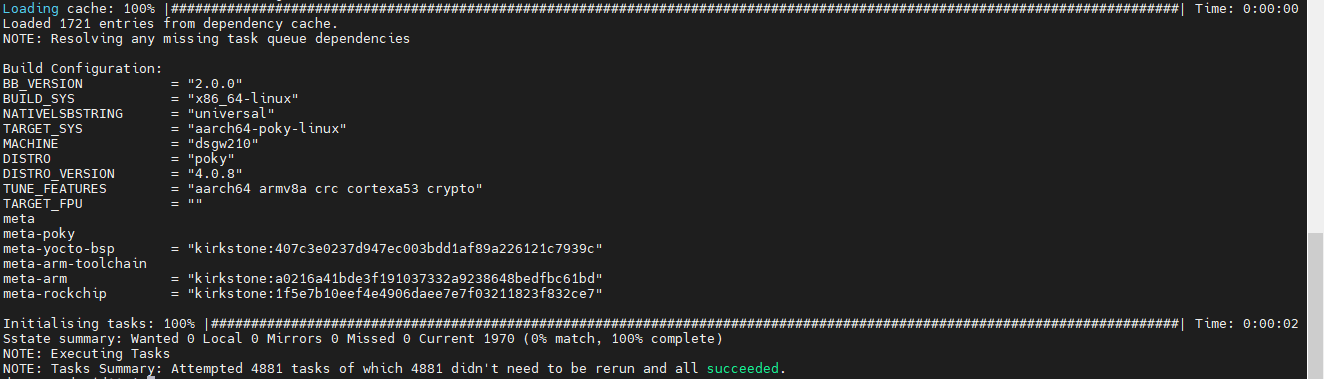
4.1.2 Compile the whole SDK
cd ~/workdir/yocto020
source ./oe-init-build-env
bitbake core-image-full-cmdline
4.2 Ubuntu Compile the Environment to Build
Build a local environment for RK LINUX development, either on Linux or Mac OS, we recommend using It is recommended to use ubuntu16.04 64bit, etc. to avoid environmental problems; if your computer is a Windows environment, you can install the virtual machine software VMware and install ubuntu16.04 64bit in the virtual machine.
If your computer is a Windows environment, you can install the virtual machine software VMware, and install ubuntu16.04 64bit in the virtual machine. The Linux SDK is not as large as Android, and the compilation environment is not as demanding as Android, so you can install a virtual machine to compile it to meet your needs.
Note: Running Linux in a virtual machine requires at least 2GB of RAM/swap or 30GB of disk space to create the compilation environment.
Install the required packages with the following command:
sudo apt-get update
sudo apt-get install git gnupg flex bison gperf libsdl1.2-dev libwxgtk3.0-dev build-essential zip
curl zlib1g-dev gcc-multilib g++-multilib genromfs libc6-dev-i386 libncurses5-dev
x11proto-core-dev libx11-dev ccache libgl1-mesa-dev libxml2-utils xsltproc unzip gperf lsb-core
lib32z1-dev lib32ncurses5-dev lzop liblz4-tool proot libssl1.0.0 libssl-dev genext2fs
For ubuntu 14.04, which may have compatibility issues with older versions, install the package with the following command:
$ sudo apt-get install git gnupg flex bison gperf build-essential \
zip tar curl libc6-dev libncurses5-dev:i386 x11proto-core-dev \
libx11-dev:i386 libreadline6-dev:i386 libgl1-mesa-glx:i386 \
libgl1-mesa-dev g++-multilib mingw32 cmake tofrodos \
python-markdown libxml2-utils xsltproc zlib1g-dev:i386 lzop libssl1.0.0 libssl-dev
$ sudo ln -s /usr/lib/i386-linux-gnu/mesa/libGL.so.1 /usr/lib/i386-linux-gn
u/libGL.so
sudo apt-get install git-core gnupg flex bison gperf build-essential zip curl
zlib1g-dev gcc-multilib g++-multilib libc6-dev-i386 lib32ncurses5-dev
x11proto-core-dev libx11-dev lib32z1-dev ccache libgl1-mesa-dev libxml2-utils
xsltproc unzip device-tree-compiler
If the compiler encounters an error, you can install the corresponding package depending on the error message.
4.2.1 Compilation Help Instructions
For mk.sh, the following command can be executed to view the compilation help options
./make.sh -h
For build.sh, execute the following command to see the compile help options:
./build.sh -h
4.2.2 Compile the whole SDK
After obtaining the source code, if you do not know how to compile it, you can check the help options and if you need to compile it as a whole, perform the following:
./build.sh -h or
./make.sh
If you just use build.sh to compile, you will get the directory rockdev, which contains files such as boot.img misc.img parameter.txt rootfs.img uboot.img userdata.img MiniLoaderAll.bin oem.img recovery.img trust.img update.img
If you use mk.sh to compile, it will output all images to the output directory, roughly the same as above.
4.2.3 Compiling u-boot
The compilation method for px30/x3288/x3399 and other platforms is similar, but in general it is based on the prompt information obtained from -h above to operate:
./mk.sh -u
./build.sh uboot
4.2.4 Compiling the kernel
./mk.sh -k
./build.sh kernel
4.2.5 Compiling recovery
The Linux recovery is built on buildroot and is compiled by executing the following command:
./mk.sh -r
./build.sh recovery
4.2.6 Compiling rootfs
The Linux file system is built on buildroot and is compiled by executing the following command:
./mk.sh -b
./build.sh buildroot
4.2.7 Package the firmware
./mk.sh -U
./build.sh updateimg
4.2.8 Image file description
The images obtained after compilation script compilation include: MiniLoaderAll.bin, parameter.txt, uboot.img,
trust.img, misc.img, recovery.img, boot.img, rootfs.img, oem.img, userdata.img, these images
These image files correspond to the corresponding partitions, and their specific locations in the solid storage can be found in the parameter.txt file, such as the following Contents:
FIRMWARE_VER: 8.1
MACHINE_MODEL:rk3288
MACHINE_ID:007
MANUFACTURER:RK3288
MAGIC: 0x5041524B
ATAG: 0x00200800
MACHINE: 3288
CHECK_MASK: 0x80
PWR_HLD: 0,0,A,0,1
TYPE: GPT
CMDLINE:
mtdparts=rk29xxnand:0x00002000@0x00004000(uboot),0x00002000@0x00006000(trust),0x000
02000@0x00008000(misc),0x00010000@0x0000a000(boot),0x00010000@0x0001a000(recovery
),0x00010000@0x0002a000(backup),0x00020000@0x0003a000(oem),0x00800000@0x0005a00
0(rootfs),-@0x0085a000(userdata:grow)
uuid:rootfs=614e0000-0000-4b53-8000-1d28000054a9
MiniLoaderAll.bin: uboot image file, copied from the "loader.bin" file generated by uboot.
parameter.txt: partition file
uboot.img: uboot image file, obtained by packaging the bin file compiled by uboot.
trust.img: uboot image file, also packaged by the bin file provided by rk to get uboot.img and MiniLoaderAll.bin and trust.img generation and packaging process, interested in understanding its principle by studying the compilation script.
The process of generating uboot.img and MiniLoaderAll.bin and trust.img can be understood by studying the compilation script.
misc.img: partition image, responsible for boot mode switching and first aid mode parameter passing.
recovery.img: the first aid mode image.
boot.img: kernel image file, which is obtained by wrapping the kernel image file with resource.img, unlike Android's boot.img.
rootfs.img: file system partition image, corresponding to the rootfs partition, here you can burn the Linux system compiled by the SDK, or you can burn the Ubuntu or debian file system, etc.
oem.img: Used by manufacturers to store their APPs or data. Read-only. oem is generated by the compilation script, and the source directory is device/rockchip/oem/ in the SDK source code.
userdata.img: stores user data, user can place the required files in device/rockchip/userdata/ directory and then package it for burning. This partition takes up the remaining space in the system where the board is booted
5.SDK image burning
5.1 Overview
This chapter introduces the commonly used burning tools, as well as the introduction of each image of the Linux system and the packaging process and other processes. It is a platform AndroidTool tool under Windows.
5.2 rockchip USB driver installation for Windows
You need to install the latest USB driver before using the burn-in tool under Windows platform. During the development andThe Rockchip platform hardware operates in several modes, and the firmware can only be burned or updated on the board when the device is in Maskrom, and Loader modes.
5.3 Introduction to burn-in mode
The Rockchip platform hardware operates in several modes, and the firmware can only be burned or updated on the board when the device is in Maskrom, and Loader modes Enter the burn-in mode in the following ways
- If the firmware has not been burned, power on and enter Maskrom mode.
- Burned firmware, press and hold the recovery button to power on or reset, the system will enter the Loader firmware burn mode.
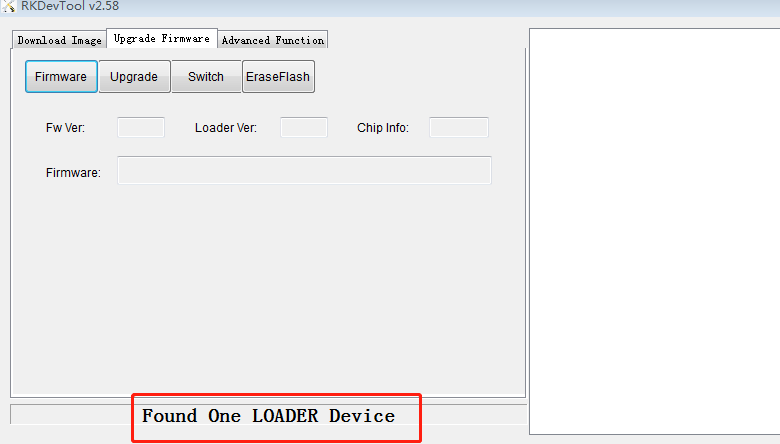
- After burning the firmware, power on or reset the development board to enter the system normally, the Rexchip development tool will show "Found an ADB device" or "MSC device found", then click the button "Switch" on the tool to enter Loader mode.
- After burning the firmware, you can enter the Loader mode by entering the reboot loader command in the serial port or adb command line mode.
5.4 RK development tool burn-in (AndroidTool)
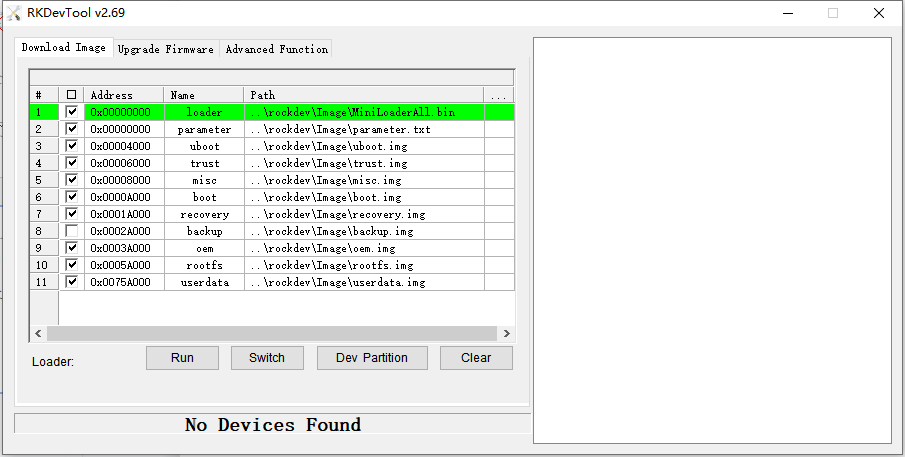
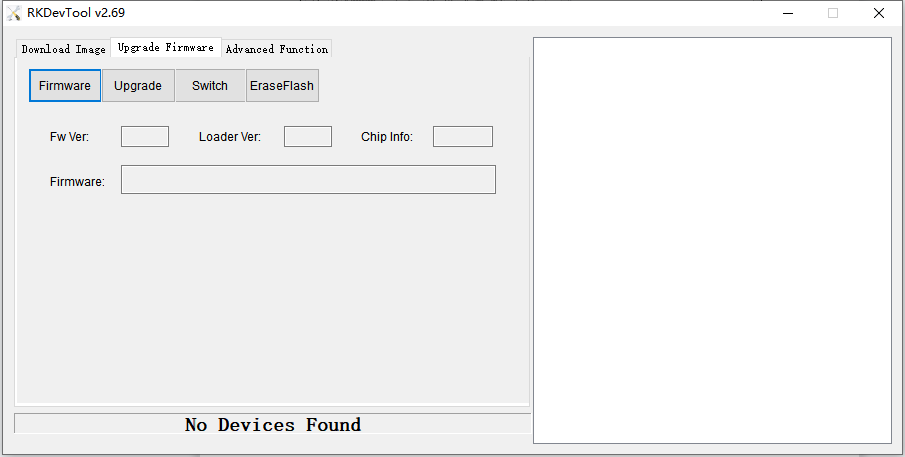
AndroidTool tool "Download Image" selection box is applicable to single image file download, enter loader mode and tap Click the select button behind the path to choose the specific image file, pay attention to the checkbox on the left side, click execute to update after you have chosen it.
The second tab "upgrade firmware" is used to burn the packaged update image, click on the firmware to select the update image.
For example, update_px30.img, then click Execute.
6.Sample Configuration
6.1 Get Tools
Download AndroidTool
Download AndroidTool Driver install package
6.2 Get SDK
Download SDK DSOM-020R-XXX.tar.gz First download the image that we provide.
7.Development Examples
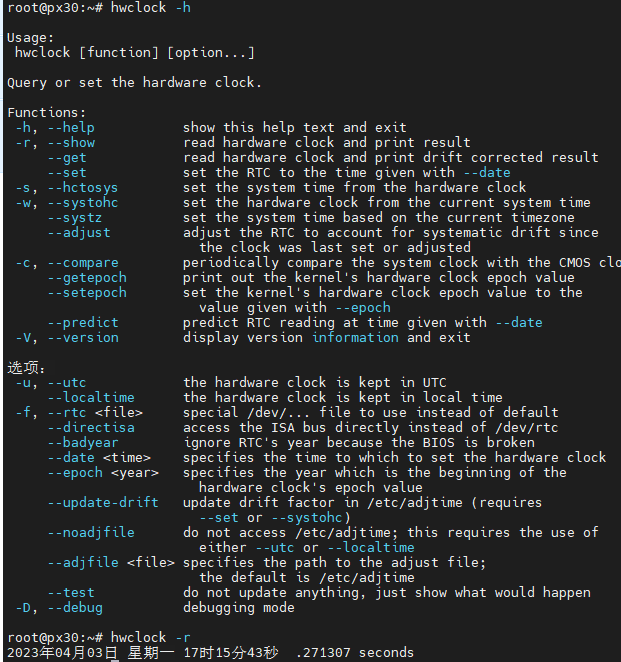
7.1 RTC TEST

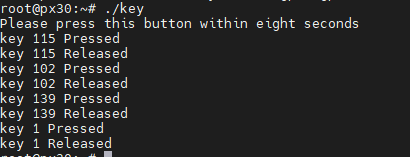
7.2 Key TEST
#include <unistd.h>
#include <stdio.h>
#include <linux/input.h>
#include <stdlib.h>
#include <sys/types.h>
#include <sys/stat.h>
#include <fcntl.h>
#include <pthread.h>

#define DEV_PATH "/dev/input/by-path/platform-adc-keys-event" }

void * thread_func(void *arg) {
    long now = time(NULL);
    while (1) {
        if (time(NULL) - now > 8) {
            exit(-2);
        }
    }
}

int main() {
        int keys_fd;
        char ret[2];
        struct input_event t;
        keys_fd=open(DEV_PATH, O_RDONLY);
        if(keys_fd <= 0) {
                printf("open /dev/input/event2 device error!\n");
                return -1;
        }
        printf("Please press this button within eight seconds\n");
        pthread_t pid;
        pthread_create(&pid, NULL, thread_func, NULL);
        while(1) {
                if(read(keys_fd, &t, sizeof(t)) == sizeof(t)) {
                        if(t.type==EV_KEY)
                                if(t.value==0 || t.value==1) {
                                        printf("key %d %s\n", t.code, (t.value)? "Pressed" : "Released");
                                        if(t.code == KEY_ESC) {
                                       }
                                }
                }
        }
        close(keys_fd);
        return 0;
}
Compile key test command: gcc key.c -o key -lpthread
7.3 UART
UART0 This serial port is used as a debug serial port
UART1 is used as the program burner interface to download programs through this port UART2 is used as a debug serial port, we can debug through this serial port
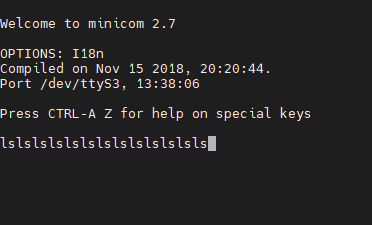
Enter the command minicom-s to enter the serial debug UART3
minicom-s
7.4 Mounted TF card
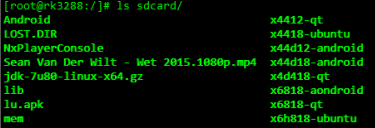
Insert the TF card into any card slot on the development board and a block device file named mmcblk1p1 will be automatically generated in the /dev directory of the file system. It is the
Use the following command to mount the TF card to the /sdcard directory:
cd /
mkdir sdcard
mount /dev/mmcblk1p1 /sdcard
Check the contents of the /scard directory, which is the contents of our TF card, as shown in the following image
7.5 Mounting a USB drive
The contents of the file system can be viewed through the console. After inserting the
USB drive: A block device file named sda4 will be automatically created in the /dev
directory of the file system. It is the corresponding Use the following command to mount the USB flash drive to the /udisk directory:
root@px30:~# lsusb
Bus 003 Device 001: ID 1d6b:0001 Linux Foundation 1.1 root hub Bus 002 Device 002: ID 05e3:0608 Genesys Logic, Inc. Hub Bus 002 Device 001: ID 1d6b:0002 Linux Foundation 2.0 root hub Bus 001 Device 001: ID 1d6b:0002 Linux Foundation 2.0 root hub

mkdir /udisk
mount /dev/sda4 /udisk
View the contents of the /udisk directory, which is the contents of our USB drive
7.6 Aborting the program
There are many ways to stop a program, the most direct way is to just press ctrl+c. For
example, if we are playing an audio file earlier, we can press ctrl+c to exit the program. If we are playing an audio file, we can press ctrl+c to exit the program. But if the program is running in the background, then we can press ctrl+c and it won't work. will not work. In
this case we can use the kill command.
ps
kill+PID
kill+filename
7.7 Save system clock
Linux can change the time and date using the date command. For example:
date -s 202307211433 #set to July 21, 2016 14:33 minutes
hwclock -w #Save the time just set to the RTC register
hwclock -s #Restore the linux system clock to the RTC register value, usually this command is placed in rcS and executed automatically at boot.
hwclock -s
7.8 Power down to save data to flash
Since the system uses ext4 file system, it is easy to save data and ensure no data loss after power failure. The If we copy a song from a USB stick to the /root directory
cp /udisk/muyangqu.mp3 /
Rebooting the board, we find that the song we just copied still exists in the root directory, which means that the data was not lost after the power failure. data was not lost after power down.
7.9 View development board memory information
After entering the file system, you can query the size of SDRAM allocated to the Linux system with the cat command. Execute the The following command:
cat /proc/meminfo
7.10 BEEP TEST
According to the schematic of the board, we can see that the port of the buzzer is IO13, and the buzzer can be operated by operating the IO port.
echo 13 > /sys/class/gpio/export
echo out > /sys/class/gpio/gpio13/direction
echo 1 > /sys/class/gpio/gpio13/value
echo 0 > /sys/class/gpio/gpio13/value
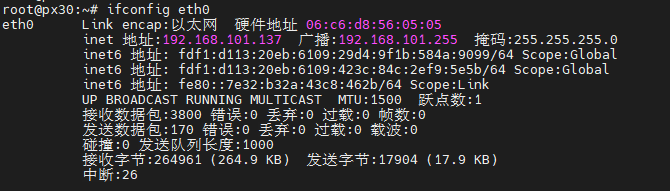
7.11 ETH TEST
ifconfig eth0
7.12 LED TEST
Presence of three programmable LEDs that can be operated according to IO ports

8.Others
For more information, please visit official website.