Quick Start Guide
1. Introduction
Generally, unless the hardware is damaged, the development board will not change bricks. If there is an accident during the upgrade process ,bootloader breakdownCause that it cannot be upgraded again, you can still enter MaskRom mode to repair.
1.1 Downloads Image
Goto https://support.dusuniot.com/hc/en-us Select Core Board Get image DSOM-050R-RK3308_img_debian-AV*.img https://drive.google.com/drive/folders/1CmImTjEPf_q_tWD4o19JDUXYZEZqqAhN?usp=drive_link
1.2 Upgrade method
Firmware upgrade is supported in the following ways, Upgrade firmware using USB cable Use USB cable to connect the motherboard to the computer, and use the upgrade tool to burn the firmware onto the motherboard.
1.3 Startup Mode
There are three startup modes
- Normal Mode
- Loader Mode
- MaskRom Mode
1.3.1 Normal Mode
Normal Mode is the normal startup process. Each component is loaded in turn and enters the system normally
1.3.2 Loader Mode
In the Loader mode, the bootloader will enter the upgrade status and wait for the host command for firmware upgrade. To enter the Loader mode, you must make the bootloader detect that the RECOVERY key is pressed and the USB is connected when starting. The method to put the device into upgrade mode is as follows: One way is to disconnect the power adapter
- Type-C data cable connects the device and host
- Press and hold the RECOVERY key on the device and hold
- Plug in the power supply
- After about two seconds, release the RECOVERY key
Another way is to connect the power adapter
- Type-C data cable connects the device and host
- Press and hold the RECOVERY key on the device and hold
- Briefly press the RESET key
- After about two seconds, release the RECOVERY key
1.3.3 MaskRom Mode
MaskRom mode is used for system repair when bootloader is damaged. Generally, you do not need to enter the MaskRom mode. Only if the bootloader verification fails (the IDB block cannot be read, or the bootloader is damaged), the BootRom code will enter the MaskRom mode. At this time, the BootRom code waits for the host to transfer the bootloader code through the USB interface, load and run it.
2. Upgrade firmware using USB cable
2.1 Prepare firmware
The firmware can be obtained by compiling the SDK, or by downloading the public firmware (unified firmware) from the resource download site. There are generally two types of firmware files:
- Single unified firmware
Unified firmware is a single file packaged and consolidated by all files such as partition table, bootloader, uboot, kernel, system, etc. The firmware officially released by dusun adopts the unified firmware format. Upgrading the unified firmware will update the data and partition table of all partitions on the motherboard, and erase all data on the motherboard.
- Multiple partition mirrors
That is, files with independent functions, such as partition table, bootloader, kernel, are generated at the development stage. The independent partition image can only update the specified partition while keeping the data of other partitions intact. It will be very convenient for debugging during the development process.
Though the unified firmware unpacking/packaging tool, you can unpack the unified firmware into multiple partition images, or merge multiple partition images into one unified firmware.
2.2 Install the burning tool
2.2.1 Windows operating system
- Installing the RK USB drive
Download Release_ DriverAssistant.zip, extract it, and then run DriverInstall.exe. In order to use the updated driver for all devices, please select Driver Uninstall before selecting Driver Installation
- Run AndroidTool RKDevTool.exe
Download AndroidTool, decompress and run RKDevTool Release RKDevTool.exe in the v2.xx directory (note that if it is Windows 7/8, you need to press the right mouse button and select Run as administrator), as shown below:
2.2.2 Linux operating system
No need to install device driver under Linux
- Linux Upgrade Tool
Download Linux Upgrade Tool, and install it into the system in the following way for easy calling:
unzip Linux_Upgrade_Tool_xxxx.zip
cd Linux_UpgradeTool_xxxx
sudo mv upgrade_tool /usr/local/bin
sudo chown root:root /usr/local/bin/upgrade_tool
sudo chmod a+x /usr/local/bin/upgrade_tool
2.3 Enter upgrade mode
2.3.1 Loader Mode
- Enter Loader mode in hardware mode
Connect the device and press the RECOVERY key to enter the Loader upgrade mode. The steps are as follows:
- Disconnect the power adapter first
- USB Type-A to Type-C data cable connects the host at one end and the development board at the other end
- Press and hold the RECOVERY key on the device and hold
- Connect the power supply
- After about two seconds, release the RECOVERY key
- Enter Loader mode in software mode
After the Type-C data cable is connected, run the following command to the board at the serial port debugging terminal or adb shell
reboot loader
- View Loader Mode
How to determine whether the board is in Loader mode? We can use tools to view
1、Windows operating system
The following prompt can be seen through the Android Tool tool
If the operation of "Enter Loader Mode" is carried out, and you still do not see the
burning tool prompt LOADER, you can check whether the Windows host prompts you to discover new hardware and configure drivers. Open the device manager and see the new device Rockusb Device, as shown in the following figure. If not, you can return to the previous step to reinstall the driver.
Computer Manager ->System Tools->Device Manager

2、Linux operating system
After Run upgrade_tool, you can see the prompt of a Loader in the connected device
root@T-chip:~/severdir/down_firmware$ sudo upgrade_tool List of rockusb connected
DevNo=1 Vid=0x2207,Pid=0x330c,LocationID=106    Loader
Found 1 rockusb,Select input DevNo,Rescan press <R>,Quit press <Q>:q
2.3.2 MaskRom mode
For the method of entering MaskRom mode, please refer to 《MaskRom Mode》
2.4 Burn firmware
2.4.1 Windows operating system
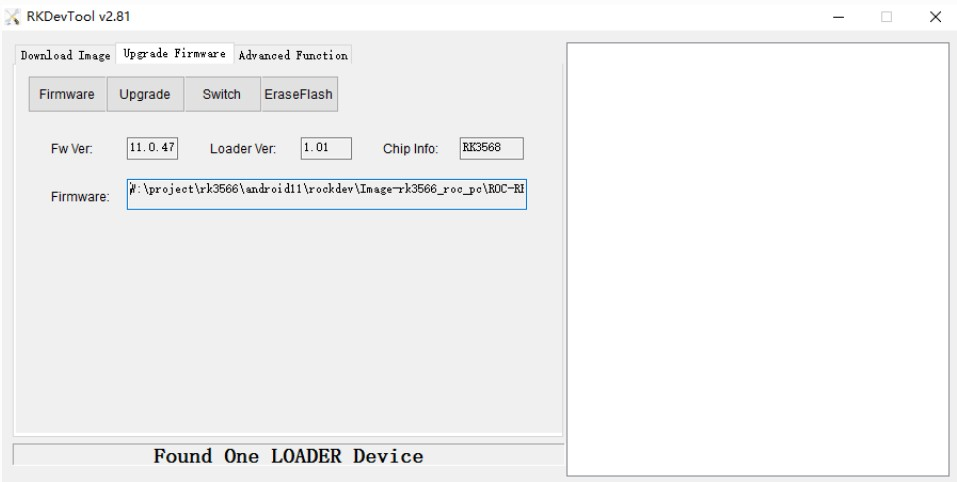
- Burn and write unified firmware update.img
The steps for burning the unified firmware update.img are as follows:
- Switch to the Upgrade Firmware page.
- Press the Firmware button to open the firmware file to be upgraded. The upgrade tool displays detailed firmware information.
- Press the Upgrade button to start the upgrade.
- If the upgrade fails, you can try to erase the Flash by pressing the EraseFlash button first, and then upgrade.
Note: If the version of the firmware loader you burned is inconsistent with that of the original machine, please execute EraseFlash before upgrading the firmware.
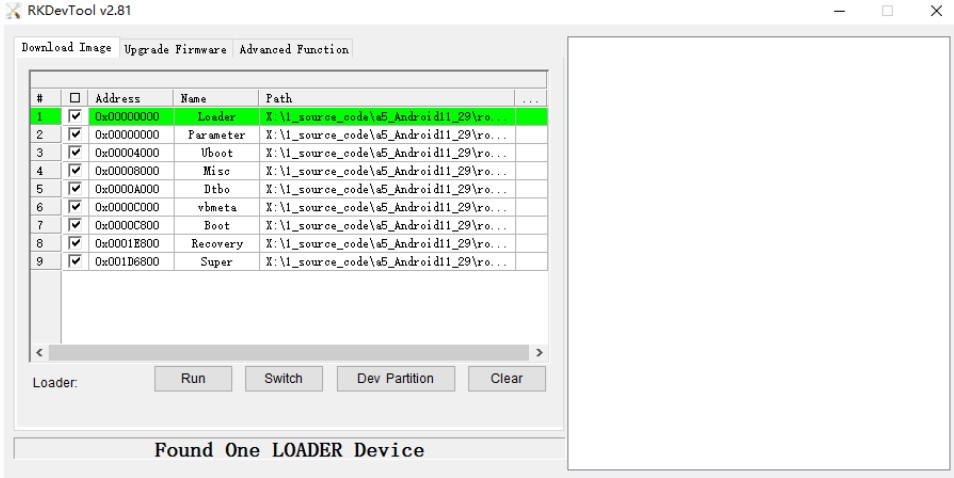
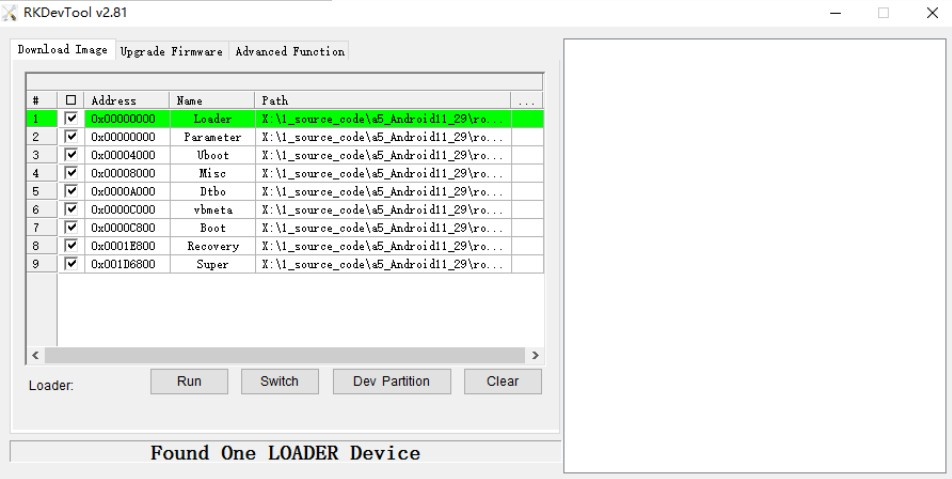
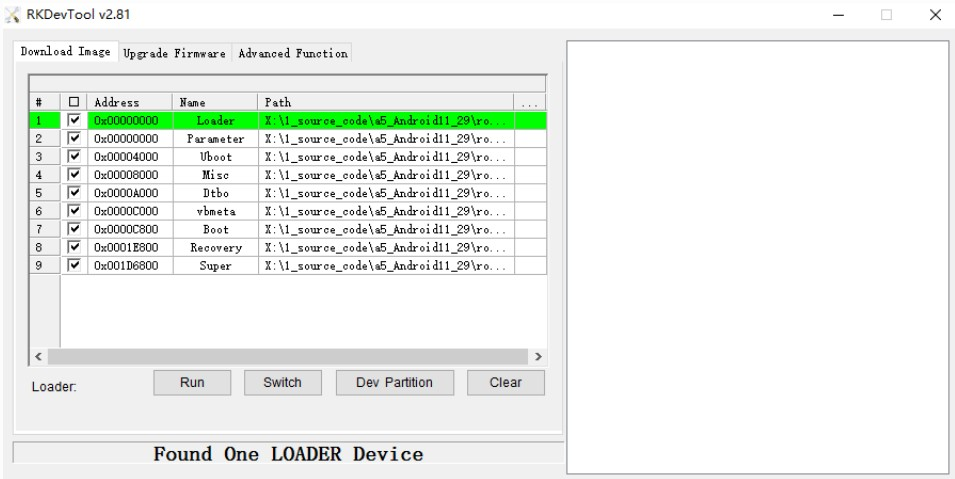
- Burn and write partition image
The steps to burn the partition image are as follows:
- Switch to the Upgrade Firmware page.
- Check the partition to be burned. You can select multiple partitions.
- Make sure the path of the image file is correct. If necessary, click the blank table cell on the right of the path to reselect it.
- Click the Run button to start the upgrade. After the upgrade, the device will restart automatically.
2.4.2 Linux operating system
- Burn and write unified firmware update.img
sudo upgrade_tool uf update.img
If the upgrade fails, you can try to erase it before upgrading.
# To erase flash and use the ef parameter, you need to specify the loader file or the corresponding update.img
sudo upgrade_tool ef update.img #update.img : You need to burn Ubuntu firmware
# Re-burning
sudo upgrade_tool uf update.img
- Burn and write partition image
sudo upgrade_tool di -b /path/to/boot.img
sudo upgrade_tool di -r /path/to/recovery.img sudo upgrade_tool di -m /path/to/misc.img
sudo upgrade_tool di -u /path/to/uboot.img
sudo upgrade_tool di -dtbo /path/to/dtbo.img
sudo upgrade_tool di -p paramater   #烧写 parameter
sudo upgrade_tool ul bootloader.bin # 烧写 bootloader
- How to forcibly enter the MaskRom mode
If the board cannot enter Loader mode, you can try to enter MaskROM mode by force. See MaskRom Mode for operation method
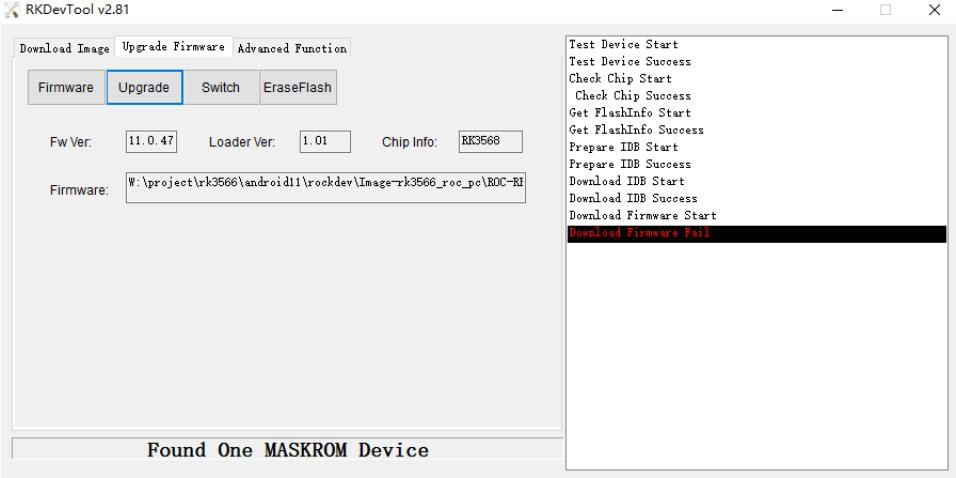
- Burn failure analysis
If a Download Boot Failure occurs during the burning process, or an error occurs during the burning process, as shown in the figure below, it is usually caused by poor connection of the USB cable used, poor quality wire, or insufficient drive capacity of the USB port of the computer, please replace the USB cable or the USB port of the computer for troubleshooting.
3. Compile Environment Construction
This chapter describes the compilation process of the Linux SDK
Note:
(1) It is recommended to develop under the Ubuntu 18.04 system environment. If other system versions are used, the compilation environment may need to be adjusted accordingly. (2) Compile with normal users, not with root privileges.
3.1 Install dependent packages
sudo apt-get install repo git ssh make gcc libssl-dev liblz4-tool \
expect g++ patchelf chrpath gawk texinfo chrpath diffstat binfmt-support \ qemu-user-static live-build bison flex fakeroot cmake gcc-multilib g++-multilib \ unzip device-tree-compiler python-pip ncurses-dev python-pyelftools
SDK required software package, how to compile the process and there is an error, need to install the software package according to the actual situation
3.2 Downloads SDK
Goto https://support.dusuniot.com/hc/en-us
Select Core Board
get SDK DSOM-050R-RK3308_sdk_debian_AV*.tar.gz https://drive.google.com/drive/folders/1pRhdL-2cj-9g_vcpqOaUS2ym1Er6Seo2?usp=drive_link
4. Compiling Debian Firmware
There are two ways to setup a build environment
4.1 Compile SDK
The configuration files of different boards are stored in the directory : device/rockchip/rk3308/
Go back to the SDK root directory execute build.sh to select the configuration file.
 Use dusun SDK to select 1 by default, press Enter.
The configuration file will be linked to device/rockchip/. BoardConfig.mk. Check the file to verify whether the configuration is successful.
Use dusun SDK to select 1 by default, press Enter.
The configuration file will be linked to device/rockchip/. BoardConfig.mk. Check the file to verify whether the configuration is successful.
Related configurations:
# Target arch
export RK_ARCH=arm64
# Uboot defconfig
export RK_UBOOT_DEFCONFIG=dusun-rk3308-debug-uart4
# Kernel defconfig
export RK_KERNEL_DEFCONFIG=dusun-rk3308b_linux_defconfig
# Kernel dts
export RK_KERNEL_DTS=rk3308b-roc-cc-plus-amic_emmc
# parameter for GPT table
export RK_PARAMETER=parameter-64bit-emmc.txt
# packagefile for make update image
export RK_PACKAGE_FILE=rk3308-package-file
# Buildroot config
export RK_CFG_BUILDROOT=rockchip_rk3308
# Recovery config
export RK_CFG_RECOVERY=rockchip_rk3308_recovery
export RK_TARGET_PRODUCT=rk3308
export RK_ROOTFS_IMG=rockdev/rootfs.${RK_ROOTFS_TYPE}
4.2 Download Debian Root File System
Download the root file system: Debian root file system (64 bit), and put it under the SDK path Place the root file system in Debian of the SDK_ Under the debian/directory
mkdir debian
cd debian
cp rootfs.img debian/debian11.img
rootfs.img can use dusun's default debian.img, or replace it with your own file system.
4.3 Fully automatic compilation
Full-automatic compilation will perform all compilation and packaging operations and directly generate RK firmware.
./build.sh
4.4 Partial compilation
Compile u-boot
./build.sh ubootCompile kernel
./build.sh kernelCompile recovery
./build.sh recovery
4.5 update link
Update the image link of each part to the rockdev/directory
./ build.sh firmware
4.6 Packaging firmware
Package the firmware, and the generated complete firmware will be saved to the rockdev/pack/directory.
./build.sh updateing
4.7 Partition description
4.7.1 Partition table
The parameter.txt file contains the partition information of the firmware. Take parameter- ubuntu-fit.txt as an example: Path
device/rockchip/rk3308/parameter-64bit-ubuntu.txt
FIRMWARE_VER:8.1
MACHINE_MODEL:RK3308
MACHINE_ID:007
MANUFACTURER: RK3308
MAGIC: 0x5041524B
ATAG: 0x00200800
MACHINE: 3308
CHECK_MASK: 0x80
PWR_HLD: 0,0,A,0,1
TYPE: GPT
CMDLINE:
mtdparts=rk29xxnand:0x00001000@0x00002000(uboot),0x00001000@0x00003000(trust),0x00000800@0x 00004000(misc),0x0000A000@0x00004800(recovery),0x0000A000@0x0000E800(boot),0x00100000@0x000
18800(rootfs),-@0x118800(userdata:grow)
uuid:rootfs=614e0000-0000-4b53-8000-1d28000054a9
CMDLINE attribute is our focus. Take uboot as an example, 0x00001000@0x00002000 (uboot) 0x00001000 is the starting position of the uboot partition, 0x00002000 is the size of the partition, and so on
4.7.2 package-file
The package-file file is used to determine the required partition image and image path when packaging firmware, and it needs to be consistent with the parameter.txt file. Path:
tools/linux/Linux_Pack_Firmware/rockdev/rk3308-package-file
#NAME   Relative path
#
#HWDEF  HWDEF
package-file    package-file
bootloader  Image/MiniLoaderAll.bin parameter   Image/parameter.txt trust   Image/trust.img
uboot   Image/uboot.img boot    Image/boot.img rootfs   Image/rootfs.img
recovery    Image/recovery.img
#oem        Image/oem.img userdata:grow RESERVED
misc    Image/misc.img
backup  RESERVED
#update-script update-script
#recover-script recover-scrip
5. Firmware Program And Program
5.1 Firmware Program
5.1.1 USB OTG
- Driver installation (burn mirror/ADB debugging)
1.Unzip driverAsSatant_v4.5 2.Open driverinstall.exe 3.Click Drive Installation, and it will show that the installation driver is successful
- Mirror Upgrade Tool
1.Unzip AndroidTool_Release_V2.69
- Enter the upgrade mode
1.Connect the 12V power supply and connect the OTG port to the burning computer
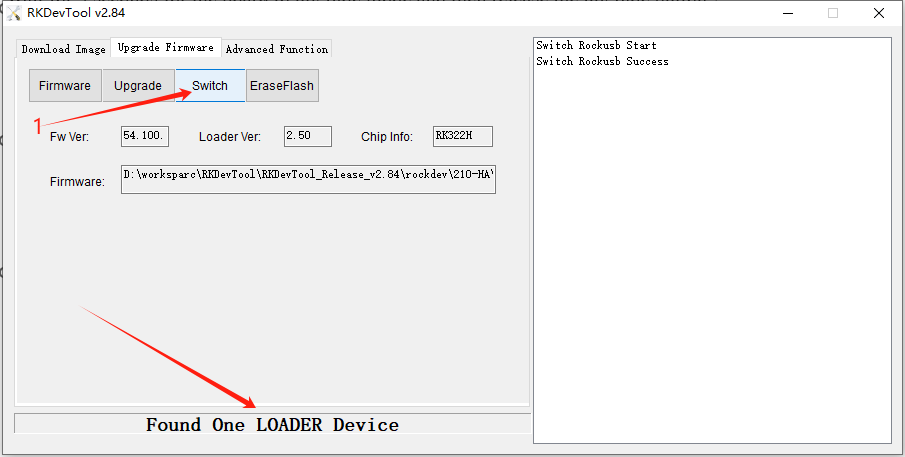
2.Plug in the voltage and wait for the display of “Found One ADB Device”
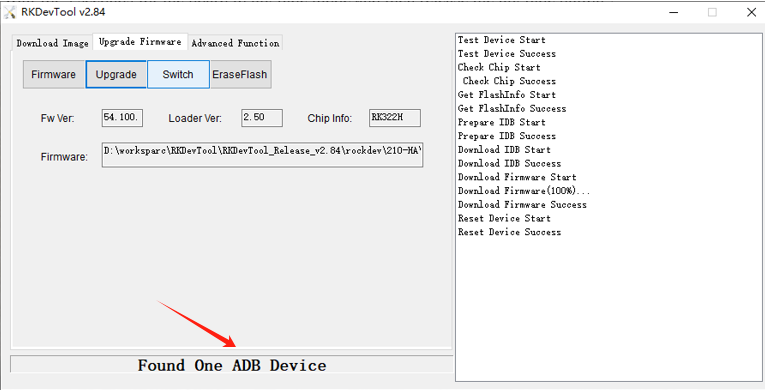
3.Click on the Switch , display “Found One LOADER Device”
Update. img access: network disk link download or download source code compilation

6. Gateway Login
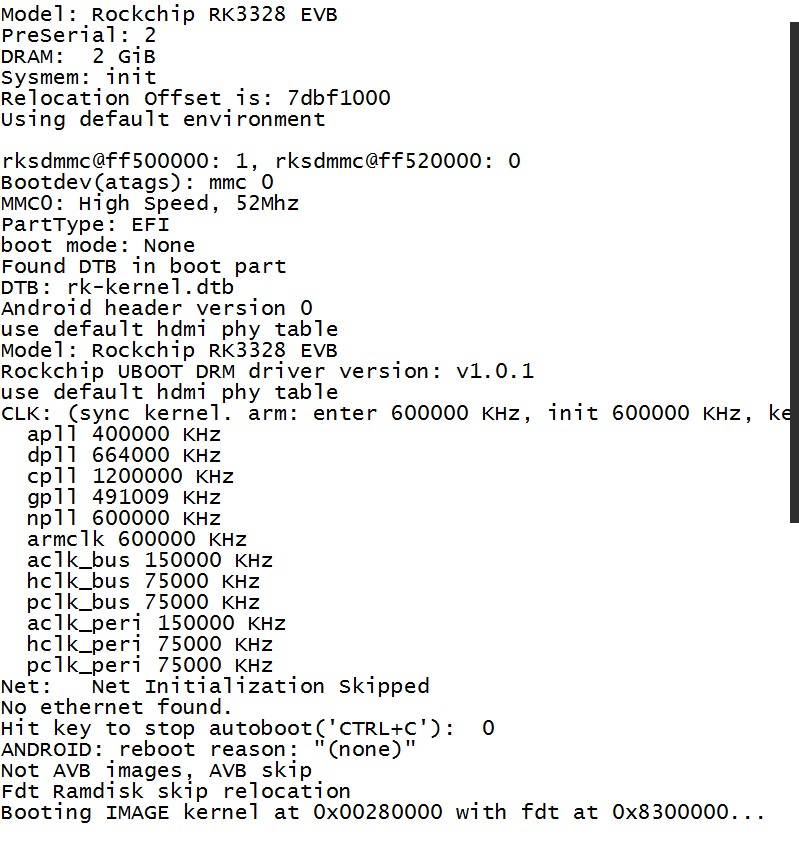
6.1 Login Through Debug Uart
connect uart serial tool to the board’s debug uart port
config the serial tools’s uart config
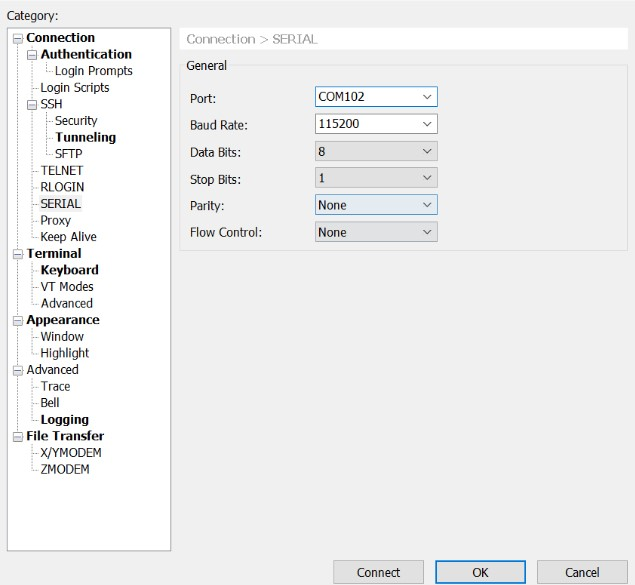
power on the gateway
6.2 Login Through Network(SSH)
config the ssh connection parameters
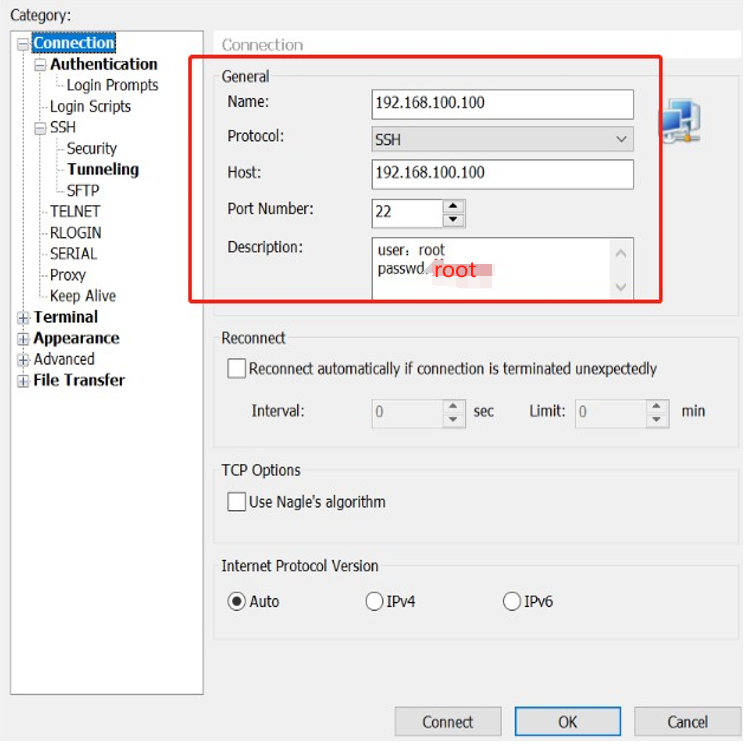
connect success
root@debian:~#
7.Application Layer Development
7.1 Ethernet
This board has one wan port eth0 work as dhcp
root@debian:~# ifconfig
eth0: flags=4163<UP,BROADCAST,RUNNING,MULTICAST>  mtu 1500
inet 192.168.100.105  netmask 255.255.255.0  broadcast 192.168.100.255         inet6 fe80::4c18:17fa:c0ce:368e  prefixlen 64  scopeid 0x20<link>
ether aa:c8:1b:79:bb:bb  txqueuelen 1000  (Ethernet)
        RX packets 3124  bytes 219970 (214.8 KiB)
        RX errors 0  dropped 0  overruns 0  frame 0
        TX packets 717  bytes 153287 (149.6 KiB)
        TX errors 0  dropped 0 overruns 0  carrier 0  collisions 0         device interrupt 44
7.2 OTG
The OTG used to program the board. See Section 5.1.1
7.3 I2C
the board has two i2c bus
- i2cdetect
root@linaro-alip:~# i2cdetect -y 1
     0  1  2  3  4  5  6  7  8  9  a  b  c  d  e  f
00:          -- -- -- -- -- -- -- -- -- -- -- -- --  10: -- -- -- -- -- -- -- -- UU -- -- -- -- -- -- --
20: -- -- -- -- -- -- -- -- -- -- -- -- -- -- -- --
30: -- -- -- -- -- -- -- -- -- -- -- -- -- -- -- --
40: -- -- -- -- -- -- -- -- -- -- -- -- -- -- -- --  50: -- UU -- -- -- -- -- -- -- -- -- -- -- -- -- --
60: -- -- -- -- -- -- -- -- -- -- -- -- -- -- -- --  70: -- -- -- -- -- -- -- --
- i2cdump
root@linaro-alip:~# i2cdump  -f -y 1 0x51
No size specified (using byte-data access)
     0  1  2  3  4  5  6  7  8  9  a  b  c  d  e  f    0123456789abcdef
00: 00 00 43 19 06 21 05 04 23 80 80 80 80 00 03 00    ..C??!??#????.?.
10: 00 00 43 19 06 21 05 04 23 80 80 80 80 00 03 00    ..C??!??#????.?.
20: 00 00 43 19 06 21 05 04 23 80 80 80 80 00 03 00    ..C??!??#????.?.
30: 00 00 43 19 06 21 05 04 23 80 80 80 80 00 03 00    ..C??!??#????.?.
40: 00 00 43 19 06 21 05 04 23 80 80 80 80 00 03 00    ..C??!??#????.?.
50: 00 00 43 19 06 21 05 04 23 80 80 80 80 00 03 00    ..C??!??#????.?.
60: 00 00 43 19 06 21 05 04 23 80 80 80 80 00 03 00    ..C??!??#????.?.
70: 00 00 43 19 06 21 05 04 23 80 80 80 80 00 03 00    ..C??!??#????.?.
80: 00 00 43 19 06 21 05 04 23 80 80 80 80 00 03 00    ..C??!??#????.?.
90: 00 00 43 19 06 21 05 04 23 80 80 80 80 00 03 00    ..C??!??#????.?.
a0: 00 00 43 19 06 21 05 04 23 80 80 80 80 00 03 00    ..C??!??#????.?.
b0: 00 00 43 19 06 21 05 04 23 80 80 80 80 00 03 00    ..C??!??#????.?.
c0: 00 00 43 19 06 21 05 04 23 80 80 80 80 00 03 00    ..C??!??#????.?.
d0: 00 00 43 19 06 21 05 04 23 80 80 80 80 00 03 00    ..C??!??#????.?.
e0: 00 00 43 19 06 21 05 04 23 80 80 80 80 00 03 00    ..C??!??#????.?.
f0: 00 00 43 19 06 21 05 04 23 80 80 80 80 00 03 00    ..C??!??#????.?.
- i2cget
i2cget -f -y 1 0x51 0x00
7.4 GPIO
- see the gpios used by kernel
root@linaro-alip:~# cat /sys/kernel/debug/gpio
gpiochip0: GPIOs 0-31, parent: platform/fd8a0000.gpio, gpio0:
gpio-15  (                    |vcc-3v3-sd-s0-regula) out lo
gpiochip1: GPIOs 32-63, parent: platform/fec20000.gpio, gpio1:
gpiochip2: GPIOs 64-95, parent: platform/fec30000.gpio, gpio2:
gpio-85  (                    |vcc3v3-pcie30       ) out lo
gpiochip3: GPIOs 96-127, parent: platform/fec40000.gpio, gpio3:
gpio-111 (                    |work                ) out lo
gpiochip4: GPIOs 128-159, parent: platform/fec50000.gpio, gpio4:
gpio-132 (                    |miso                ) in  hi
gpio-133 (                    |mosi                ) out lo
gpio-134 (                    |sck                 ) out lo
gpio-135 (                    |spi6 CS0            ) out hi ACTIVE LOW
gpio-136 (                    |spi6 CS1            ) out hi ACTIVE LOW
gpio-139 (                    |sysfs               ) out hi
gpio-142 (                    |sysfs               ) out hi
gpio-150 (                    |sysfs               ) in  hi IRQ
gpio-158 (                    |sysfs               ) in  lo IRQ
gpio export N is the gpio number.

$ echo N > /sys/class/gpio/export
- gpio out on/off
$ echo out > /sys/class/gpio/gpioN/direction
$ echo 1 > /sys/class/gpio/gpioN/value
$ cho 0 > /sys/class/gpio/gpioN/value gpio in
$ cho in > /sys/class/gpio/gpioN/direction
7.5 UART
The board has one uart used by user ttyS
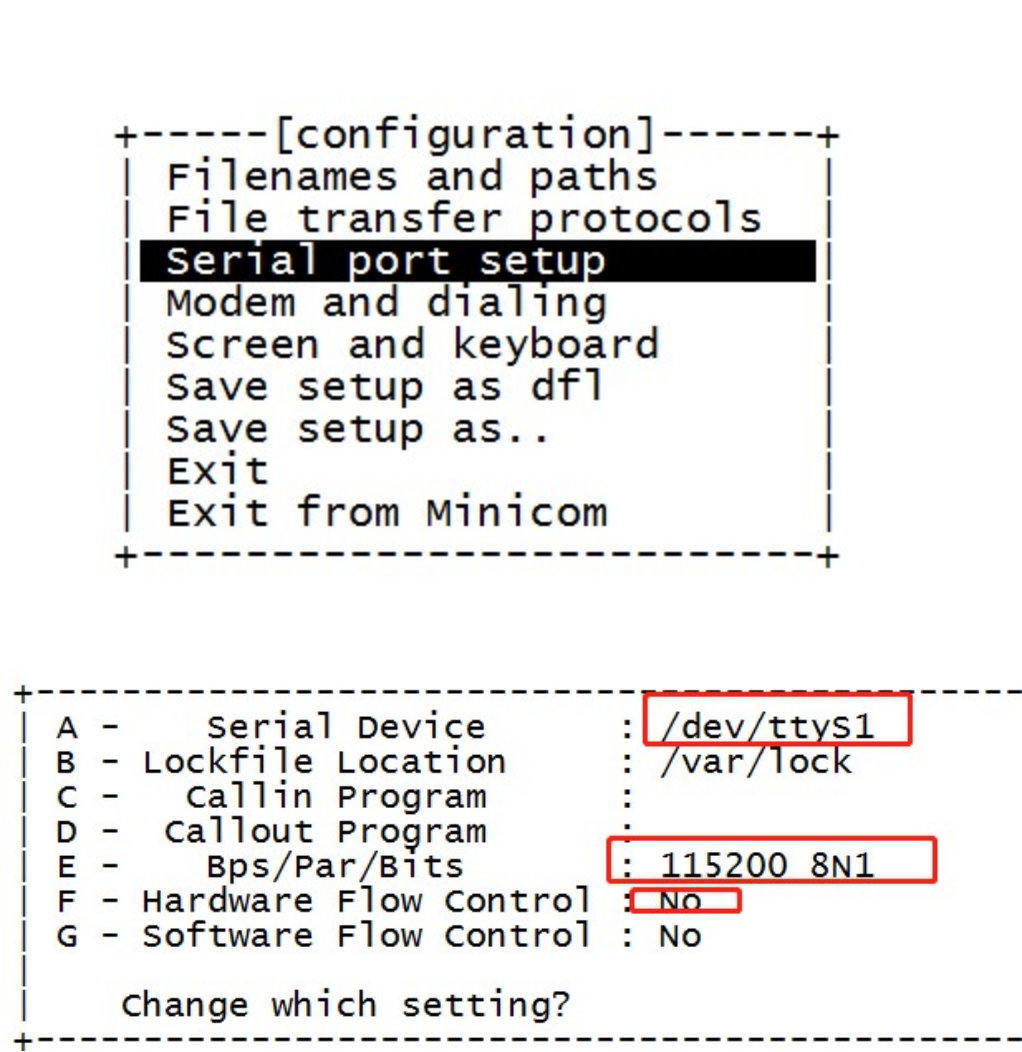
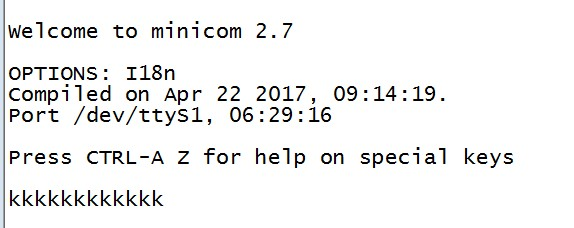
- install minicom
$ apt-get update; apt-get install minicom
- config uart`
$ minicom -s
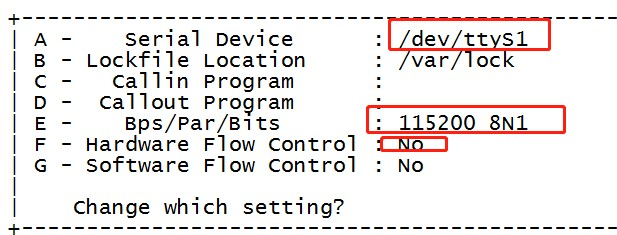

- short the uart1 rx and tx

- Prees any key, it will receive any key in loopback mode
7.6 RECOVERY
This Key Used to switch the board to MaskRom Mode.
7.7 Key RST
This Key used to reset the board.
7.8 wifi
the board has one wifi mode ap6212
- ifconfig wlan0
- root@linaro-alip:~# ifconfig wlan0
wlan0: flags=4099<UP,BROADCAST,MULTICAST>  mtu 1500
ether d4:9c:dd:48:35:dc  txqueuelen 1000  (Ethernet)
        RX packets 0  bytes 0 (0.0 B)
        RX errors 0  dropped 0  overruns 0  frame 0
        TX packets 0  bytes 0 (0.0 B)
        TX errors 0  dropped 0 overruns 0  carrier 0  collisions 0
- add supplicant config file
root@linaro-alip:~#cat /etc/wpa_supplicant.conf  ctrl_interface=/var/run/wpa_supplicant ctrl_interface_group=0
update_config=1

network={
ssid=" shu fang @```  "
psk="dl123456"
        disabled=1
}

network={
ssid="AAAAAA"
scan_ssid=1
psk="dl123456"
priority=2
}
- add network interface
root@linaro-alip:~# cat /etc/network/interfaces
# interfaces(5) file used by ifup(8) and ifdown(8)
# Include files from /etc/network/interfaces.d: source-directory
/etc/network/interfaces.d

auto wlan0 iface wlan0 inet dhcp
wpa-conf /etc/wpa_supplicant.conf   metric 1
- up wlan0 ifup wlan0;
- scan
root@linaro-alip:~# wpa_cli -i wlan0 scan
OK
-scan results
root@linaro-alip:~# wpa_cli -i wlan0 scan_result;
 bssid / frequency / signal level / flags / ssid
1e:60:de:6e:85:c4       2437    -20     [WPA-PSK-CCMP][WPA2-PSK-CCMP][ESS]      ROUTER_SSID
1c:60:de:4e:85:c4       2437    -21     [WPA-PSK-CCMP][WPA2-PSK-CCMP][ESS]      AAAAAA
32:ae:7b:e2:2e:93       2462    -19     [WPA2-PSK-CCMP][ESS]    Dusun-E22E94-2.4G
58:d9:d5:36:7a:71       2437    -30     [WPA-PSK-CCMP+TKIP][WPA2-PSK-CCMP+TKIP][WPS][ESS]       Tenda_dzx123
32:ae:7b:e2:2e:27       2462    -41     [WPA2-PSK-CCMP][ESS]    Dusun-E22E27 f4:84:8d:37:db:48       2462    -43     [WPA-PSK-CCMP][WPA2-PSK-CCMP][ESS]      zzs f6:84:8d:35:db:48       2462    -44     [WPA-PSK-CCMP][WPA2-PSK-CCMP][ESS]
10:5d:dc:b5:26:74       2412    -45     [WPA-PSK-CCMP+TKIP][WPA2-PSK-CCMP+TKIP][WPS][ESS]       huawei-\xe4\xb d\xa0\xe5\xa4\xa7\xe7\x88\xb7
5c:de:34:6e:82:67       2462    -47     [WPA-PSK-CCMP][WPA2-PSK-CCMP][WPS][ESS] MERCURY_2G_DJLtest
b0:39:56:d3:67:af       2412    -34     [WPA2-PSK-CCMP][WPS][ESS]       NETGEAR87
00:4b:f3:99:ac:19       2412    -50     [WPA-PSK-CCMP][WPA2-PSK-CCMP][WPS][ESS] MERCURY_AC19
32:ae:7b:e2:48:98       2437    -57     [WPA2-PSK-CCMP][ESS]
be:5a:b6:dd:5c:fd       2462    -60     [WPA-PSK-TKIP][WPA2-PSK-CCMP][ESS]      luckincoffee_debian
20:01:02:33:44:98       2472    -57     [WPA2-PSK-CCMP+TKIP][ESS]       Apmode_lw_2.4g
f0:10:90:57:2b:30       2437    -60     [WPA-PSK-CCMP+TKIP][WPA2-PSK+FT/PSK-CCMP+TKIP][ESS]     hzDusun
32:ae:7b:26:2d:23       2462    -63     [WPA2-PSK-CCMP][ESS]    Dusun-262D22
30:ae:7b:e2:05:31       2437    -58     [WPA2-PSK-CCMP+TKIP][ESS]       Hazhantai
90:5d:7c:97:ba:02       2412    -58     [WPA-PSK-CCMP][WPA2-PSK-CCMP][ESS]      jinhai2.4
10:5d:dc:b5:26:79       2412    -44     [WPA2-PSK-CCMP][WPS][ESS]
32:ae:7b:e2:2d:52       2437    -61     [WPA2-PSK-CCMP][ESS]    Dusun-E22D53
5e:de:34:5e:82:67       2462    -47     [ESS]   12345678901234567890123456789012 90:5d:7c:97:ba:04       2412    -59     [ESS]
32:ae:7b:e5:fe:dc       2412    -58     [WPA2-PSK-CCMP][ESS]    Dusun-E5FEDD-2.4G
7c:b5:9b:0e:d1:b1       2437    -69     [WPA-PSK-CCMP][WPA2-PSK-CCMP][ESS]      TP-LINK_cw
90:5d:7c:97:bc:d2       2412    -64     [WPA-PSK-CCMP][WPA2-PSK-CCMP][ESS]      jinhai2.4 90:5d:7c:97:bc:d4       2412    -74     [ESS]
9c:fe:a1:a8:bd:cd       2447    -66     [WPA-PSK-CCMP][ESS]     ChinaNet-Af4K 32:ae:7b:e3:ad:46       2462    -71     [WPA2-PSK-CCMP][ESS]    Dusun-E3AD45 ce:69:90:19:52:ec       2462    -72     [WPA2-PSK-CCMP][ESS]    dusunha-zigbee 52:b0:9b:67:6b:9b       2462    -72     [WPA2-PSK-CCMP][ESS]    Dusun_123B4C17FE05
2a:6d:cd:4f:41:bf       2437    -70     [ESS]   HC-25-286dcd4f41bf
f0:10:90:57:37:d0       2462    -88     [WPA-PSK-CCMP+TKIP][WPA2-PSK+FT/PSK-CCMP+TKIP][ESS]     hzDusun
34:e0:cf:00:e1:58       2452    -76     [WPA-PSK-CCMP][WPS][ESS]        ChinaNet-UQvQ
76:54:27:57:60:be       2462    -85     [ESS]   FAGuest_60BE
f4:83:cd:26:d9:5b       2437    -81     [WPA-PSK-CCMP+TKIP][WPA2-PSK-CCMP+TKIP][ESS]   TP-LINK_dusun
- list netowrk
root@linaro-alip:~# wpa_cli -i wlan0
list_network network id / ssid / bssid / flags
- connect ap
wpa_cli -i wlan0 add_network
wpa_cli -i wlan0 list_network
wpa_cli -i wlan0 set_network 1 ssid '"AAAAAA"'
wpa_cli -i wlan0 set_network 1 psk '"dl123456"'
wpa_cli -i wlan0 set_network 1 key_mgmt WPA2-PSK-CCMP
wpa_cli -i wlan0 set_network 1 priority 2 wpa_cli -i wlan0 set_network 1 scan_ssid 1 wpa_cli -i wlan0 enable_network 1
wpa_cli -i wlan0 select_network 1
wpa_cli -i wlan0 save_config
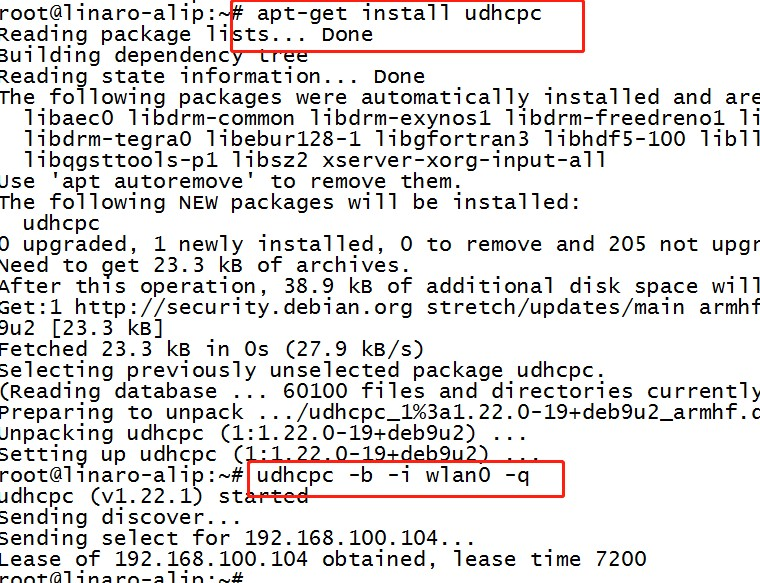
apt-get update; apt-get install udhcpc; udhcpc -b -i wlan0 -q
8.Kernel Development DTS Description
This Gateway’s dts file is the rp-rk3308.dts
8.1 Ethernet
&gmac2io {
  phy-supply = <&vcc_phy>;
phy-mode = "rgmii";
clock_in_out = "input";
snps,reset-gpio = <&gpio1 RK_PC2 GPIO_ACTIVE_LOW>;
snps,reset-active-low;
snps,reset-delays-us = <0 10000 50000>;
assigned-clocks = <&cru SCLK_MAC2IO>, <&cru SCLK_MAC2IO_EXT>;
assigned-clock-parents = <&gmac_clkin>, <&gmac_clkin>;
pinctrl-names = "default";
pinctrl-0 = <&rgmiim1_pins>;
tx_delay = <0x26>;
rx_delay = <0x11>;
status = "disabled";
};

&gmac2phy {
phy-supply = <&vcc_phy>;
clock_in_out = "output";
assigned-clocks = <&cru SCLK_MAC2PHY_SRC>;
assigned-clock-rate = <50000000>;
assigned-clocks = <&cru SCLK_MAC2PHY>;
assigned-clock-parents = <&cru SCLK_MAC2PHY_SRC>;
status = "okay";
};
8.2 I2C
&i2c1 {
status = "okay";
rtc@51 {
status = "okay";
 compatible = "rtc,hym8563";
                    reg = <0x51>;
        };
};
8.3 UART
&uart0 {
status = "okay";
};

&uart1 {
 status = "okay";
};
8.4 wifi
&sdio {
bus-width = <4>;
cap-sd-highspeed;
cap-sdio-irq;
disable-wp;
keep-power-in-suspend;
max-frequency = <150000000>;
mmc-pwrseq = <&sdio_pwrseq>;
non-removable;
num-slots = <1>;
  pinctrl-names = "default";
  pinctrl-0 = <&sdmmc1_bus4 &sdmmc1_cmd &sdmmc1_clk>;
supports-sdio;
  status = "okay";
};
8.5 sdcard
&sdmmc {
bus-width = <4>;
cap-mmc-highspeed;
cap-sd-highspeed;
disable-wp;
         max-frequency = <150000000>;
num-slots = <1>;
pinctrl-names = "default";
pinctrl-0 = <&sdmmc0_clk &sdmmc0_cmd &sdmmc0_dectn &sdmmc0_bus4>;
supports-sd;
    status = "okay";
    vmmc-supply = <&vcc_sd>;
};
9.Others
For more information, please visit official website.